8. Facilities and Units
In clearPath, a facility is a physical site (a hospital, clinic, long-term care home, or any other building where auditing happens). A unit is a subdivision of a facility, such as a patient care area, department, or ward. You set facilities and units up once, and the rest of clearPath — dashboards, reports, distribution lists, challenges, and auditing — uses them to scope data and colour-code results.
To open the list, go to Account | Facilities / Floors / Units.
8.1. The Facilities Page

Every facility on the account is listed one row per line. You can expand a row to see the units inside it, and everything on the page can be searched, filtered, or exported.
8.1.1. At-a-Glance Cards
Six summary cards across the top of the page show:
Facilities — how many facilities exist on the account.
Active Facilities — how many are currently enabled.
Inactive Facilities — how many are disabled.
Total Units — the combined number of units across every facility.
Active Units — how many of those units are currently enabled.
Inactive Units — the remaining count.
8.1.3. Searching and Filtering
The toolbar above the table holds the search box and several filters:
Search box — matches on the facility name.
All Facilities — narrows the table to a single facility.
All Status — show only
Activeor onlyInactivefacilities.All Lock States — show only
Lockedor onlyUnlockedunits.Last Audited — show facilities whose most recent audit is older than 7, 14, 30, 60, 90, 180, or 365 days, or
Neveraudited.Time period — the span used to calculate each facility’s compliance percentage (defaults to
This Month).
A refresh button on the right reloads the page from the server.
8.1.4. Table Columns
Every row in the table is a facility. Click the row to expand it and reveal the units inside.
Status— anActiveorInactivebadge.Lock icon — shows whether the facility is locked.
Facility— the facility name and icon. Click the heading to sort.Abbrev— the four-character abbreviation.Floors— the number of floors defined for the facility.Units— how many units the facility contains.Include— whether the facility is included in the dashboard and in corporate reports.Color— the colour swatch used to tag the facility in charts.Compliance— a percentage bar showing the facility’s performance for the selected time period.Last Audited— how long ago the most recent audit took place.
Tick the checkbox at the left of a row to select it, or tick the
header checkbox to select every row on the page. Selecting rows
reveals the bulk action bar with a Delete Selected button and a
clear-selection button.
8.1.5. Row Actions
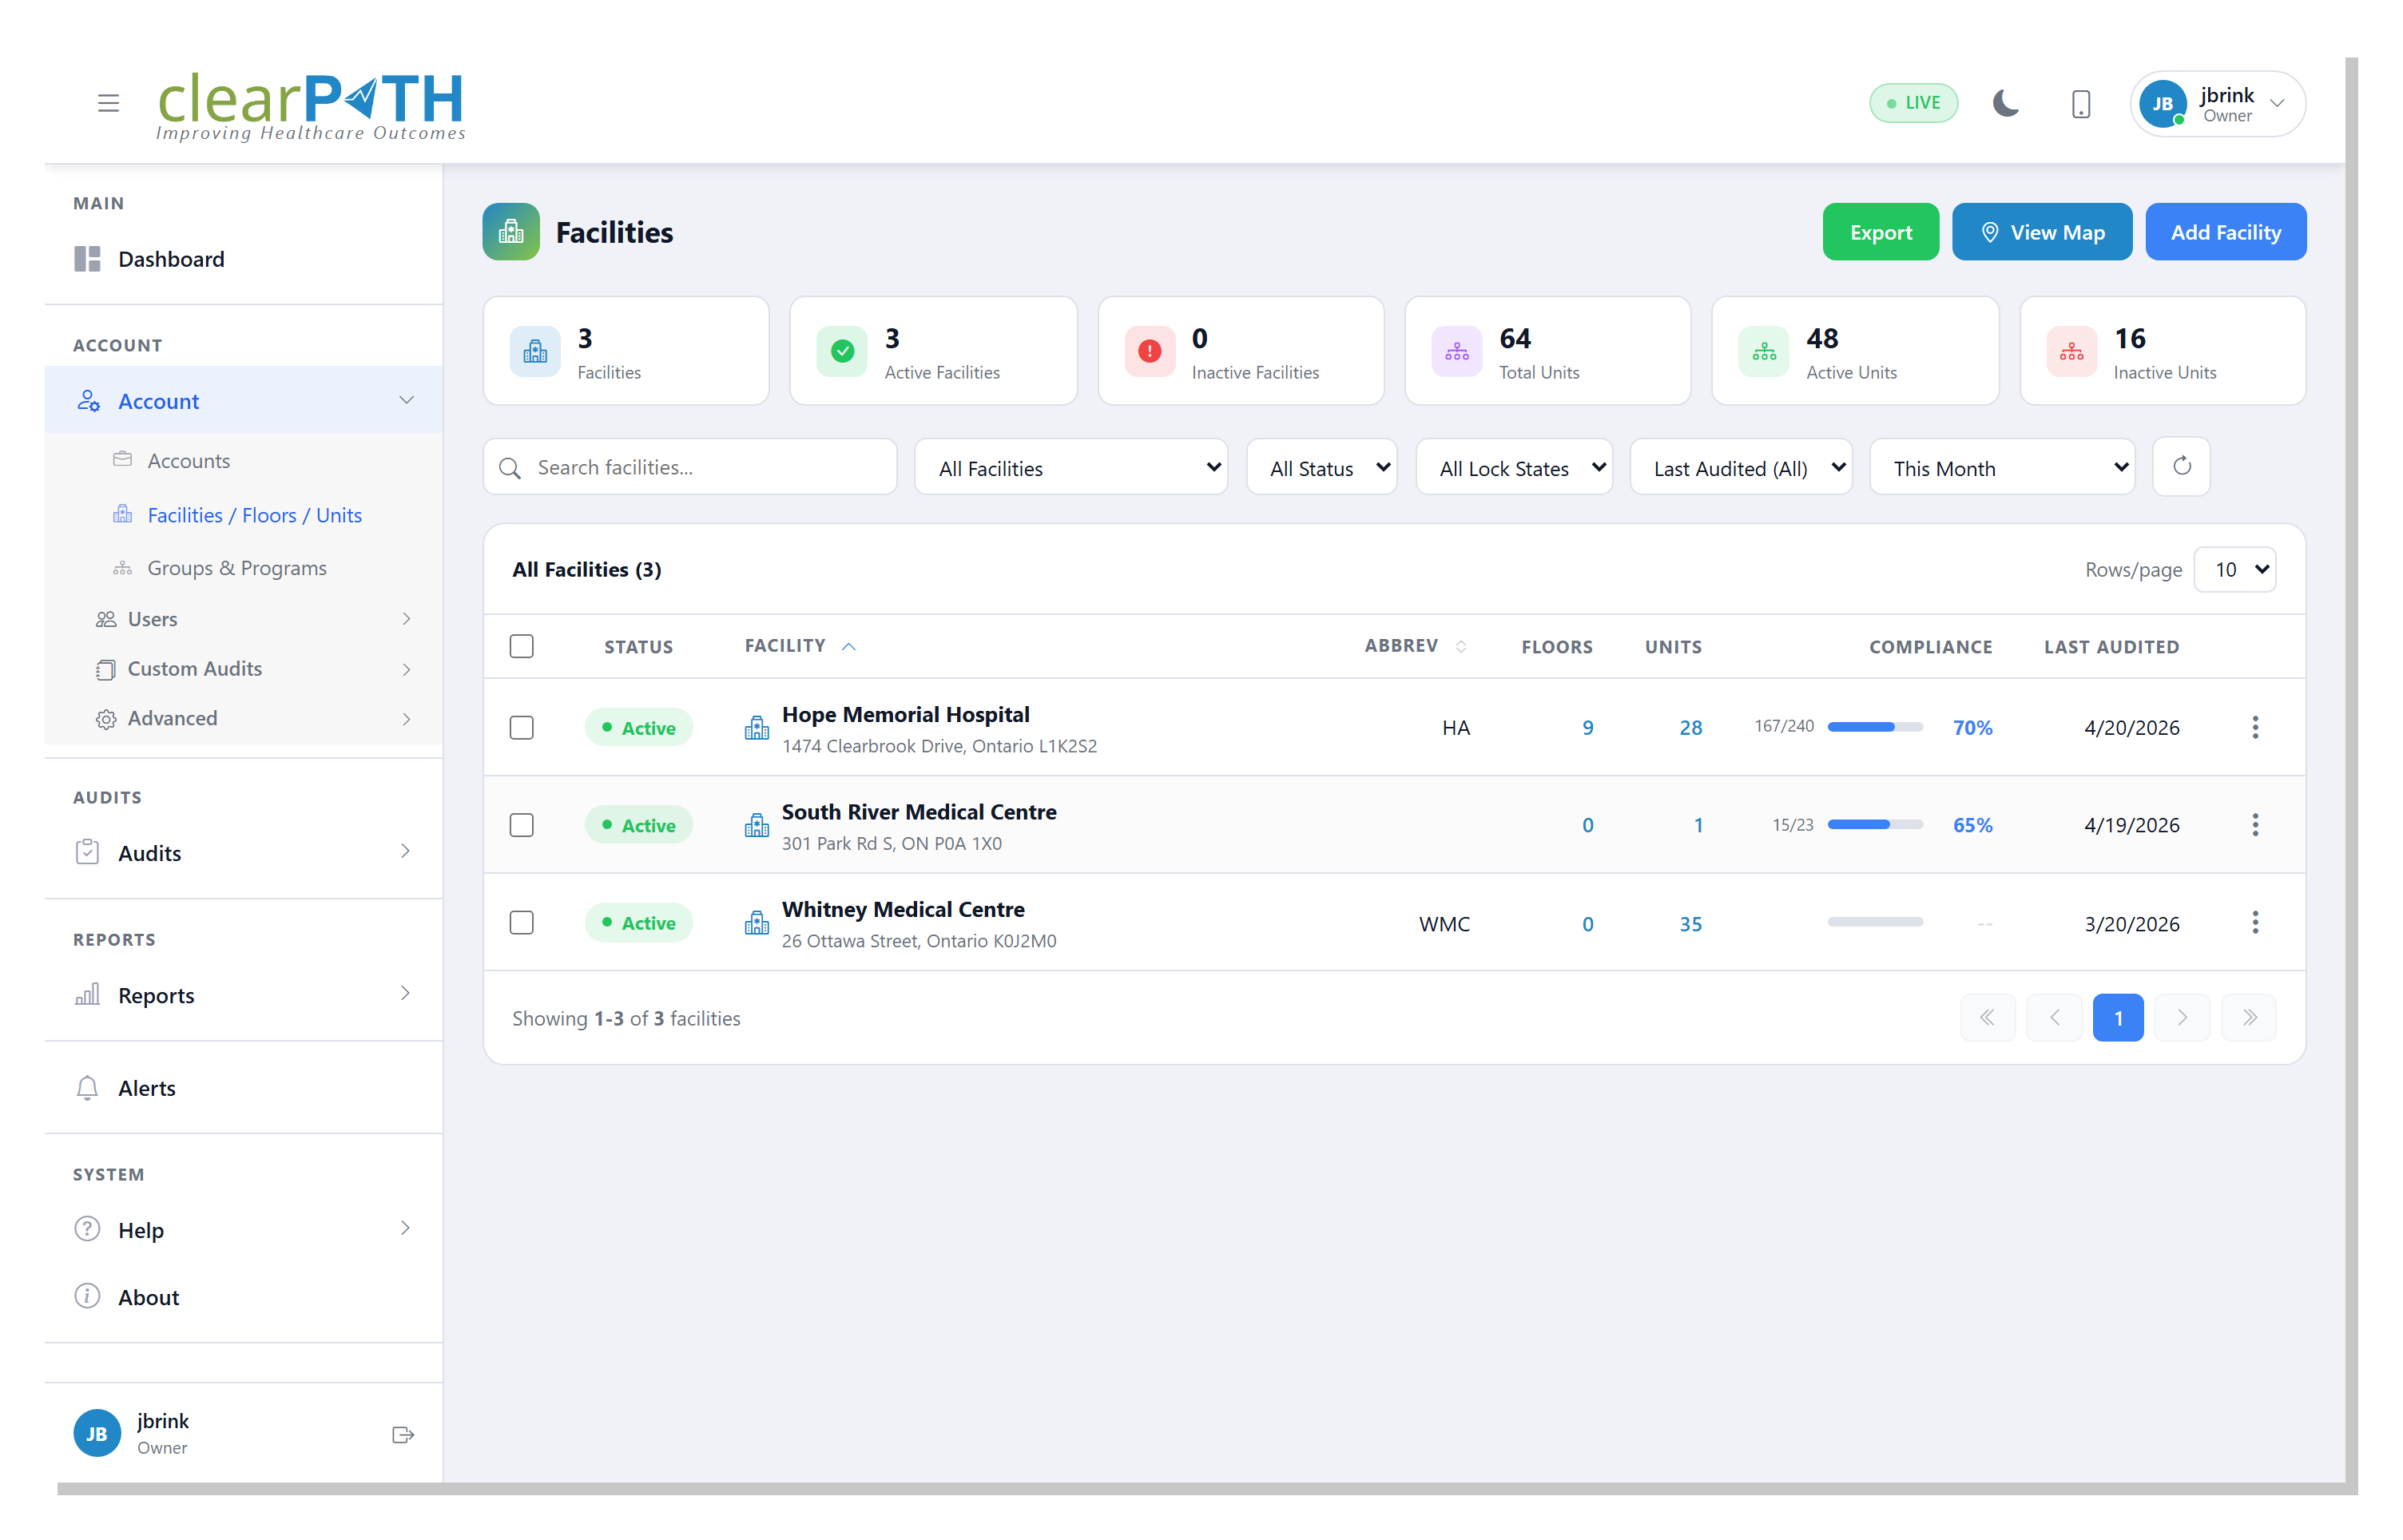
Click the three-dot button at the end of a row to open the row menu:
View Units— expands the facility so its units are visible in the table.View Floors— opens the floor plan page for the facility.Edit— opens the facility in the editor.Delete— removes the facility after a confirmation prompt. If the facility has units, every unit inside it is removed as well, so clearPath warns you before the delete goes through.
Each unit row has its own three-dot menu with Edit and
Delete options for that unit.
8.2. The Facility Editor
The editor opens as a modal dialog with four tabs. You reach it by
clicking Add Facility in the page header or by choosing Edit
on the three-dot menu.
The Active toggle at the top of the General tab marks the
facility enabled or disabled. When a facility is disabled, its data
is held back from reports and it does not appear in the picker where
auditors choose a facility to audit.
8.2.1. General Tab
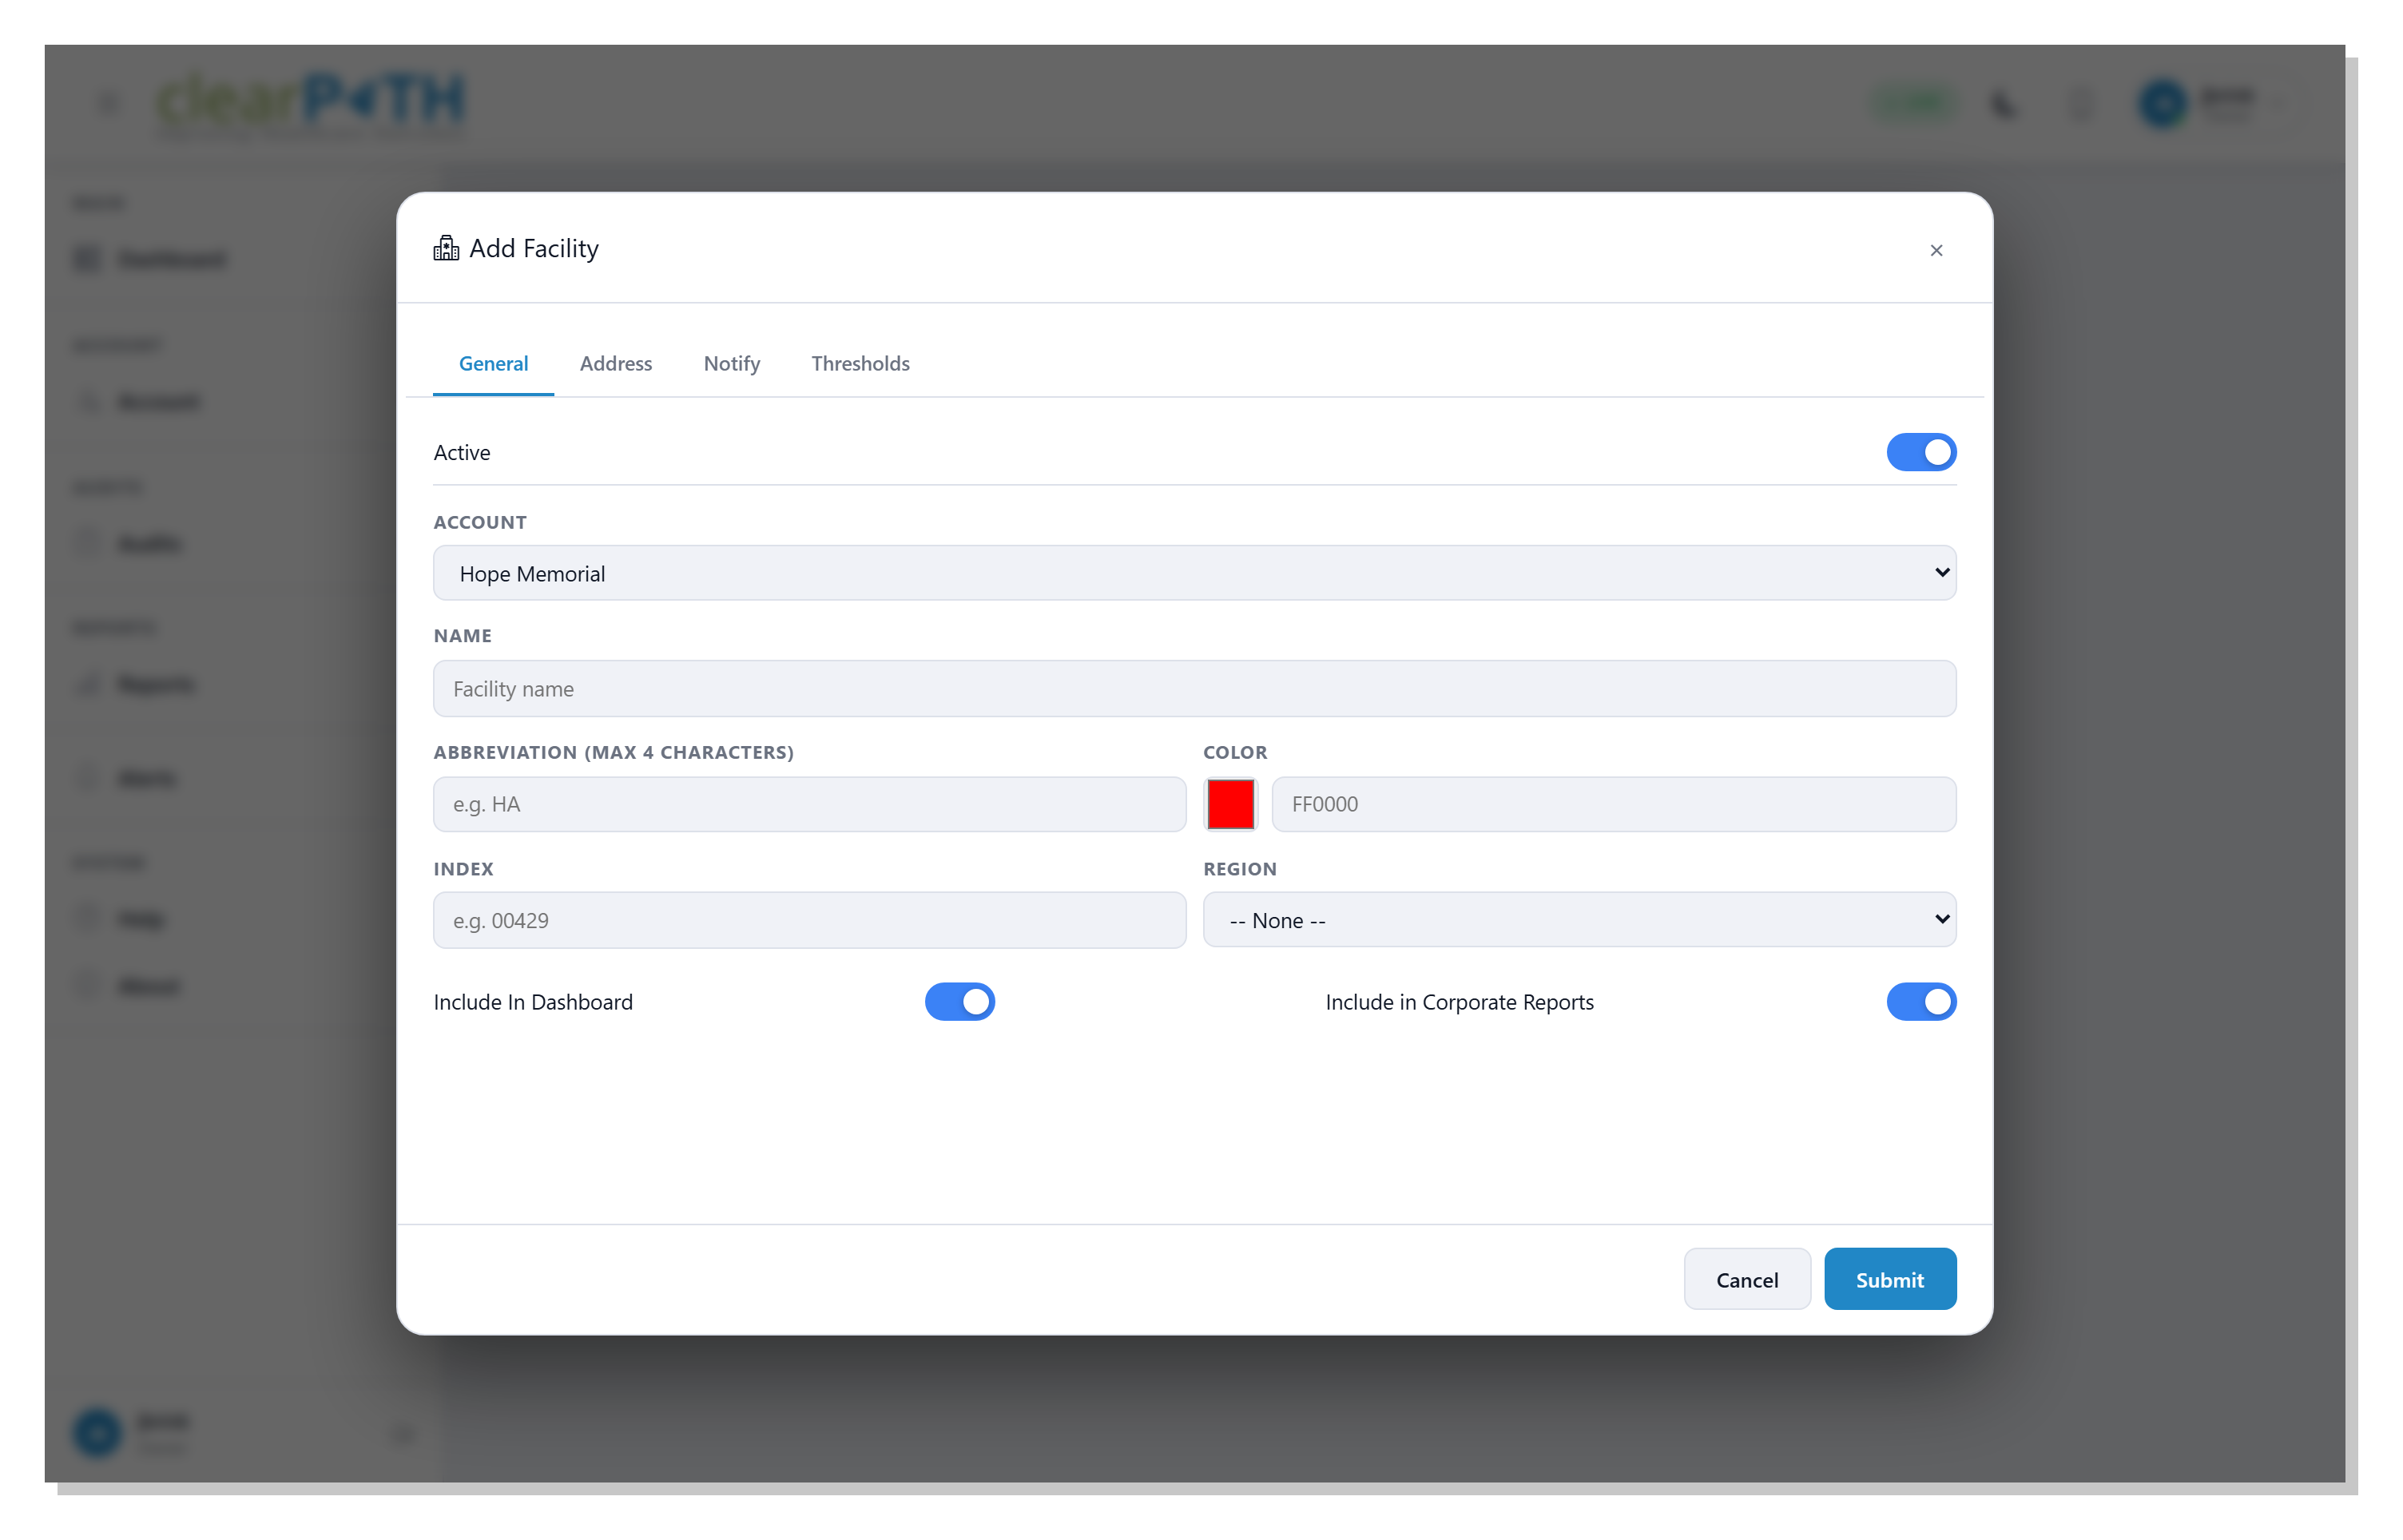
Account— the account the facility belongs to.Name— the facility name used everywhere in clearPath.Abbreviation— a short code (maximum four characters) used in compact views and exports.Color— the colour shown for this facility in charts and dashboards. Pick a swatch or type a hex value.Index— an optional four-digit identifier. Historically this mirrored a ministry-of-health spreadsheet; leave it blank if you have no need for it.Region— the region the facility is grouped under.Include In Dashboard — when on, the facility’s numbers roll up into dashboard widgets.
Include in Corporate Reports — when on, the facility is included in account-level (corporate) reports.
8.2.2. Address Tab
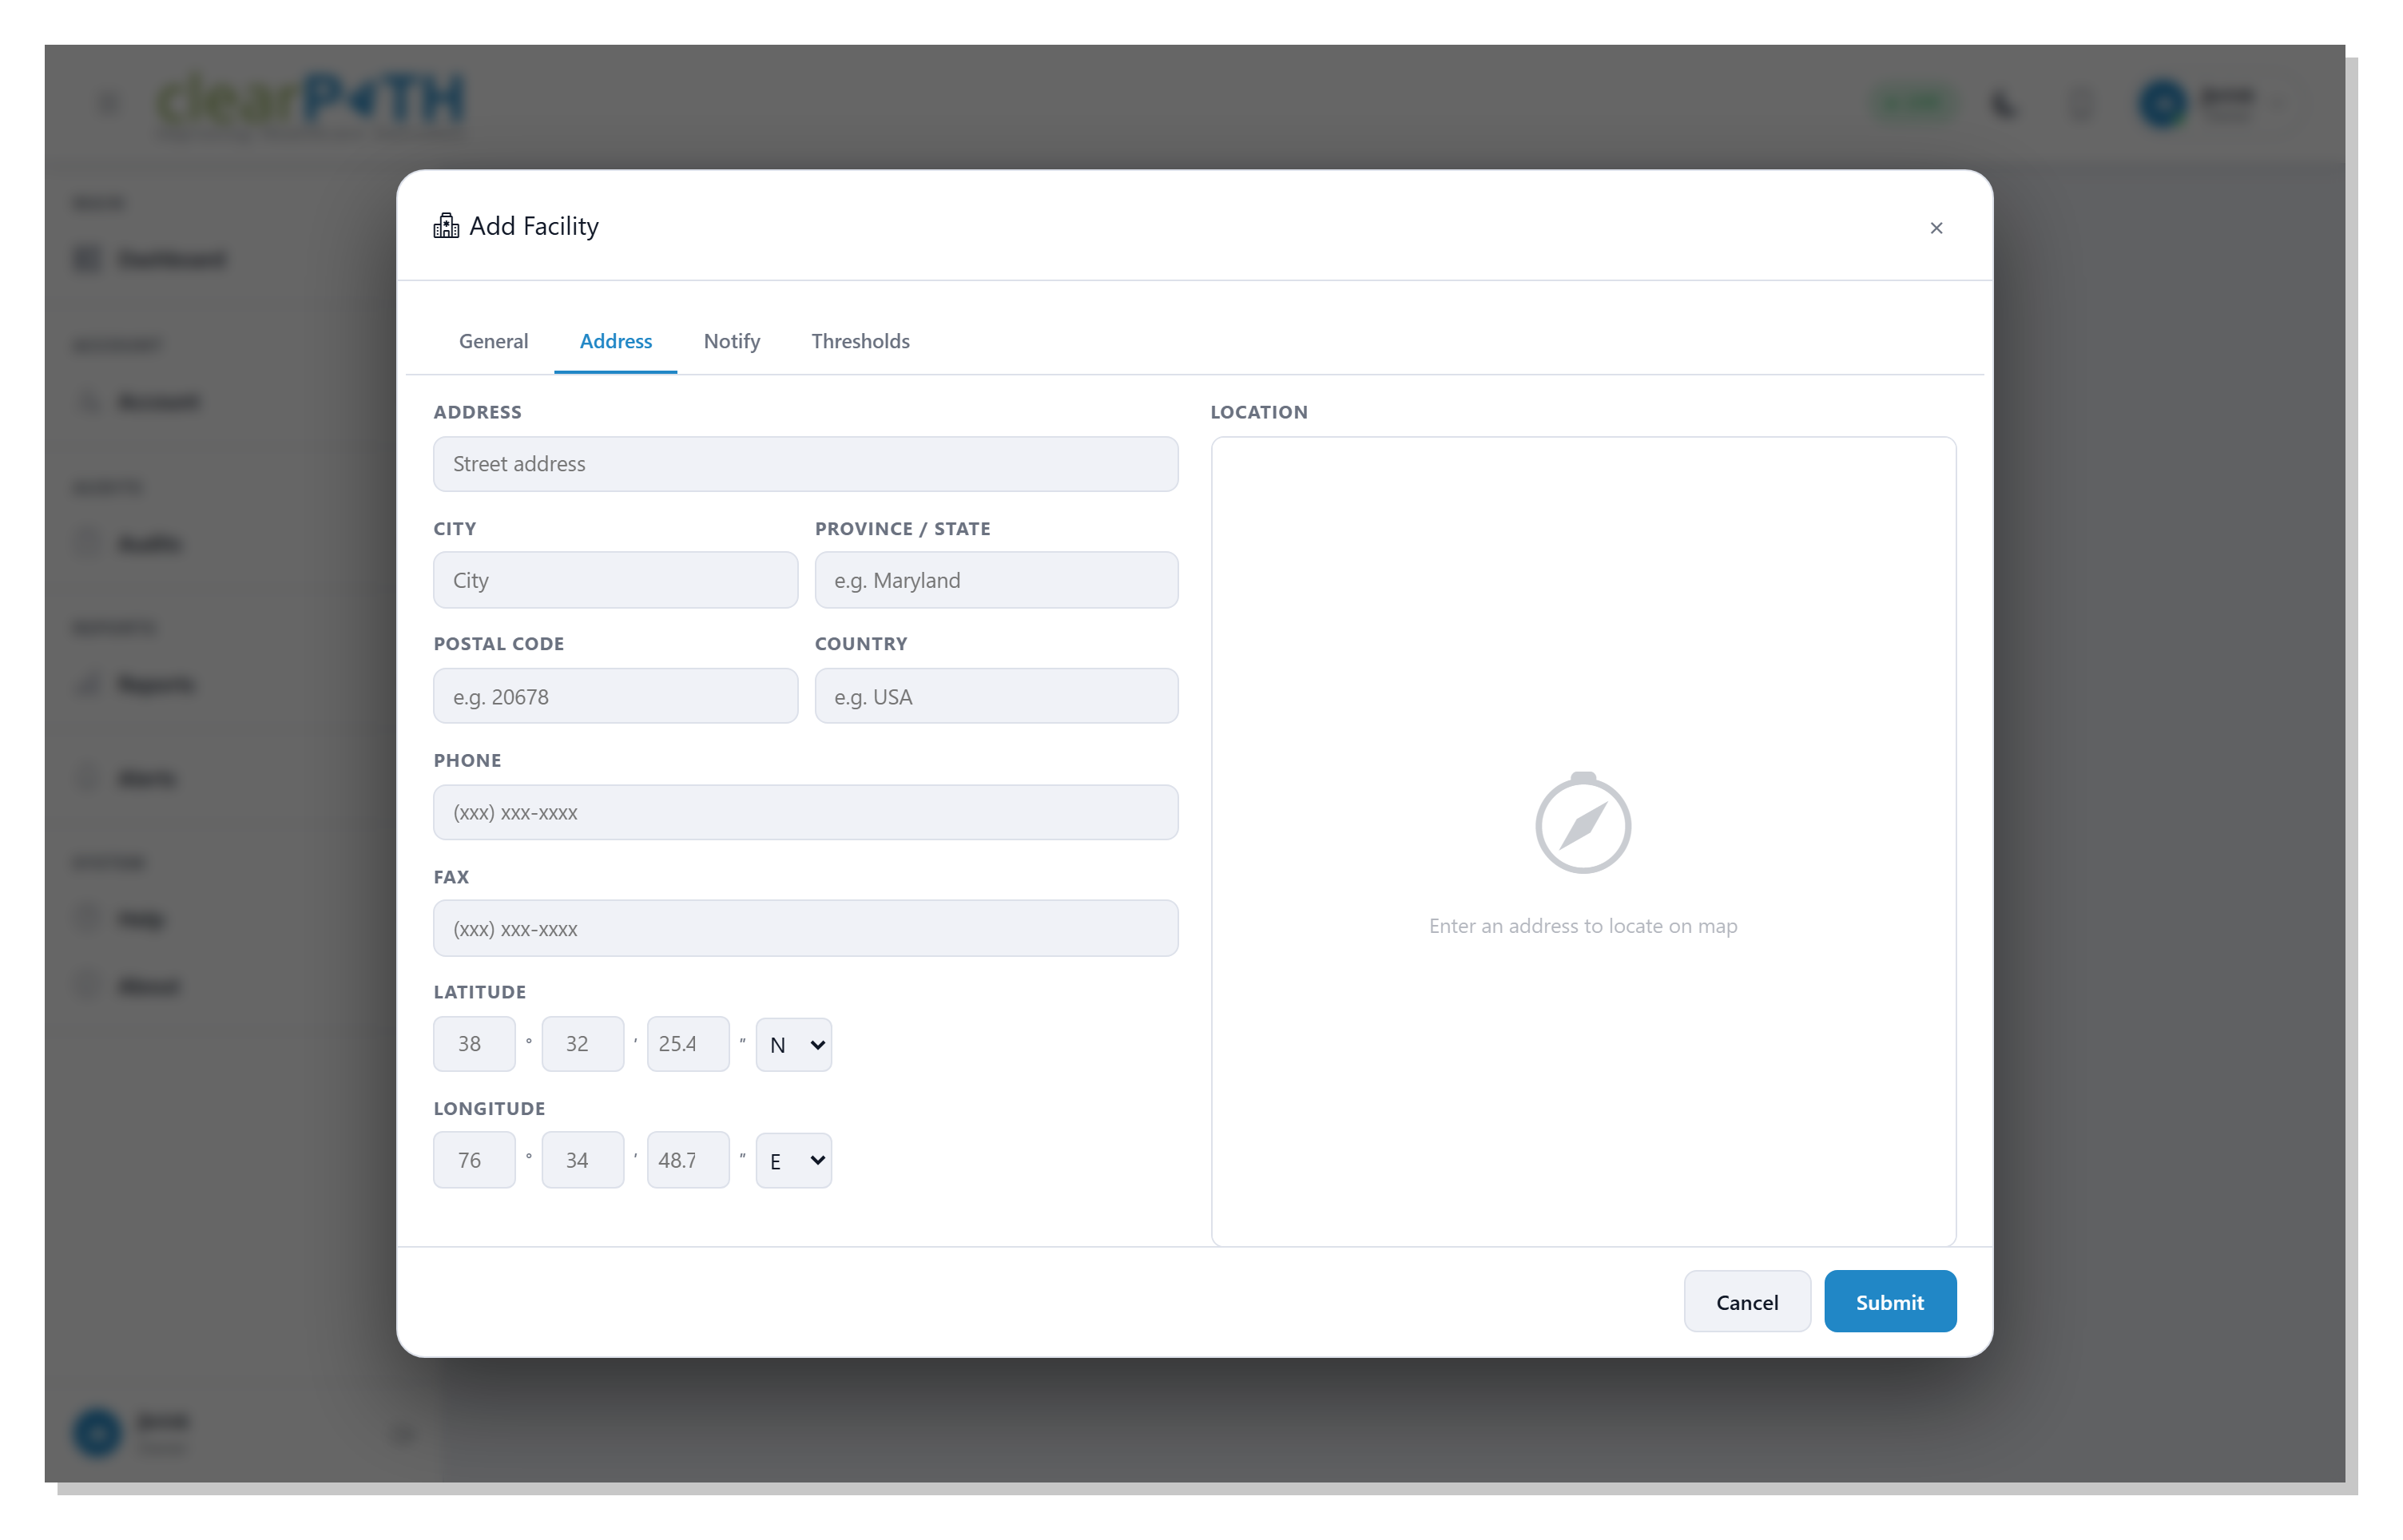
Fill in the facility’s physical address and clearPath will plot it on the map shown on the right of the tab:
Address,City,Province / State,Postal Code,Country— standard address fields.PhoneandFax— contact numbers.LatitudeandLongitude— entered in degrees, minutes, and seconds with N/S and E/W indicators. The map recentres automatically when the coordinates change.
If coordinates are not supplied, clearPath geocodes the address to place a pin on the map.
8.2.3. Notify Tab
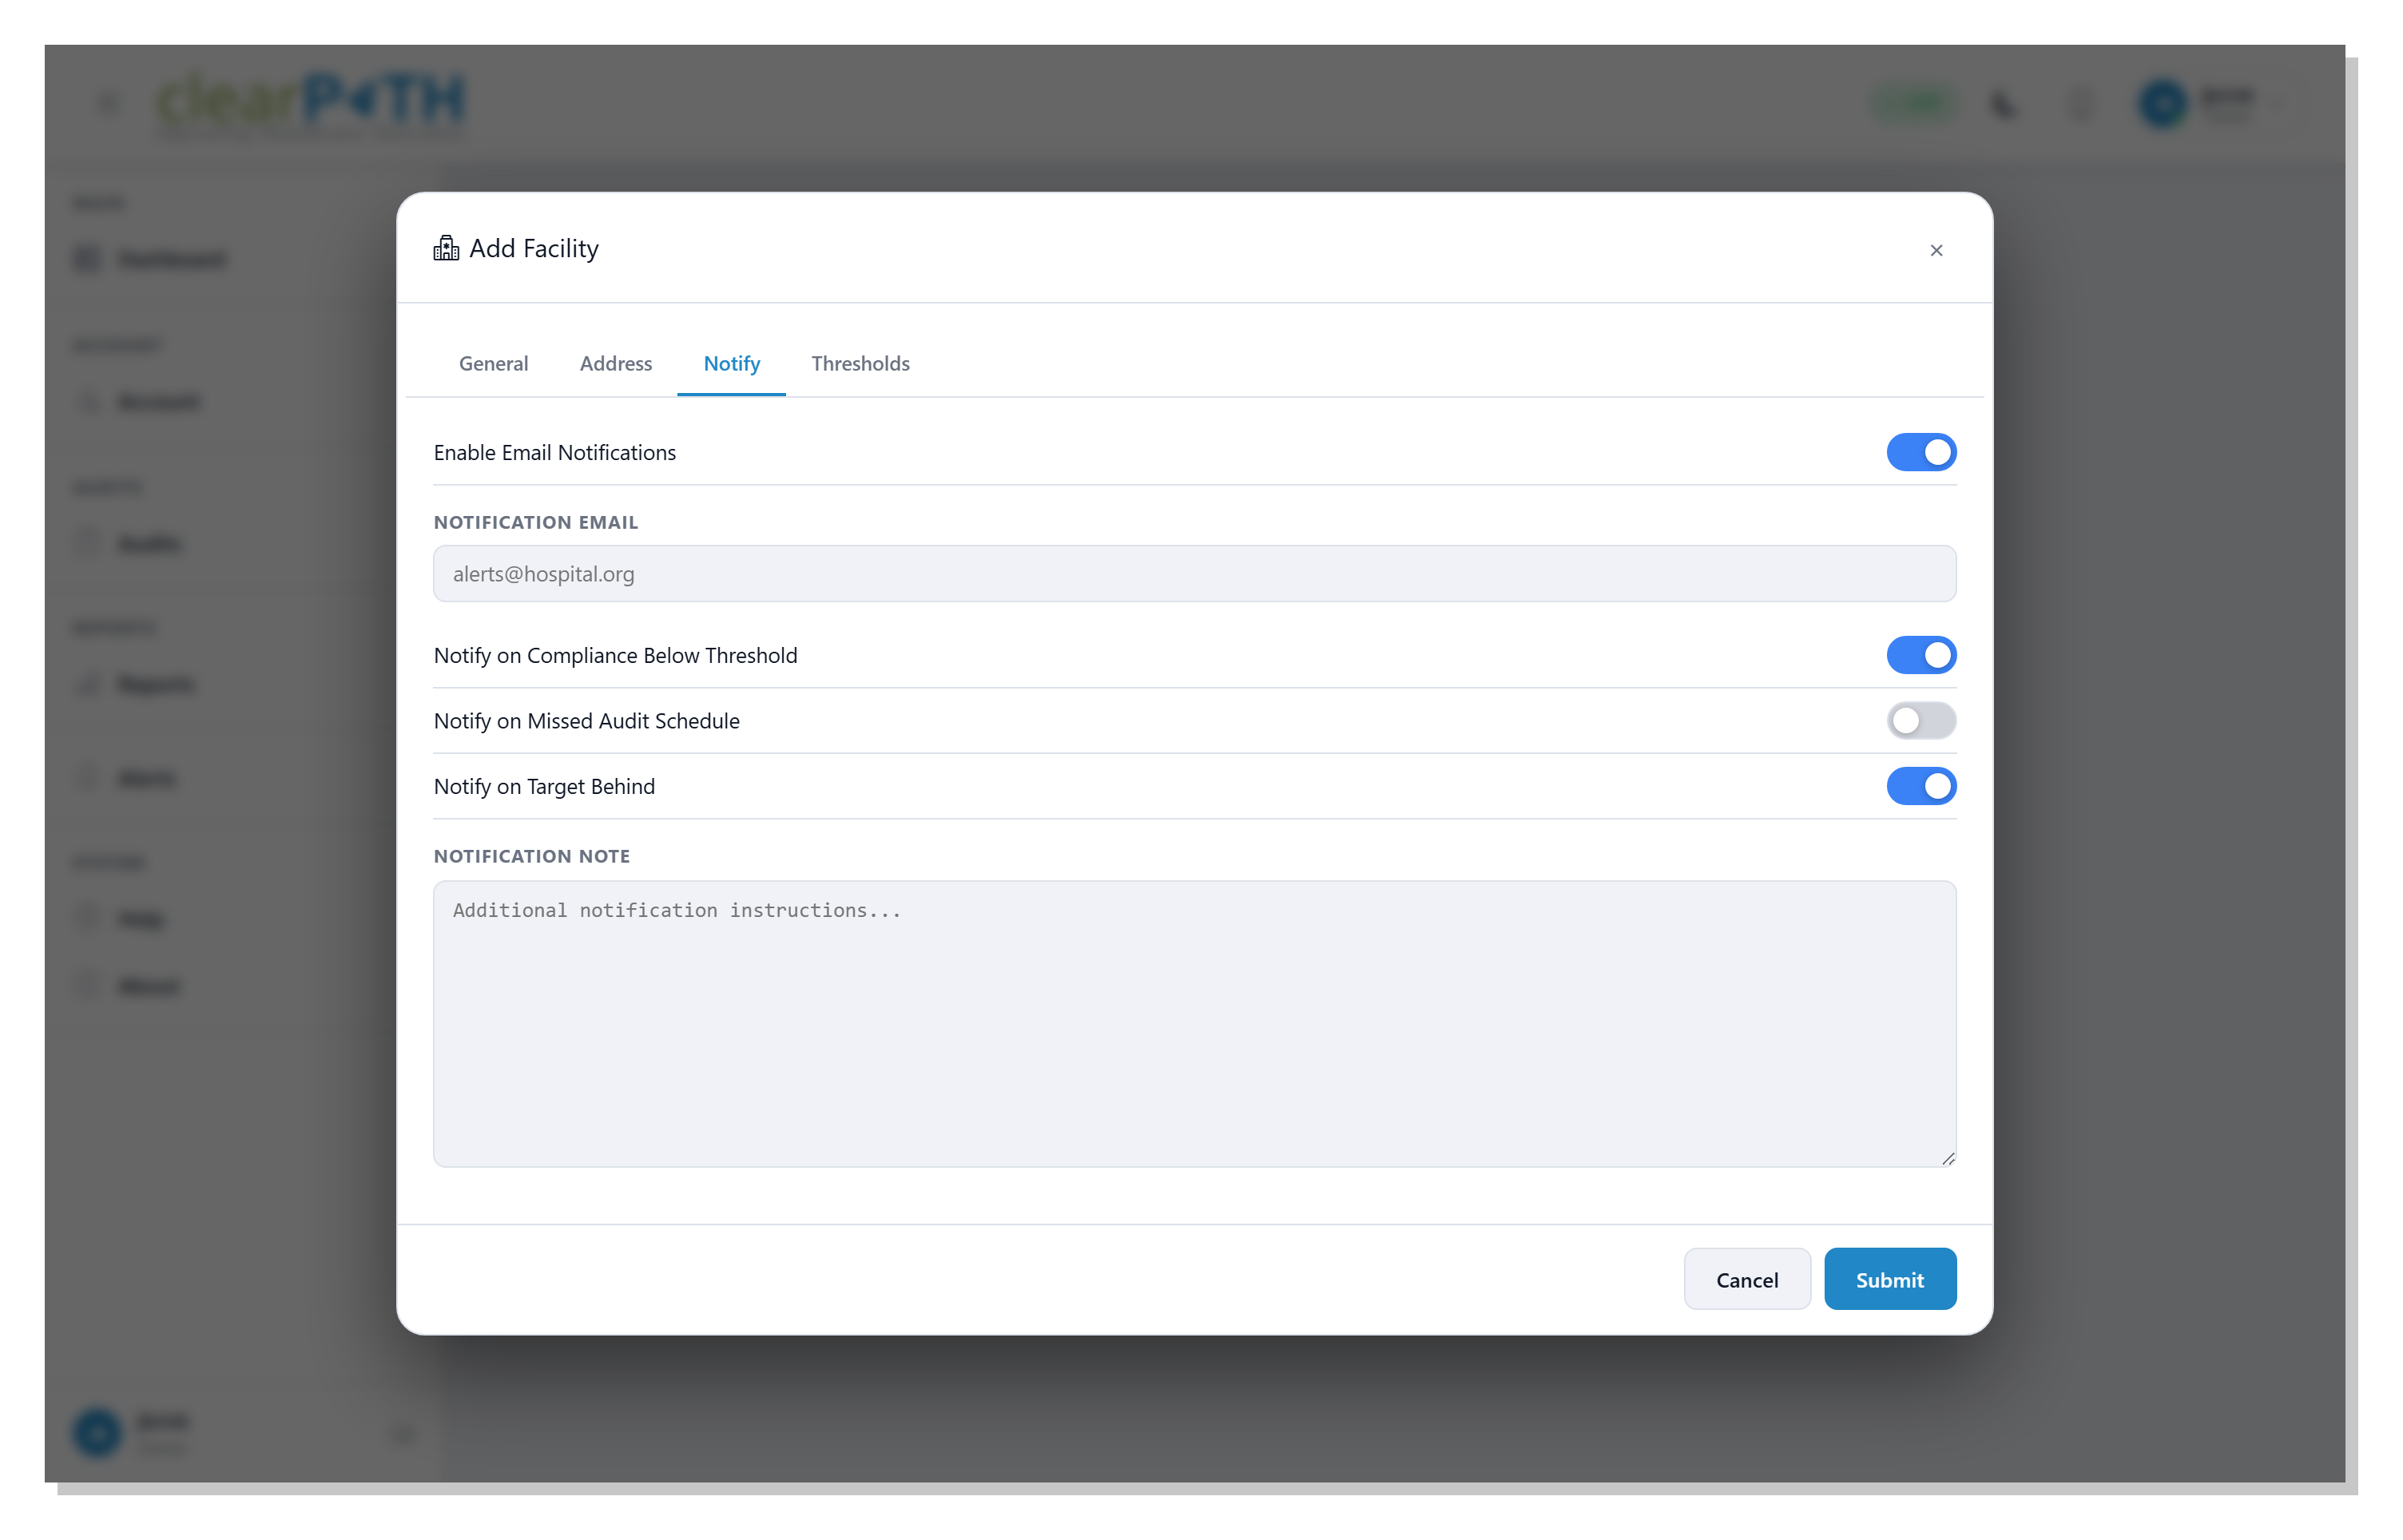
Use this tab to have clearPath send email alerts when the facility slips outside normal operating ranges:
Enable Email Notifications — master switch. If this is off, the rest of the tab is ignored.
Notification Email— the address that receives the alerts.Notify on Compliance Below Threshold — fires when the facility’s compliance drops below the threshold set on the Thresholds tab.
Notify on Missed Audit Schedule — fires when an expected audit does not run.
Notify on Target Behind — fires when the facility falls behind its monthly target.
Notification Note— free-form text that is included at the bottom of every alert email.
8.2.4. Thresholds Tab

Target (%)— the compliance target the facility is aiming at.Assigned Target— the named target profile currently in use.Gloves Required on ASP/BFL Events — when on, a glove change is required for audits in the
ASP/BFLgroup.Minimum Hand Wash Duration (seconds)— shown only when gloves are required; sets the minimum handwash time.
8.2.5. Saving and Cancelling
Click Save (or the blue confirmation button at the bottom of
each tab) to write your changes. Close the dialog without saving by
pressing the x at the top right or using the browser’s back
button.
8.3. Units
Units live inside facilities. On the facilities list you can expand
any row to see the units inside it; each unit has its own
three-dot menu with Edit and Delete options.
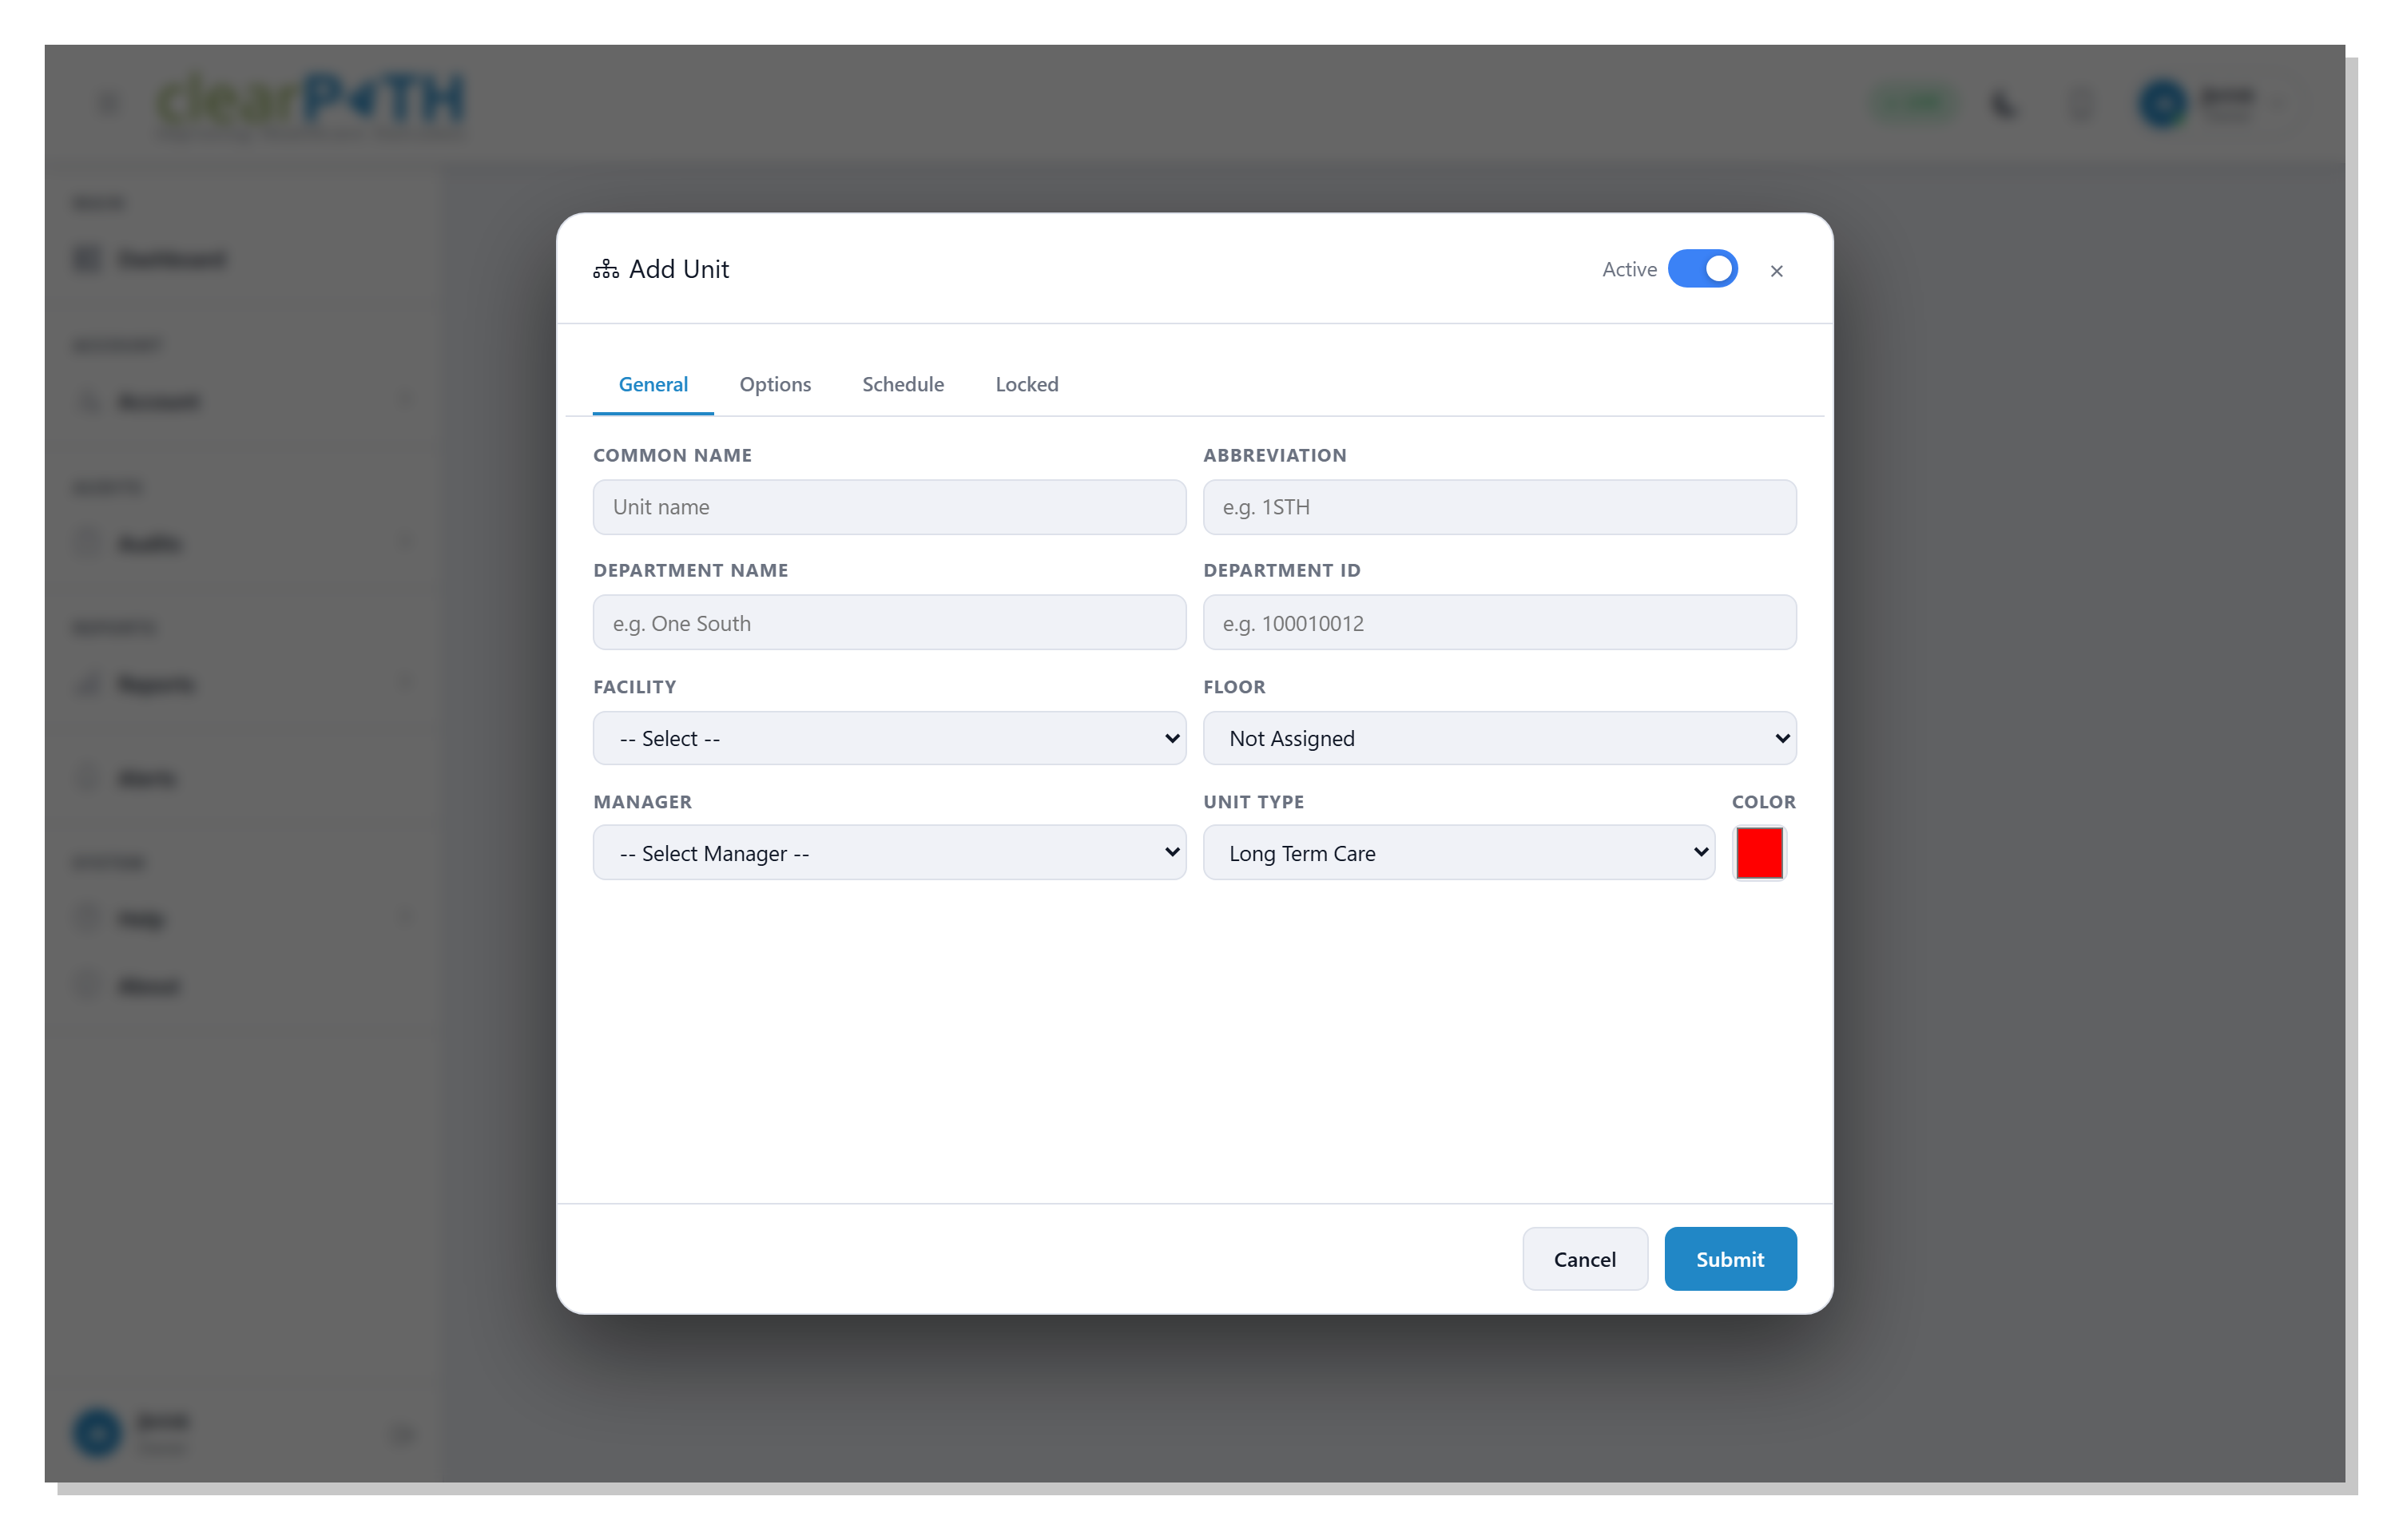
8.3.1. Unit Detail
The unit editor has up to five tabs: General, Options, Schedule, Locked, and (for Leapfrog-licensed accounts) Leapfrog.
8.3.1.1. General Tab
The General tab collects the core fields:
Parent Facility— which facility the unit belongs to.Area Name— the patient-care area or department name.Abbreviation— a short code (maximum four characters).Department Name/Department ID— optional department labels.Unit Type—Reportableunits roll up into corporate reports;Non-Reportableunits are tracked but excluded.Color— the unit’s chart colour.
An Active toggle in the top-right corner of the dialog
controls whether the unit can be audited at all. Inactive units
are kept for historical reporting but cannot collect new
observations.
8.3.1.2. Options Tab
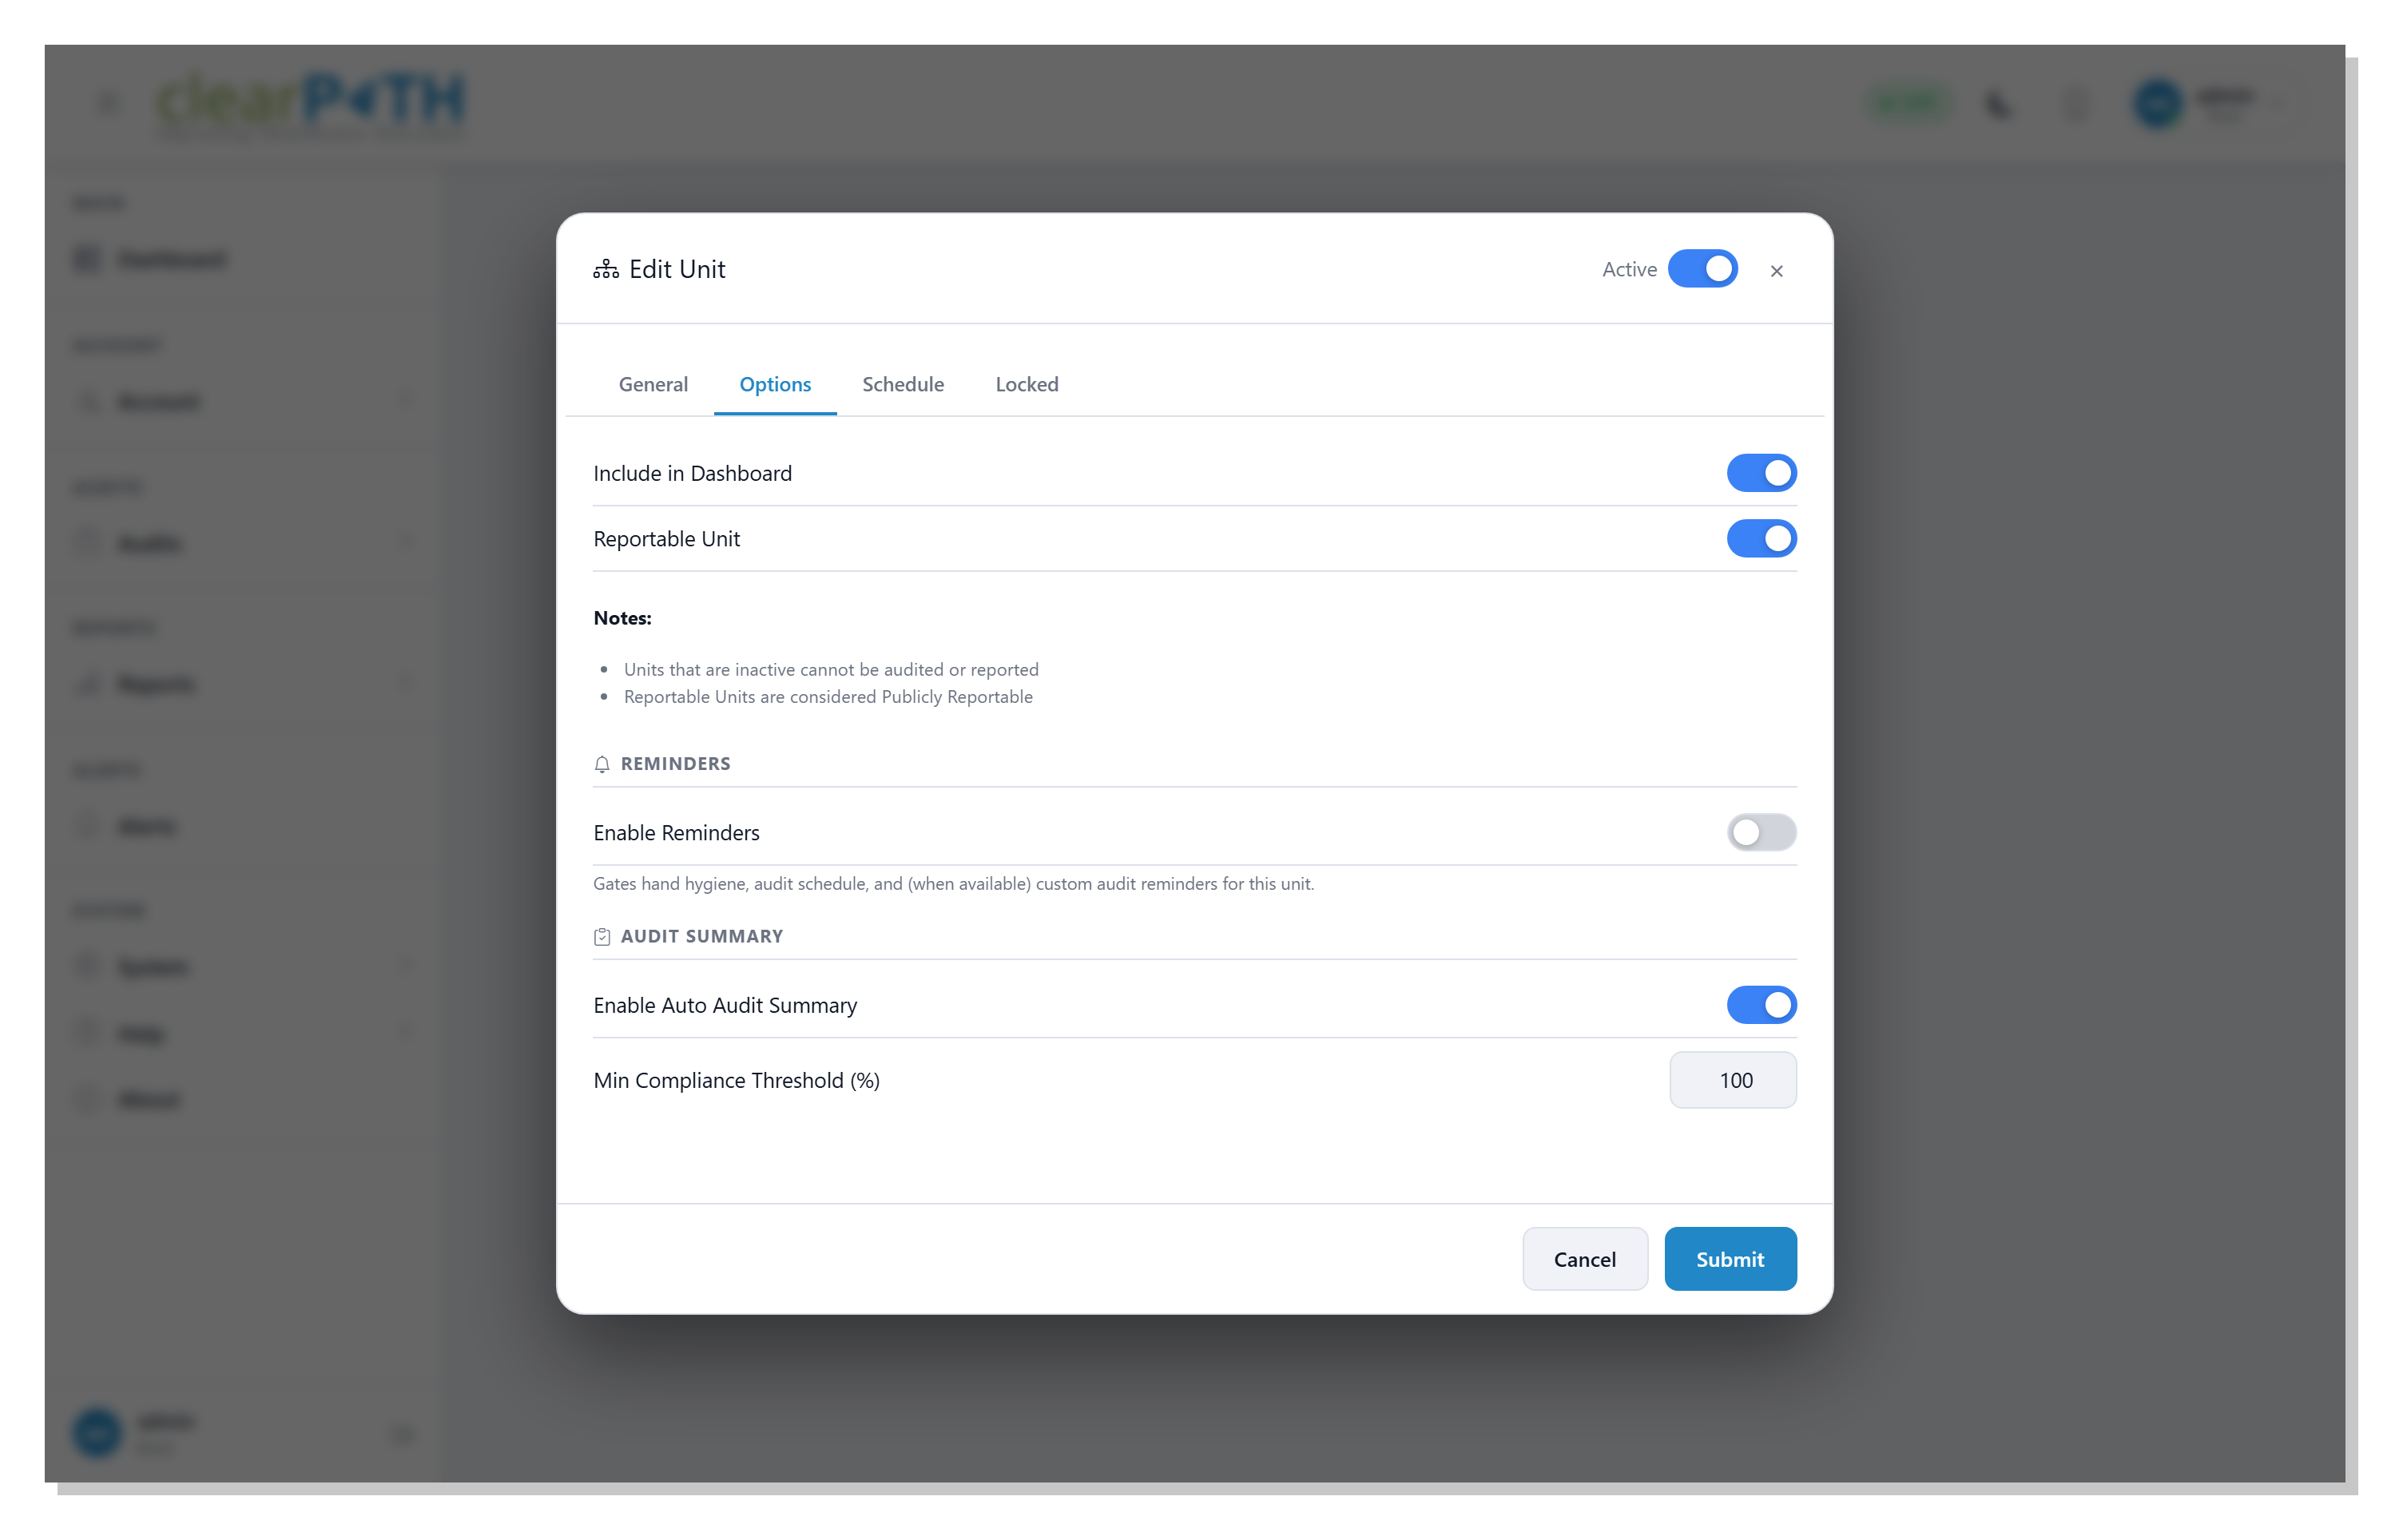
The Options tab gathers the per-unit display, reminder, and audit summary settings.
The top two toggles control where the unit appears:
Include in Dashboard— when on, the unit shows up on the facility dashboard and rolls into account-wide widgets. Turn it off for units that should be tracked but kept out of the dashboard view.Reportable Unit— when on, the unit counts as publicly reportable and rolls into corporate compliance reports. Inactive units cannot be audited or reported at all, regardless of these toggles.
The Reminders section controls automated reminder emails for this unit:
Enable Reminders— master switch. When on, clearPath sends reminder emails for hand hygiene observations, the audit schedule, and (where available) custom audits when the unit falls behind. The two fields below appear only when this is on.Send To— the primary recipient, picked from the unit’s list of contacts.Copy To— additional recipients, one email address per line.
The Audit Summary section controls the automatic summary email sent at the end of each audit:
Enable Auto Audit Summary— when on, clearPath emails a summary to the unit’s contacts after each audit completes.Min Compliance Threshold (%)— the compliance percentage below which the summary is flagged as needing attention. Default is 100 %, meaning any non-perfect audit is flagged.
8.3.1.3. Schedule Tab
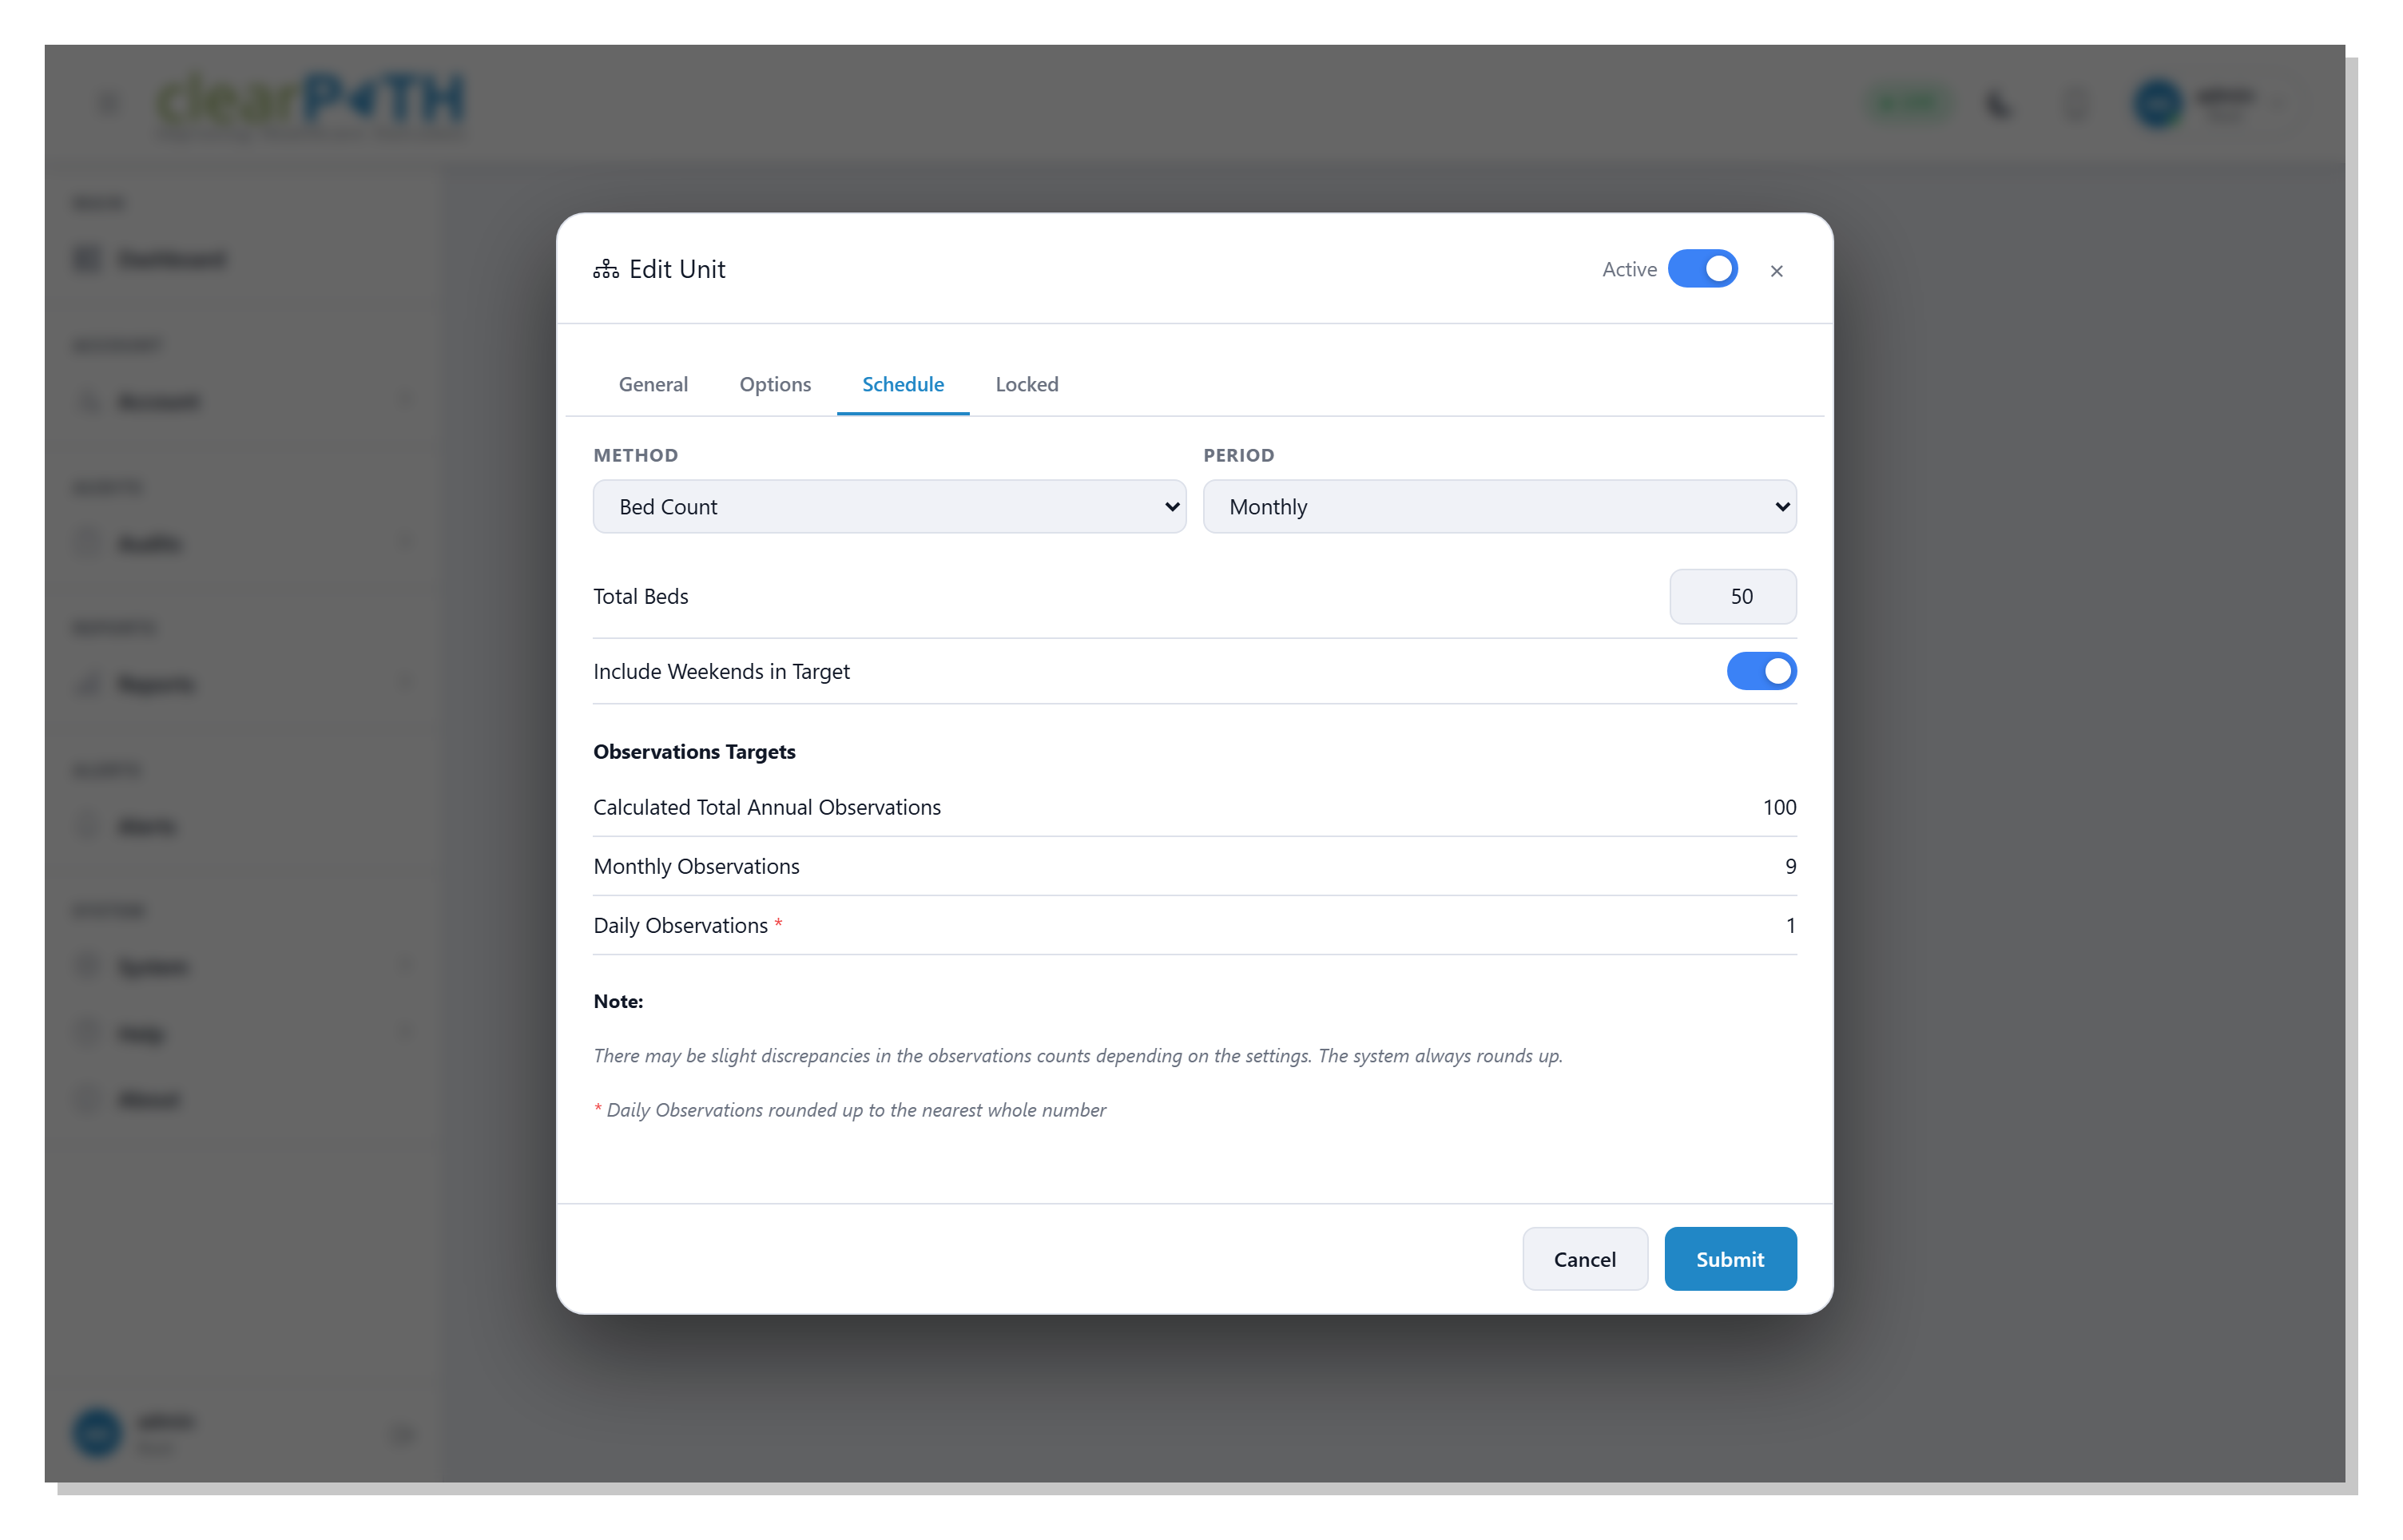
The Schedule tab decides how many observations the unit is expected to collect over a given period. clearPath supports two scheduling methods:
Method:Fixed— you enter a flat number of observations per period.Bed Count— you enter the unit’s bed count and clearPath derives the observation target from it.
Period— the cadence the target applies to:Weekly,Monthly,Quarterly, orAnnually.
The fields that follow depend on the chosen method:
Total Beds(Bed Count method only) — the number of beds on the unit. The target is computed from this.Observations Per Period(Fixed method only) — the target number of observations for one period.Include Weekends in Target— when off, clearPath spreads the observation target across weekdays only. When on, weekend days are counted equally.
The Observations Targets panel at the bottom shows the calculated breakdown:
Calculated Total Annual Observations— the annualised target rolled up from the period above.Monthly,Quarterly,Weekly, orDaily Observations— the same target broken down to the smaller cadences. Only the rows that make sense for the chosen period are shown.
Daily observations are always rounded up to the next whole number, so a target of 0.4 daily observations is displayed as 1.
Note
clearPath rounds up at every step of the calculation, so there may be a small discrepancy between the annual figure and the sum of the smaller cadences. That is by design — rounding down would let a unit slip past its yearly target.
8.3.1.4. Locked Tab
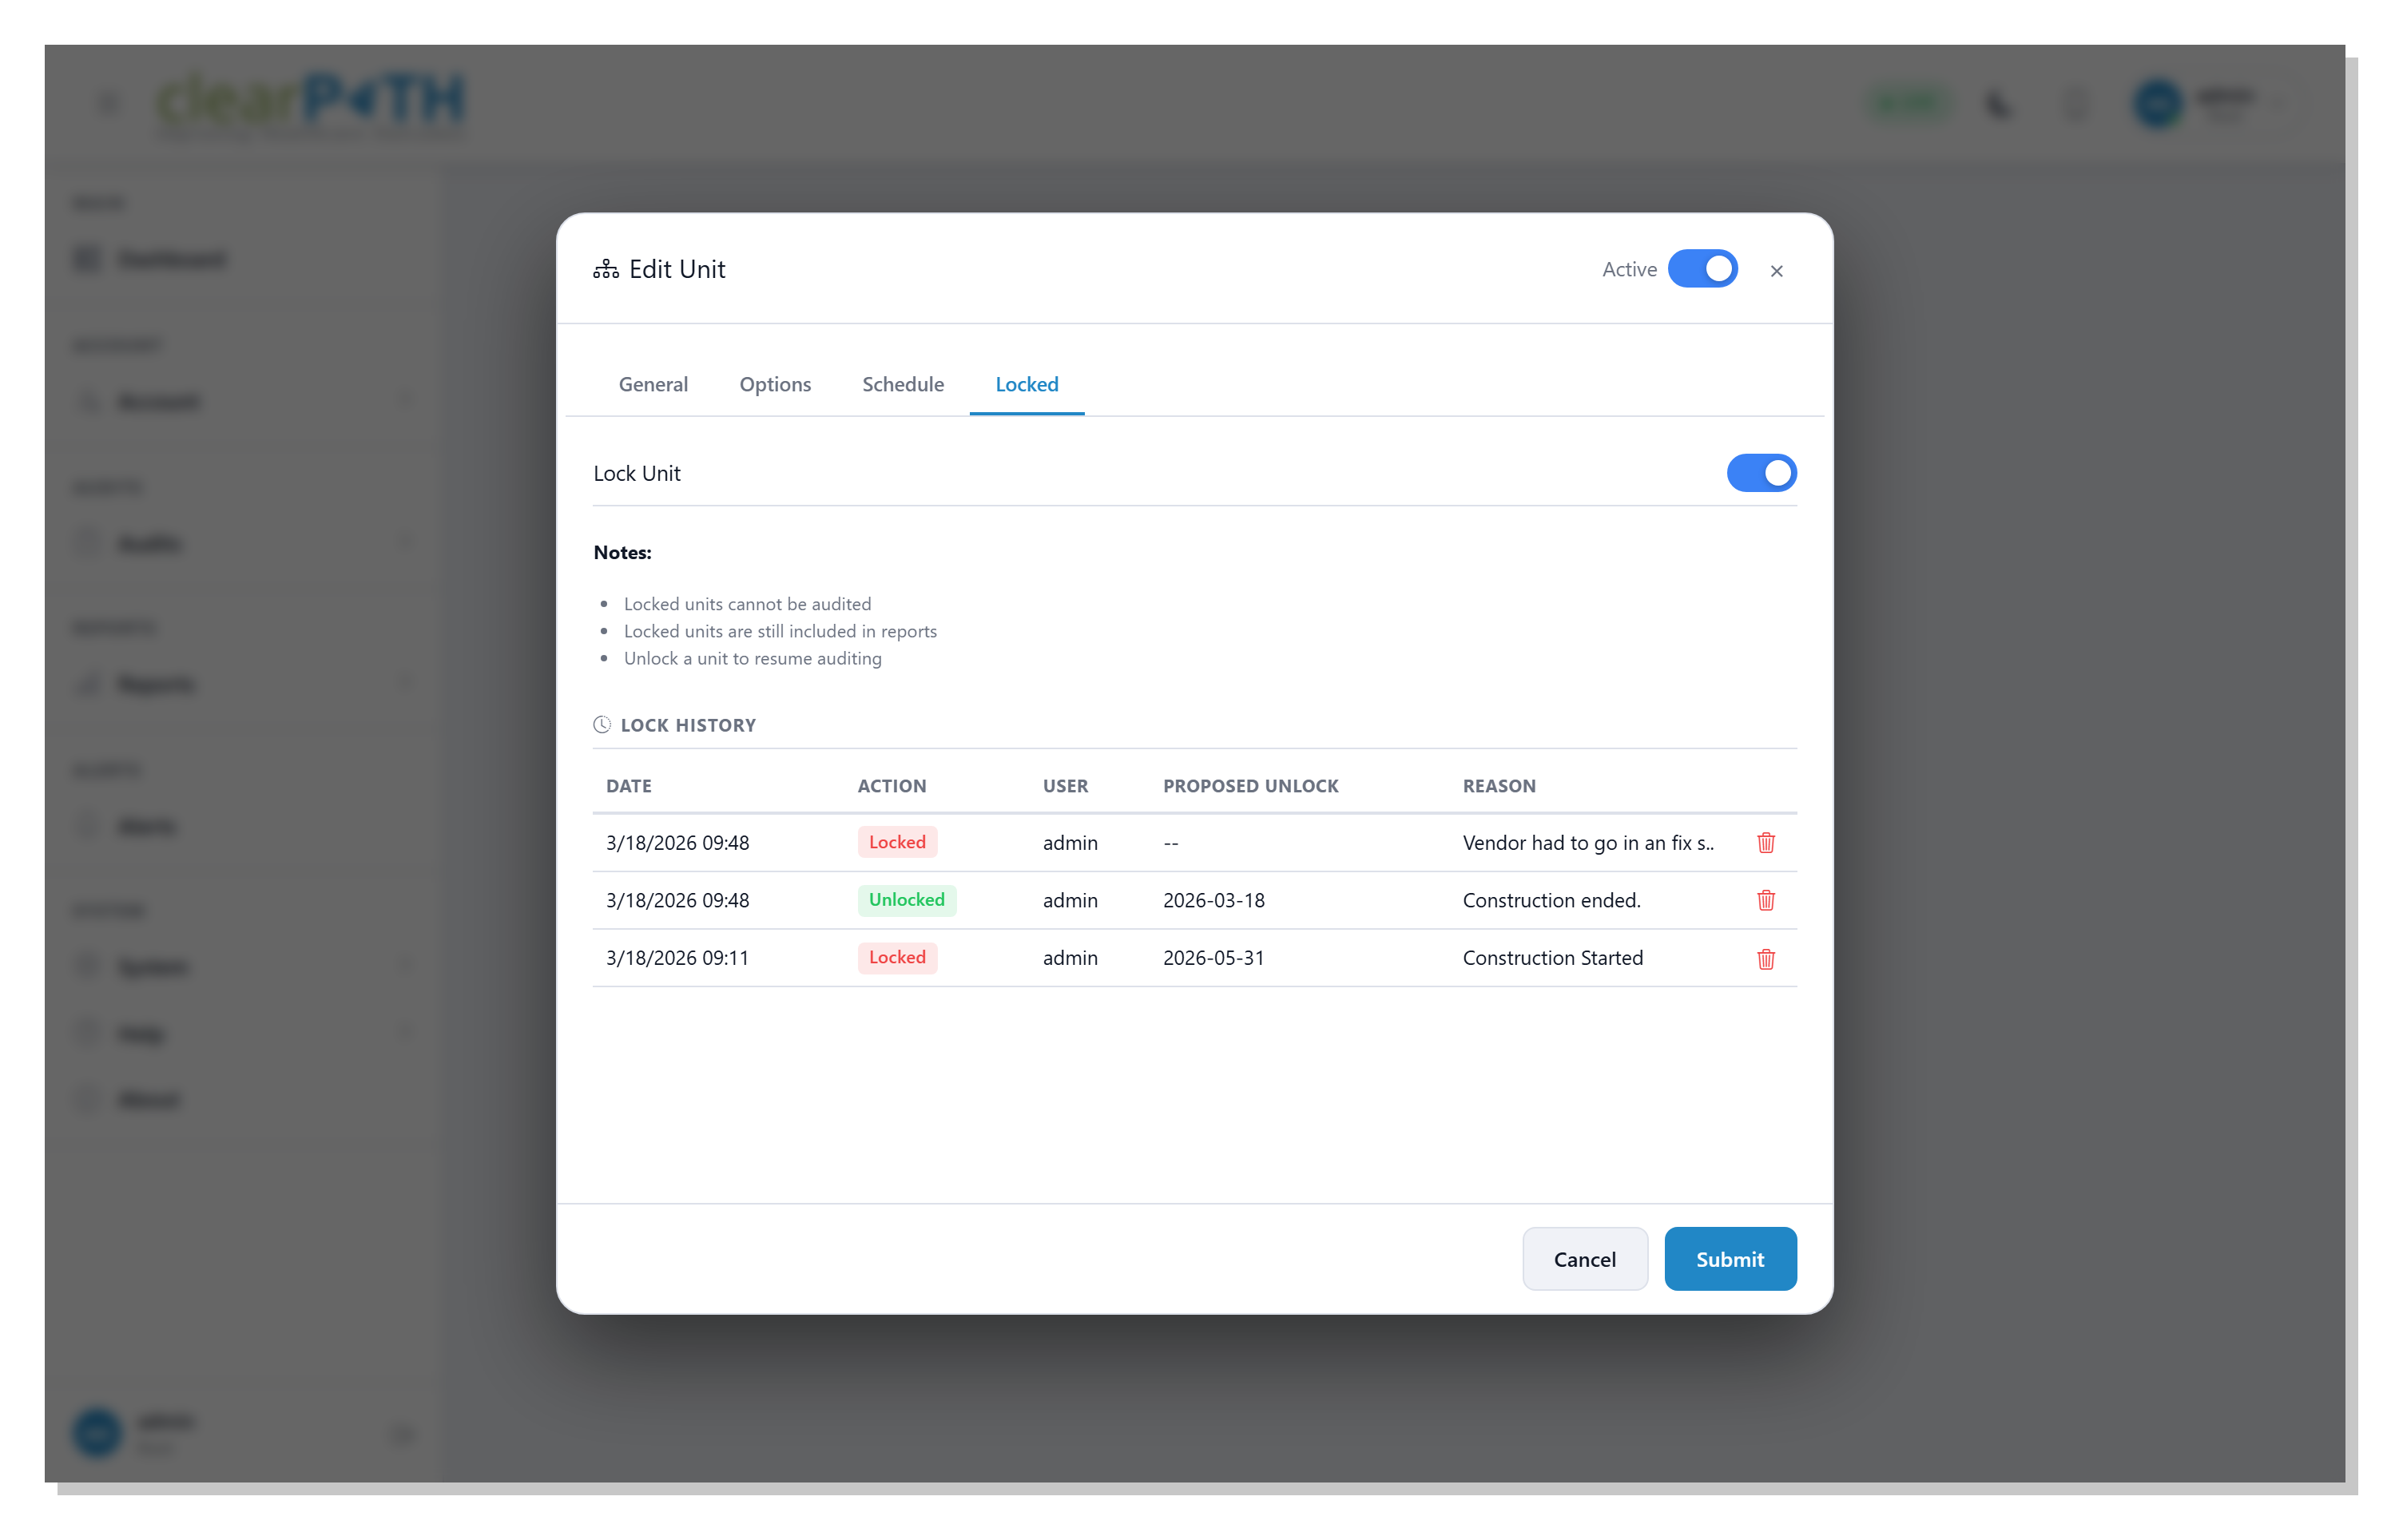
The Locked tab lets you freeze the unit so it cannot be audited while keeping it in reports. This is useful when a unit is temporarily out of service — closed for construction, vacant, on outbreak hold — and you want auditors to skip it without losing the unit’s historical data.
Lock Unit— toggling this on opens a dialog that asks for aReason(free text) and an optionalProposed Unlock Date. ClickConfirmto apply the lock; the unit becomes un-auditable until it is unlocked.Toggling it back off opens the same dialog so you can record why the unit is being unlocked. The reason and proposed date are added to the lock history.
The Lock History table below shows every lock and unlock action for the unit:
Date— when the action happened.Action—Locked(red pill) orUnlocked(green pill).User— who performed the action.Proposed Unlock— the unlock date that was scheduled at the time of locking; a dash when none was set or when the row is an unlock event.Reason— the free-text reason entered for the action.
The trashcan at the end of a row removes that history entry. Use sparingly — the lock history is a useful audit trail and is typically preserved.
Note
Locked units are excluded from observations but are still
counted in compliance reports. If you want to remove a unit
from reports entirely, set its Unit Type to
Non-Reportable on the General tab or untick
Reportable Unit on the Options tab instead.
8.3.2. Leapfrog Tab

The Leapfrog tab is shown only when the account is licensed for the Leapfrog module. Use it to override the account-level Leapfrog settings (see Leapfrog) for this unit. Leave a field blank to inherit the value from the account.
Monthly target— minimum observations expected per month.Quarterly target— minimum observations expected per quarter.Semi-annual target— minimum observations expected per six-month period.Annual target— minimum observations expected per year.Custom range (per month)— the per-month rate used when a dashboard or report applies a custom date range that does not match one of the standard cadences.Complete % ≥— the compliance percentage at which this unit is classified asComplete.Gap % ≥— the compliance percentage at which this unit is classified asGap. Anything below this threshold is treated asMissing.
Click Reset all to account default to clear every field on
this tab so the unit inherits the account-level Leapfrog values.