11. Devices
The Devices section tracks the smart sanitizer and soap dispensers,
wearable tags, and other sensor hardware that report to your account.
Each dispenser counts every press, measures how much fluid is left,
reports its battery level, and tells you when it was last used. clearPath
turns that stream of readings into live fluid levels, usage trends, and
early warnings so a container is refilled before it runs dry and a sensor
is serviced before its battery dies.
The Devices section appears in the sidebar only when device tracking
is enabled for your account. If you do not see it, contact
support@clearpathhealthsolutions.com to have it switched on.
11.1. Device List
To open the device list, go to Devices | Device List.
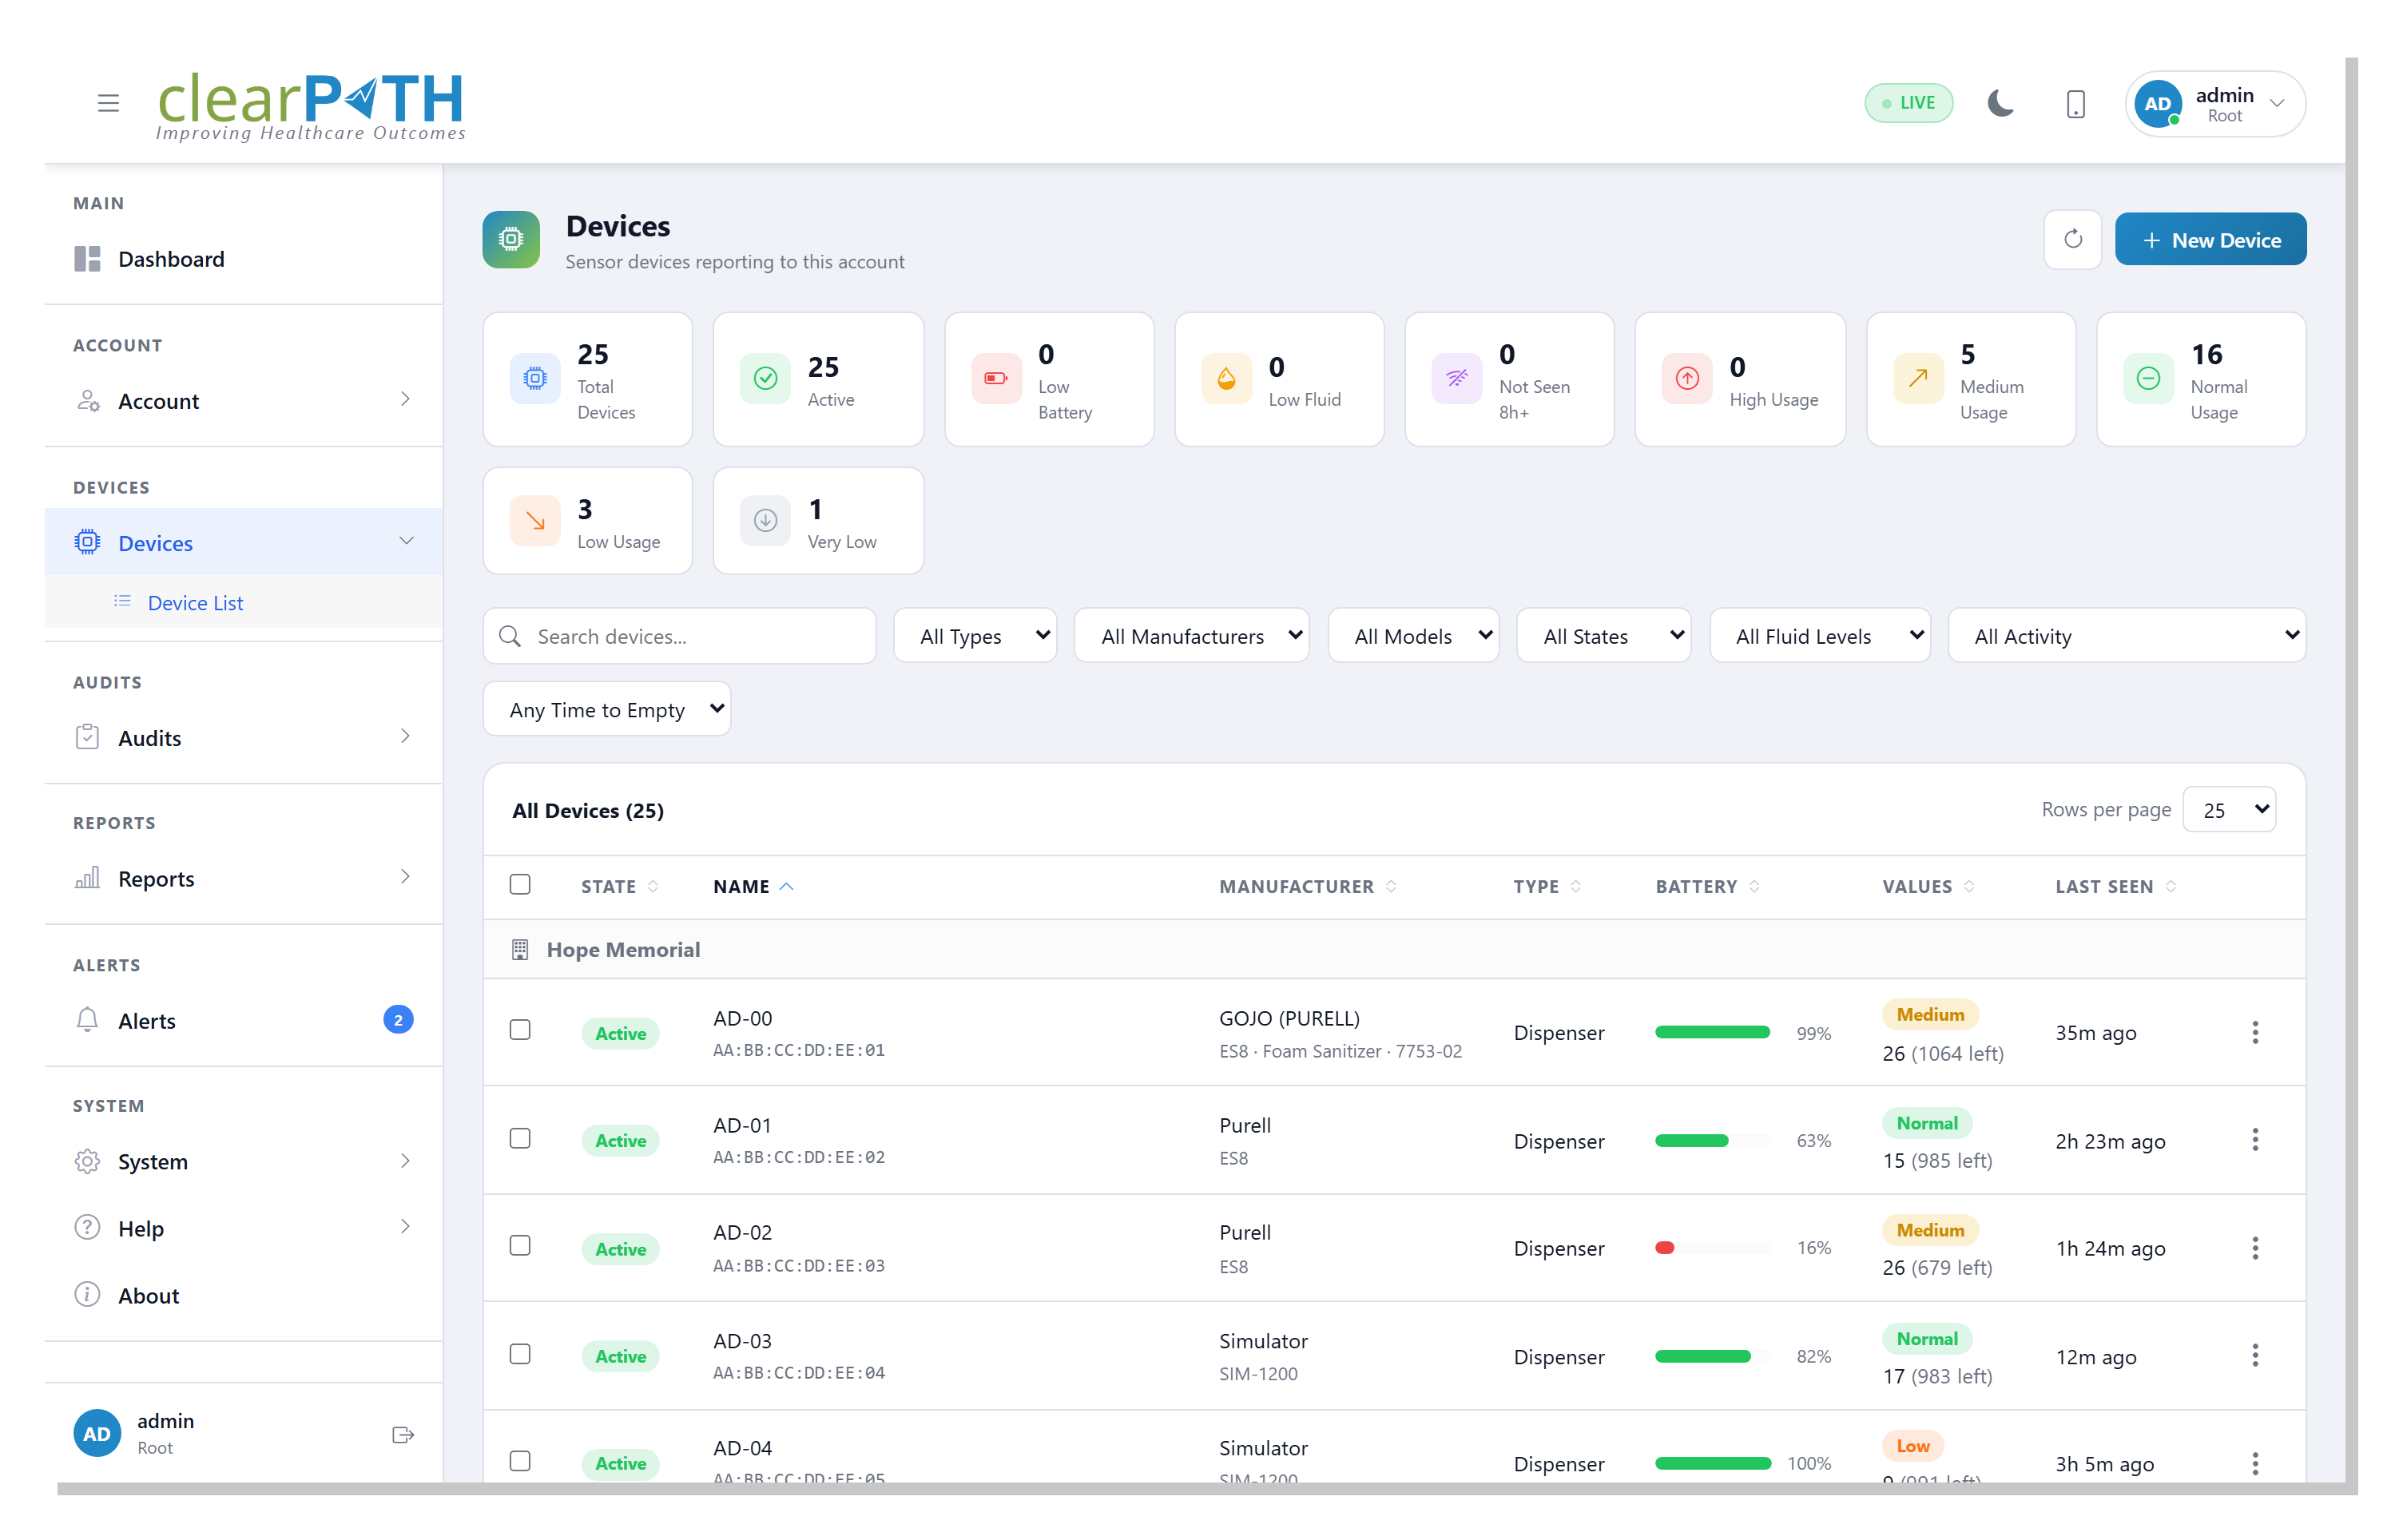
The list shows every device reporting to your account. If you manage more than one account, devices are grouped under a heading for each account.
11.1.1. Stat chips
The cards across the top summarise the health of your fleet at a glance:
Total Devices— the number of devices in the list.Active— devices currently switched on and reporting.Low Battery— devices whose battery has dropped to the low-battery warning level.Low Fluid— dispensers with little fluid left in the container.Not Seen 8h+— dispensers that have gone silent for more than eight hours, which usually means a flat battery or a connection problem.High Usage,Medium Usage,Normal Usage,Low UsageandVery Low— how many dispensers fall into each usage band, measured against the average use of all your active dispensers.
11.1.2. Filters
The toolbar narrows the list:
Search — match on name, manufacturer, model, or MAC address.
Type —
Dispenser,Tag,Desktop,Laptop,TabletorPhone.Manufacturer and Model — the model list shows only the models for the manufacturer you choose.
State —
Active,InactiveorDiscovered.Fluid Level —
Fluid Remaining,Low FluidorEmpty.Activity —
Used (last 24h)orNo usage 24h+ (check battery).Time to Empty — dispensers projected to run dry
Today,This WeekorThis Monthat their current rate of use.
Your filter choices and the rows-per-page setting are remembered the next time you open the page.
11.1.3. Columns
Each row shows:
State— anActive,InactiveorDiscoveredbadge.Name— the device name, with its MAC address beneath.Manufacturer— the vendor, with the model, fluid type, and refill part number beneath (drawn from the Dispenser Catalog).Type— the kind of device.Battery— a coloured battery bar with the percentage, markedLOWwhen it is running flat.Values— the total press count, how many presses of fluid remain, and a usage band pill comparing this dispenser to the fleet average.Last Seen— how long ago the device last reported. Hover to see the exact date and time.
Click any column heading to sort by it; click again to reverse the order.
11.1.4. Row actions
The three-dot menu at the end of each row offers:
Edit— open the device editor. Available for every device.Show Usage— open the usage screen for the dispenser. Shown for dispensers only.Refilled— mark the dispenser as refilled. This resets its fluid level to full and records a refill event. Shown for dispensers only.Force Empty (test)— drain the container to empty so you can check that your low-fluid and empty alerts fire. Shown for dispensers only.Force Low Battery (test)— drop the battery to about one percent to test the low-battery warning. Shown for dispensers only.Set Battery to Full (test)— set the battery back to one hundred percent, as if its batteries had been changed. Shown for dispensers only.
The three (test) actions are simulation aids for confirming that your
alerts work. They do not change the physical device.
11.1.5. Selecting rows
Tick the box at the start of one or more rows to reveal the bulk action
bar. From there you can Mark Refilled (dispensers only), Set
Active, or Set Inactive for every selected device at once. Clear
empties the selection. The box in the header ticks or unticks every device
on the current page.
11.1.6. Adding a device
A device must be enrolled before clearPath will accept its readings.
Readings from an unknown device are rejected. Click New Device in the
page header to open the enrolment dialog.
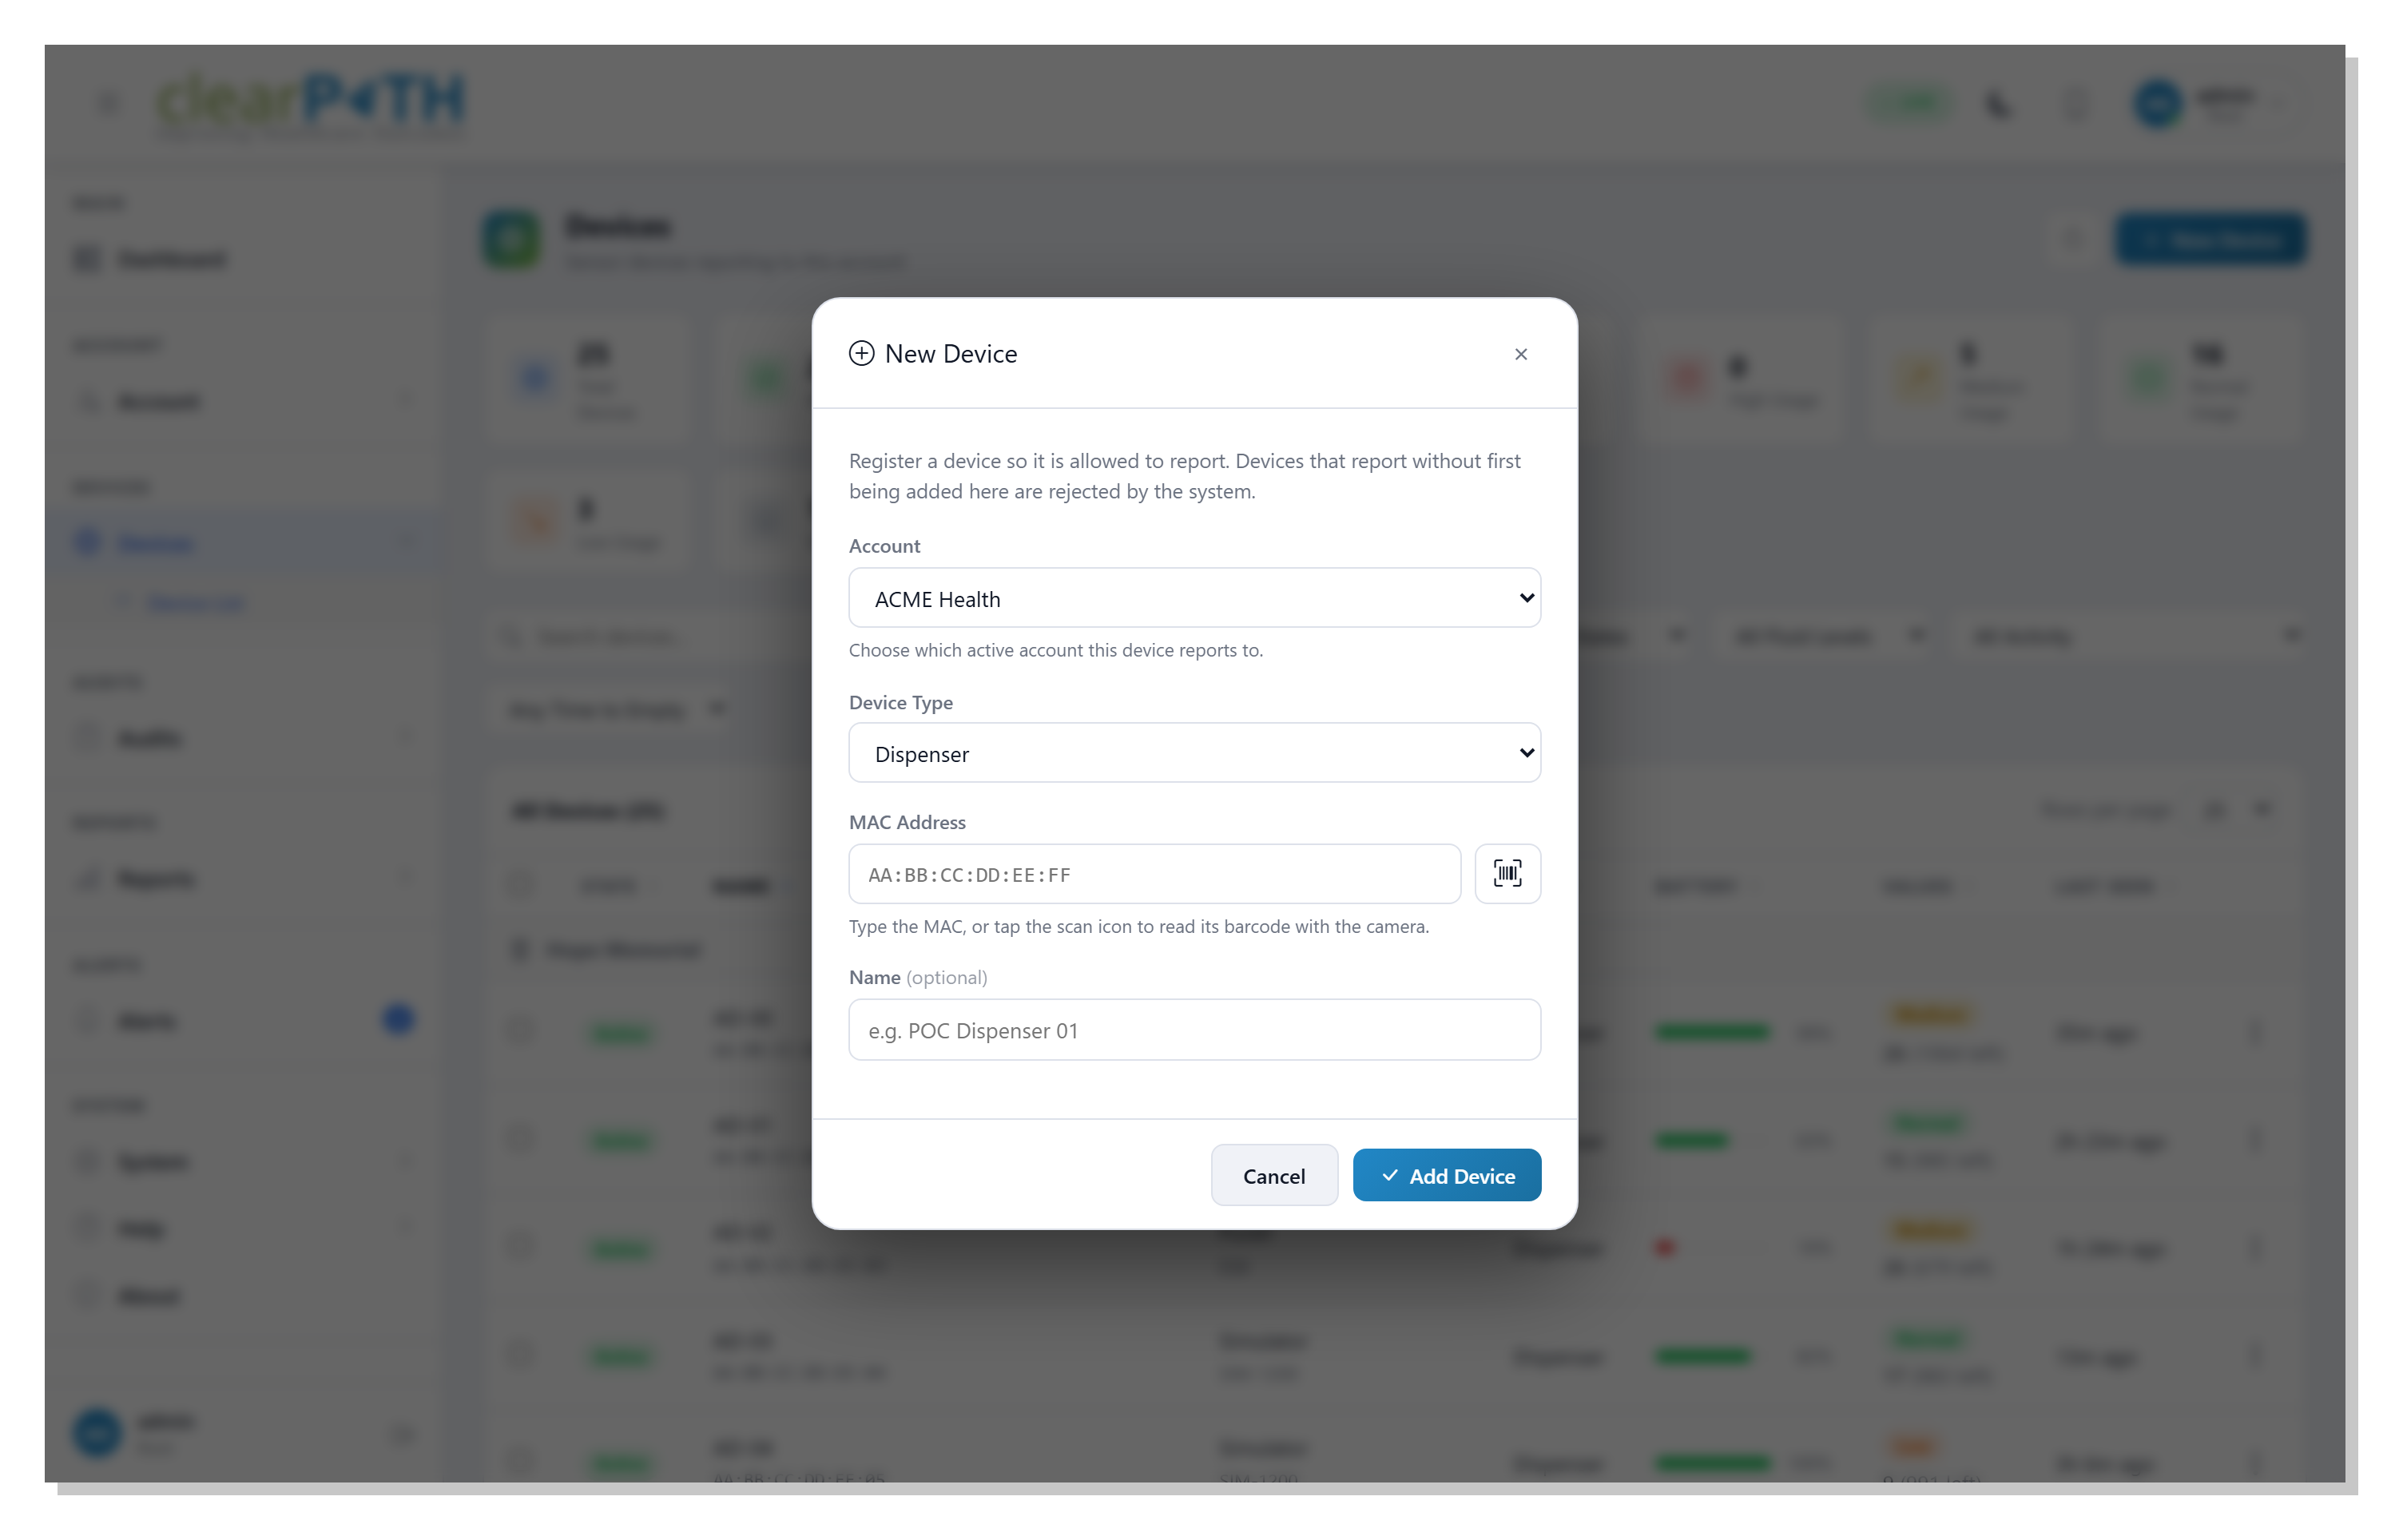
Account— the account the device reports to. If you manage a single account, this is filled in for you.Device Type—Dispenser,Tag, or another hardware type.MAC Address— type the address, or tap the scan icon to read the barcode on the device with your camera.Name— an optional friendly label, for examplePOC Dispenser 01.
Click Add Device to save. The device then appears in the list, ready
to report.
11.2. Device Usage
Choose Show Usage from a dispenser’s row menu to open its usage
screen. It shows how the dispenser has been used over time and predicts
when it will need attention.
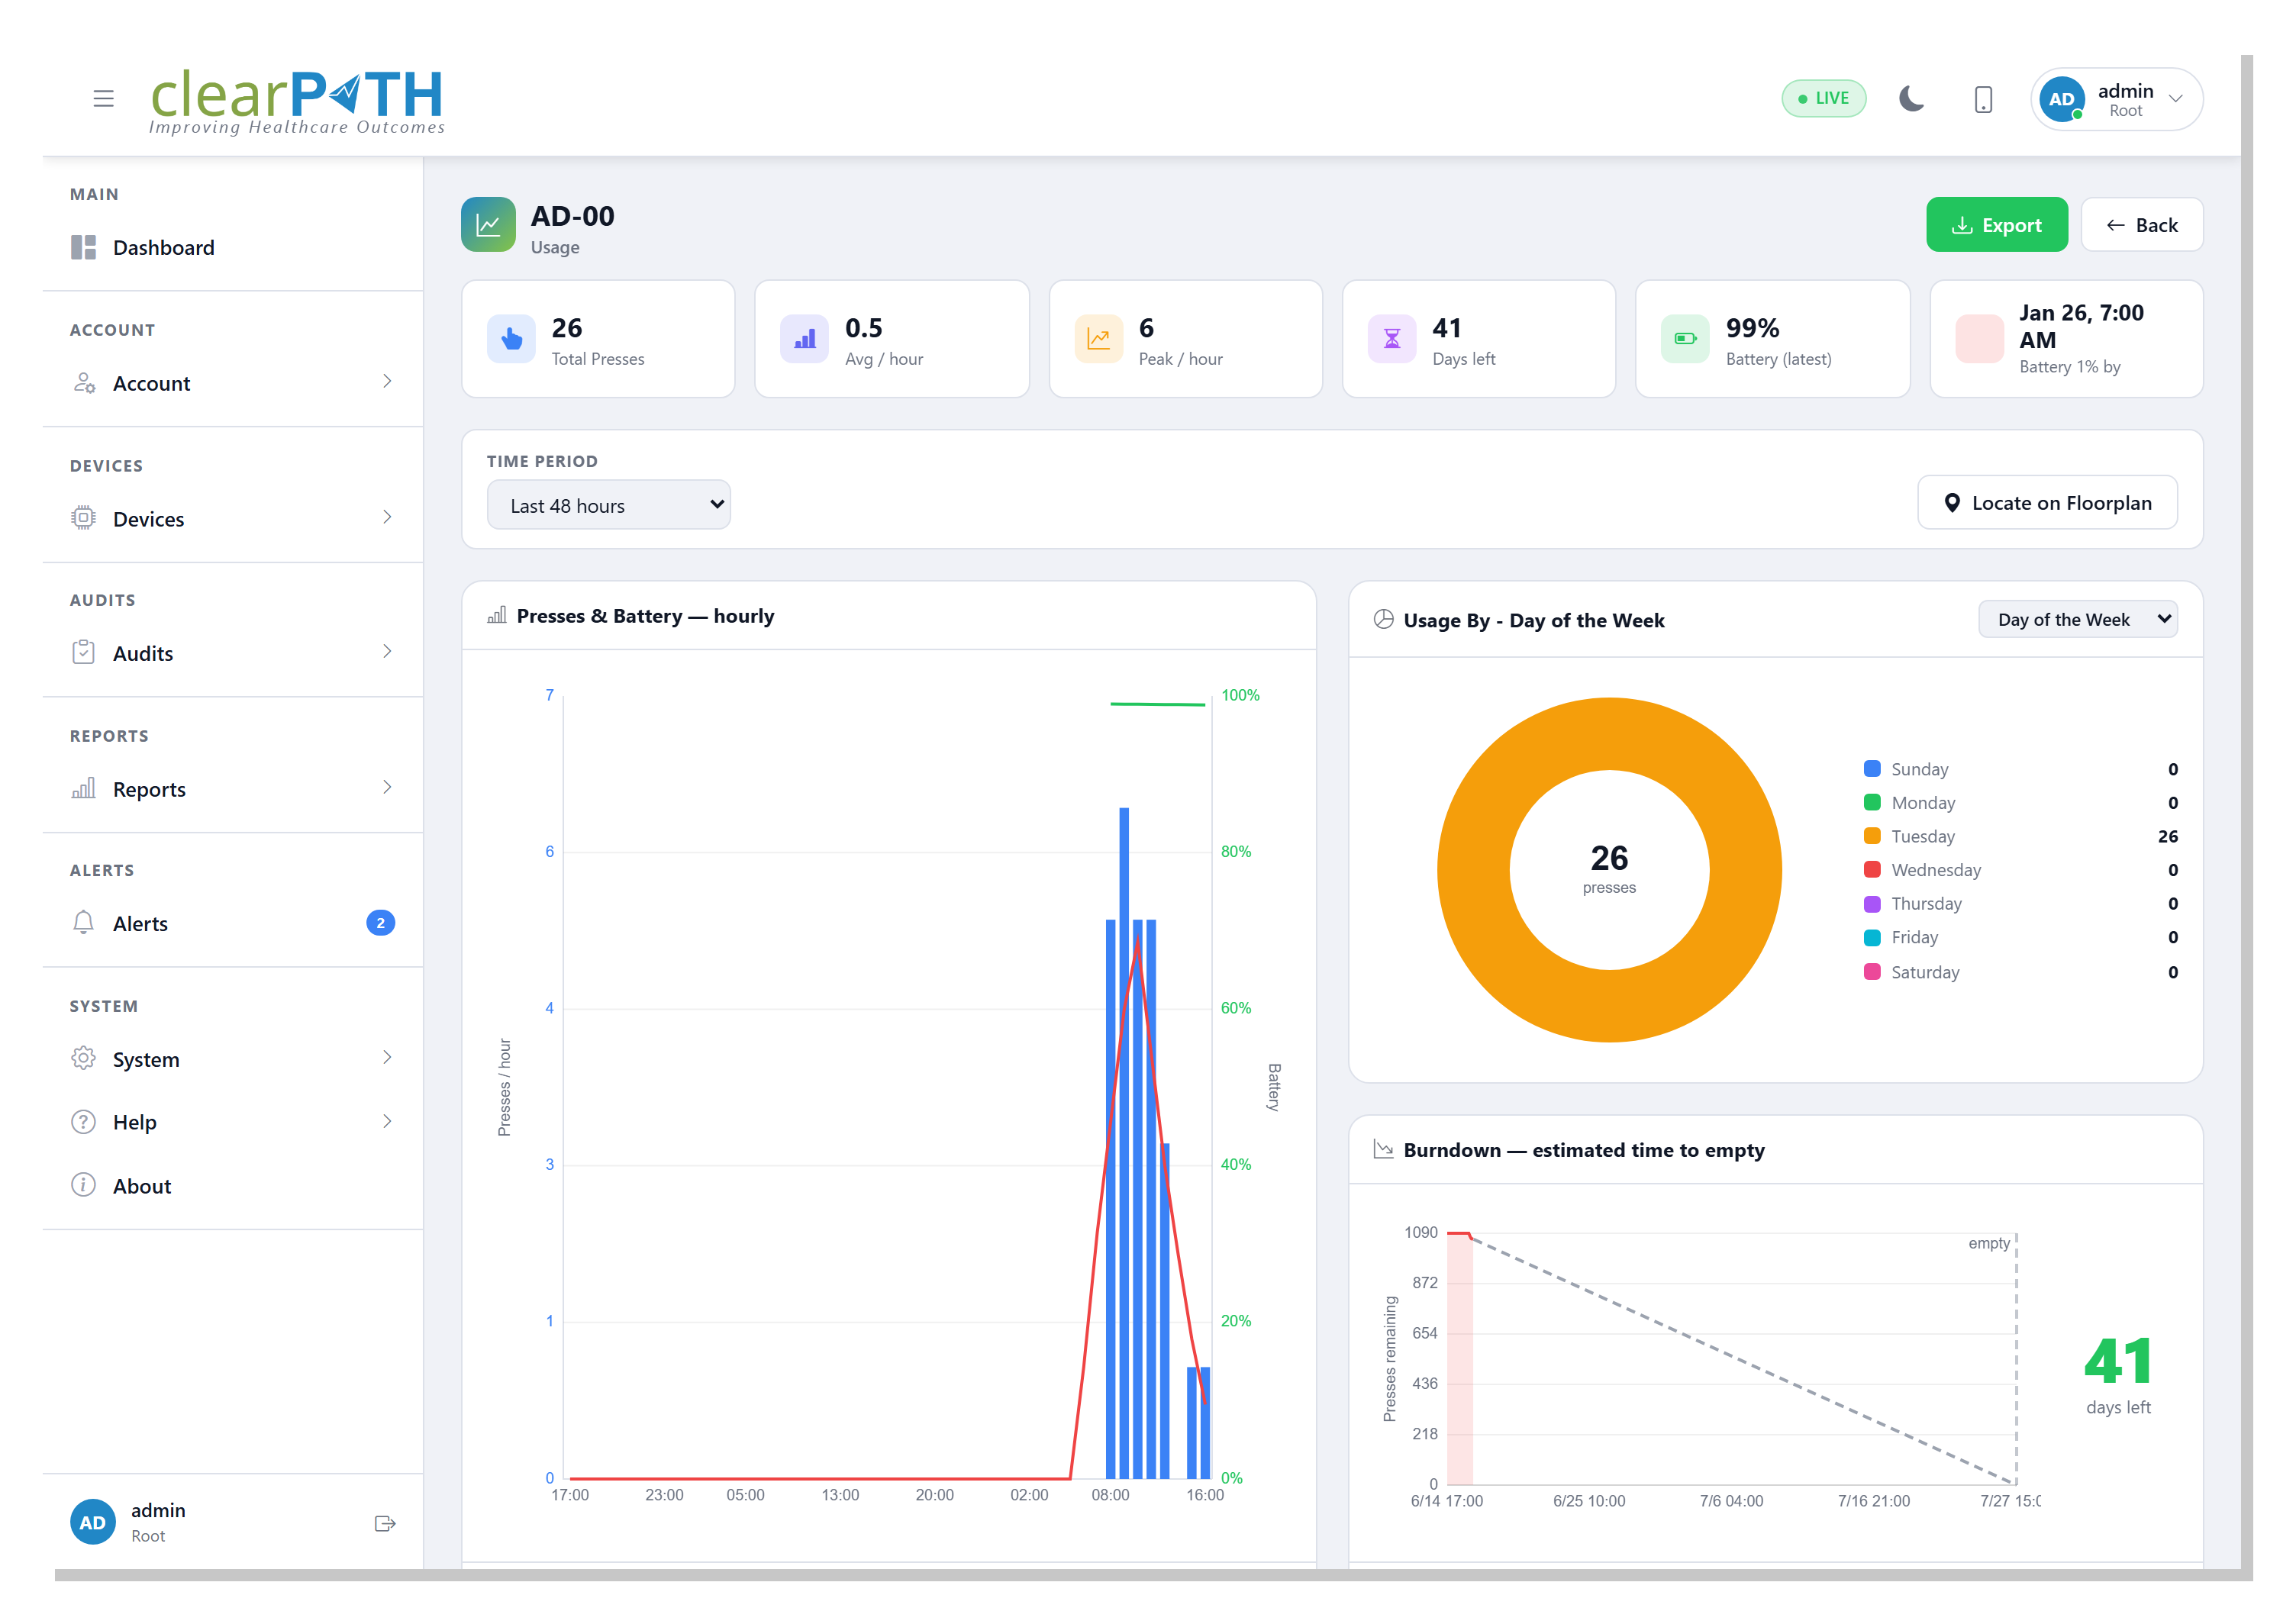
The cards along the top report the Total Presses, the average and peak
presses per hour, the projected Days left of fluid, the latest
Battery reading, and the date the battery is expected to reach one
percent.
Use the Time Period selector to look back over the last 24 hours, 48
hours, 7 days, or 30 days. Locate on Floorplan jumps to the dispenser’s
position on its floor plan when it has been placed on one.
Three charts make up the screen:
Presses & Battery (hourly) — presses per hour as bars, with the average presses and the battery percentage drawn as lines.
Usage By — a breakdown of presses by day of the week, day of the month, month, weekdays, weekends, or time of day.
Burndown — the remaining fluid drawn down to a projected empty date, with the number of days left called out beside it.
Use Export to download the usage view.
11.3. Device Editor
Choose Edit from a device’s row menu to open the editor. It opens as a
dialog with three tabs.
11.3.1. Settings
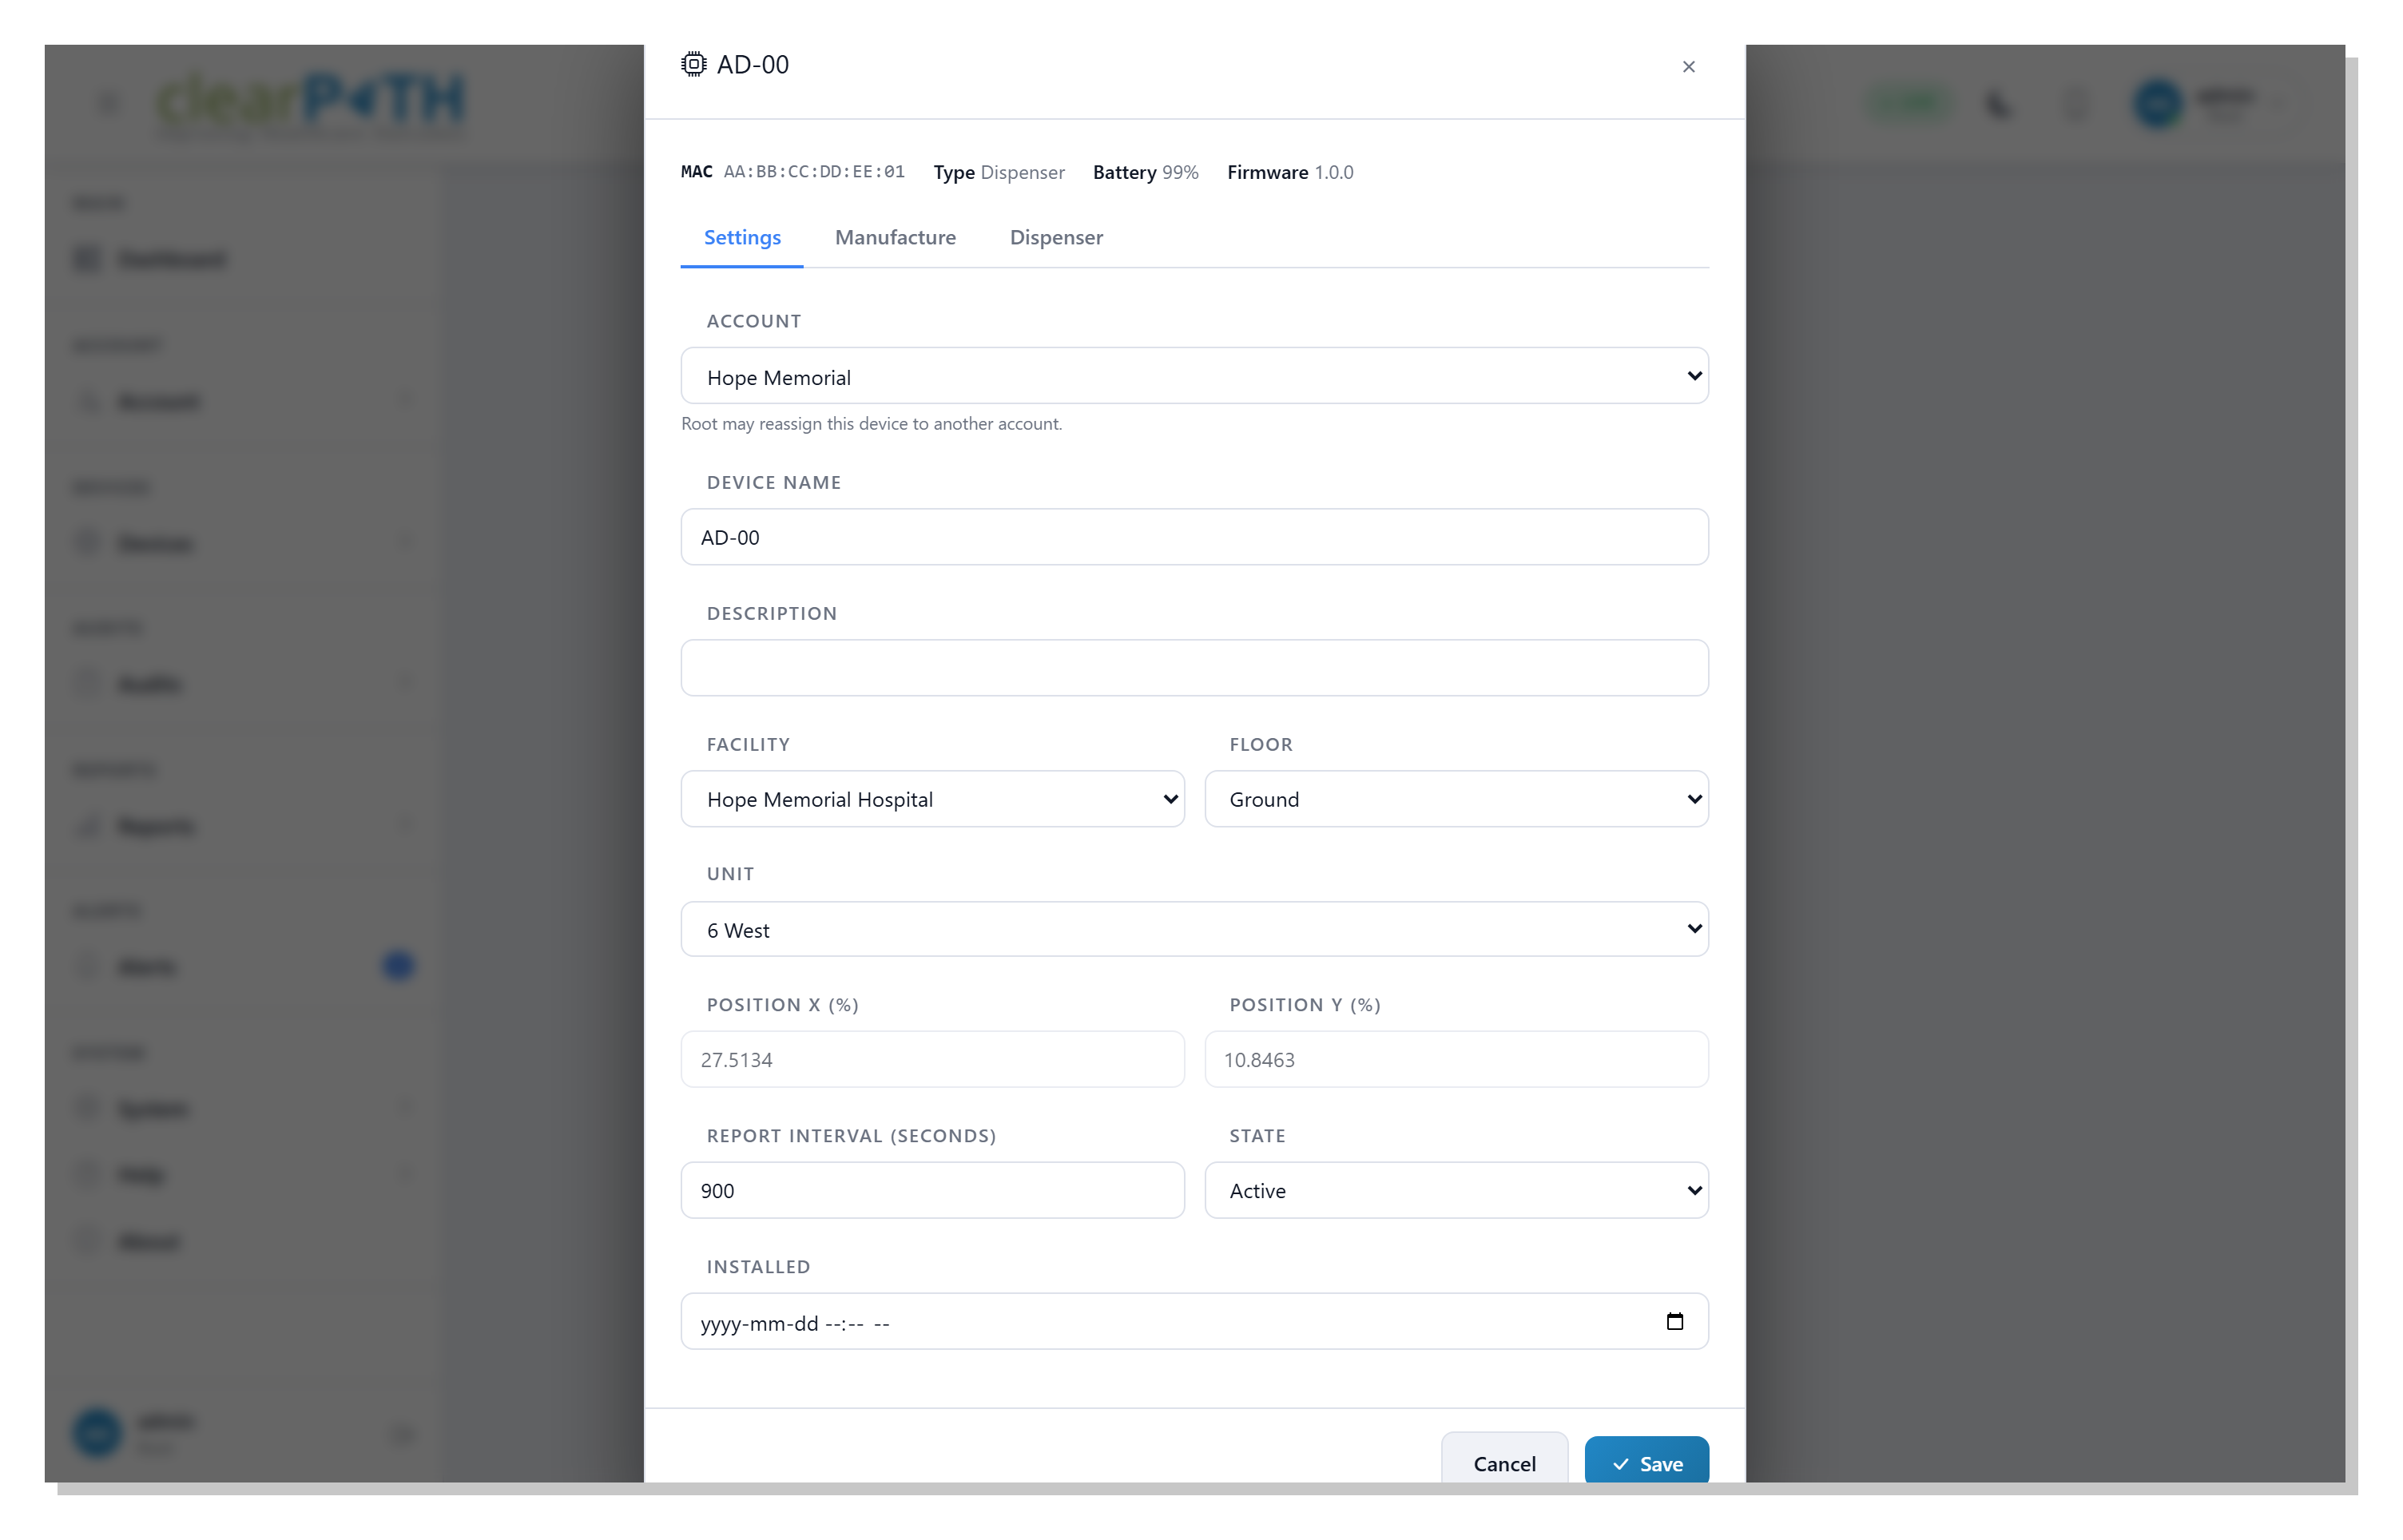
Account— the account the device belongs to.Device NameandDescription— labels for the device.Facility,FloorandUnit— where the device is installed. Choosing a facility narrows the floor and unit lists to that facility.Position XandPosition Y— the device’s location on the floor plan, shown as read-only percentages.Report Interval— how often, in seconds, the device reports in.State—Discovered,InactiveorActive.
11.3.2. Manufacture
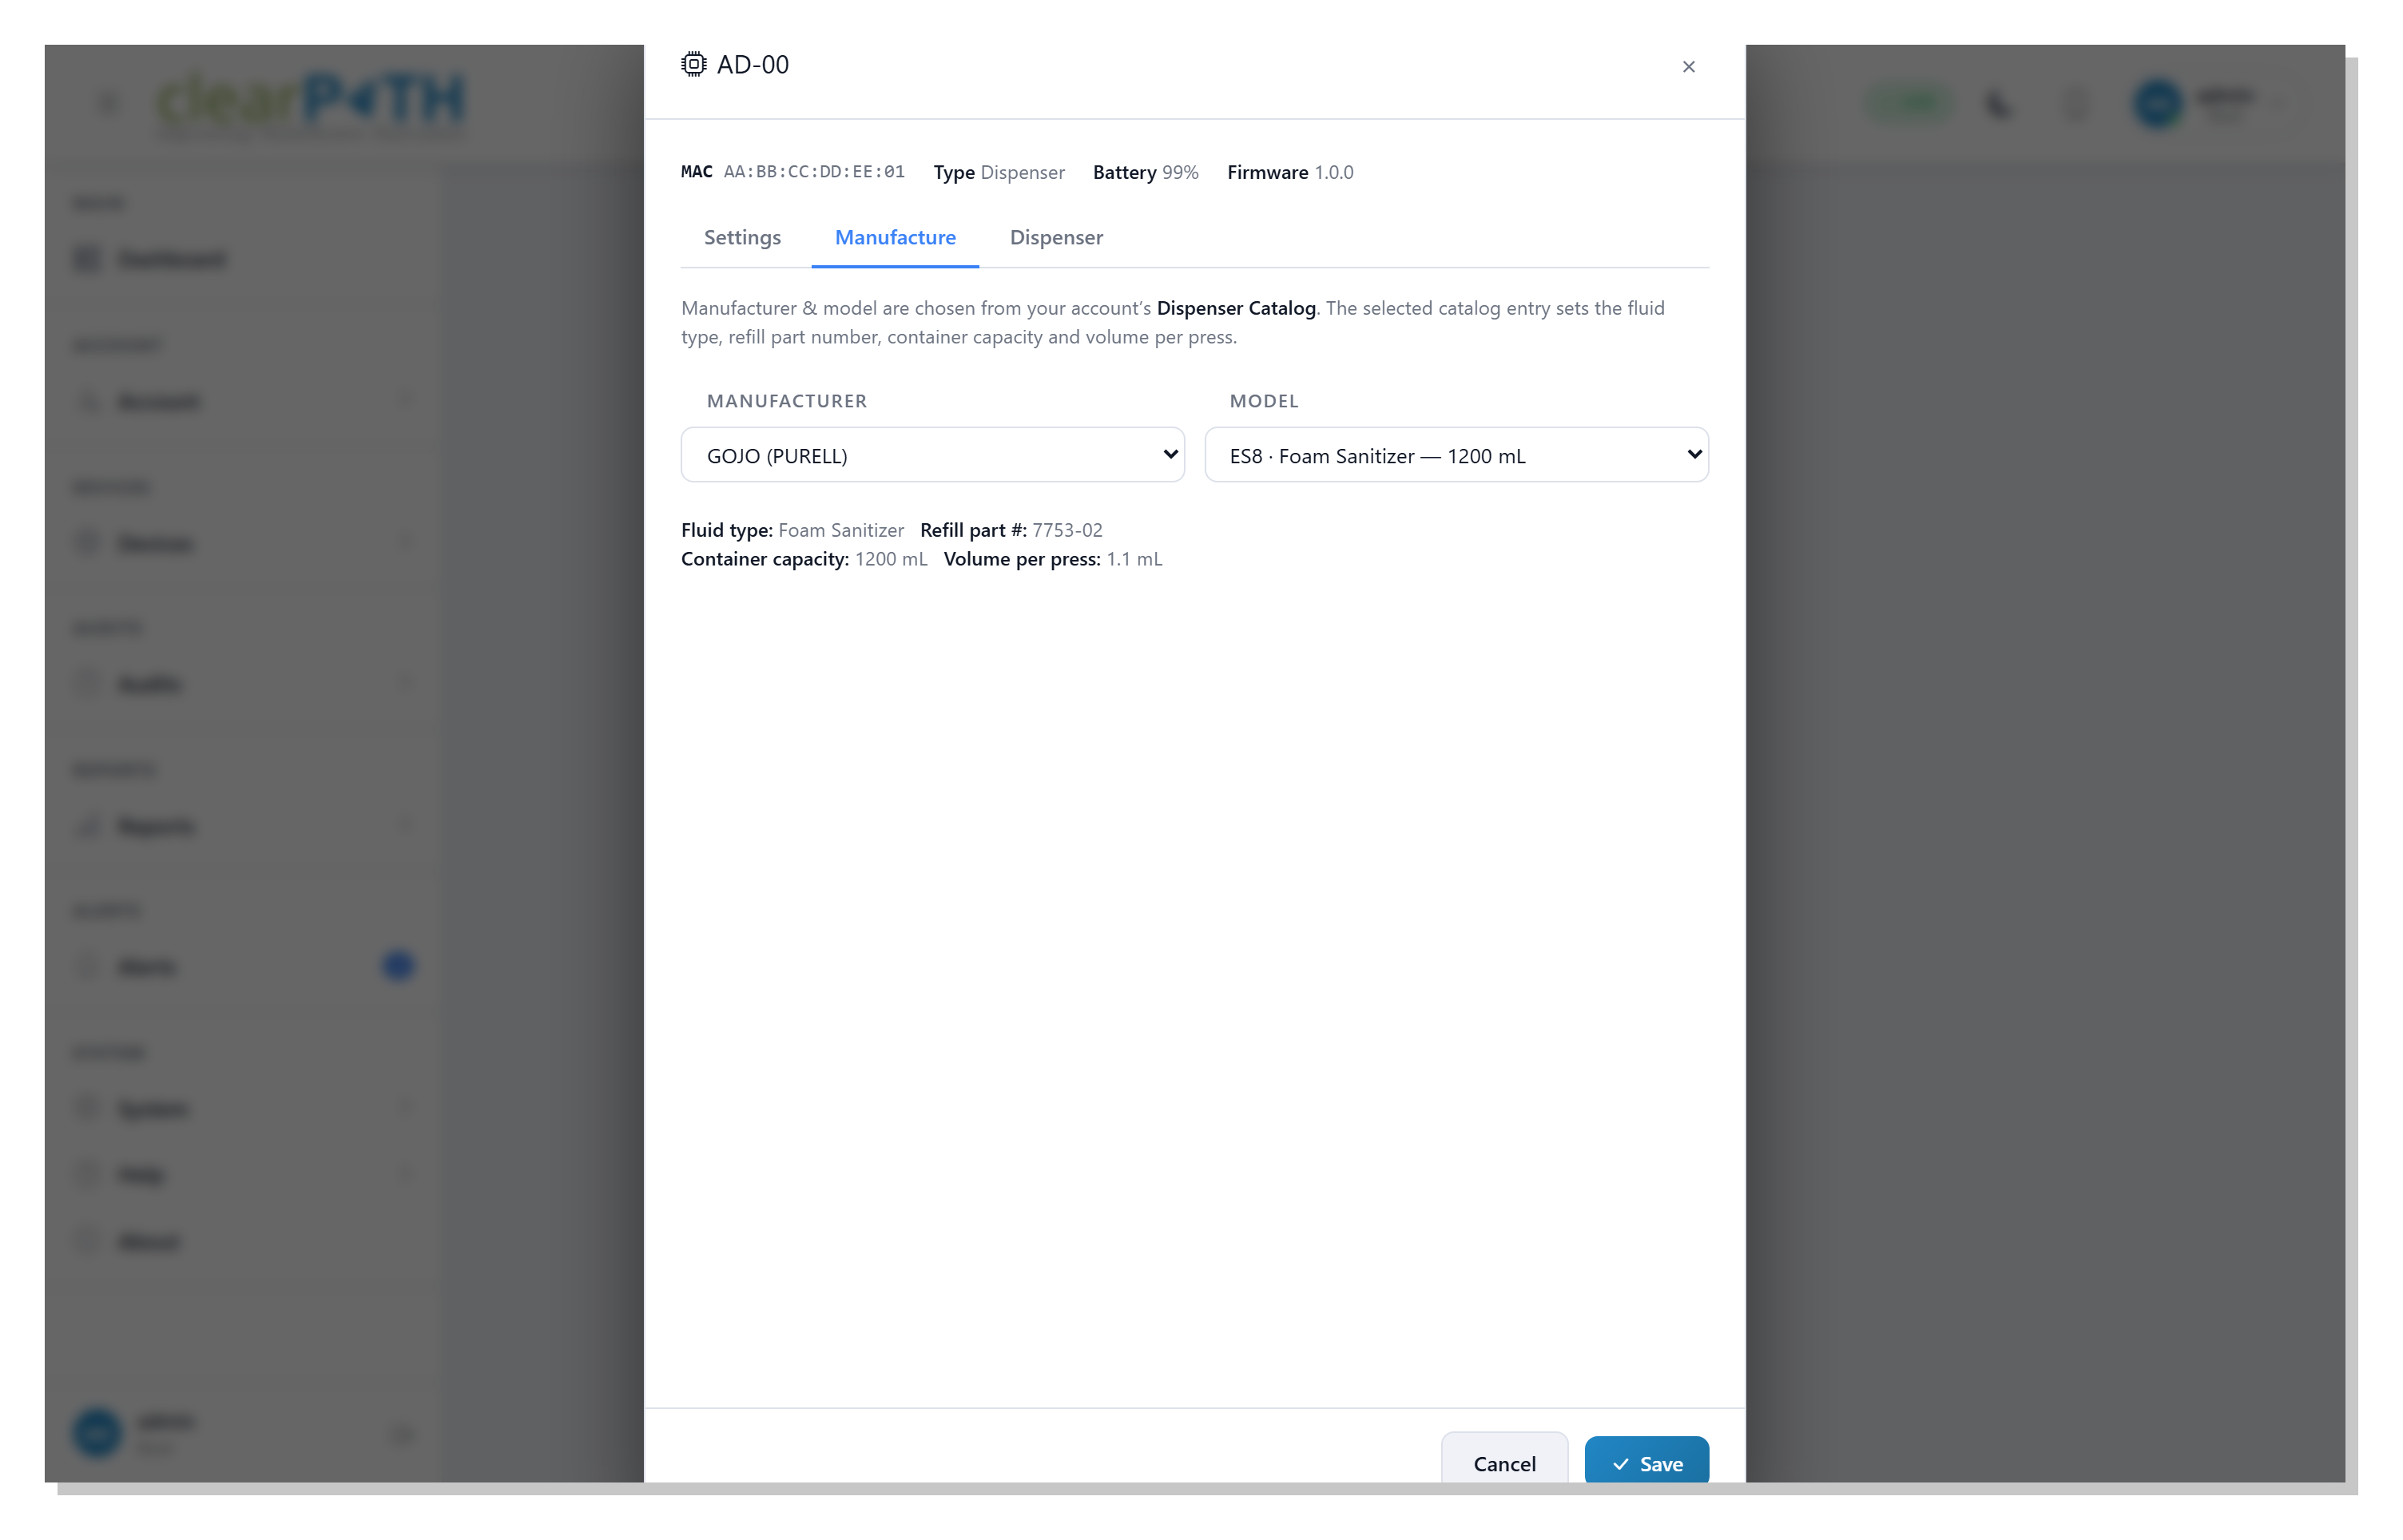
Pick the Manufacturer and Model from your Dispenser Catalog. The chosen catalog entry sets the fluid type, refill
part number, container capacity, and the volume of fluid per press, which
are shown for reference. These values drive the fluid-level and
time-to-empty calculations.
11.3.3. Dispenser
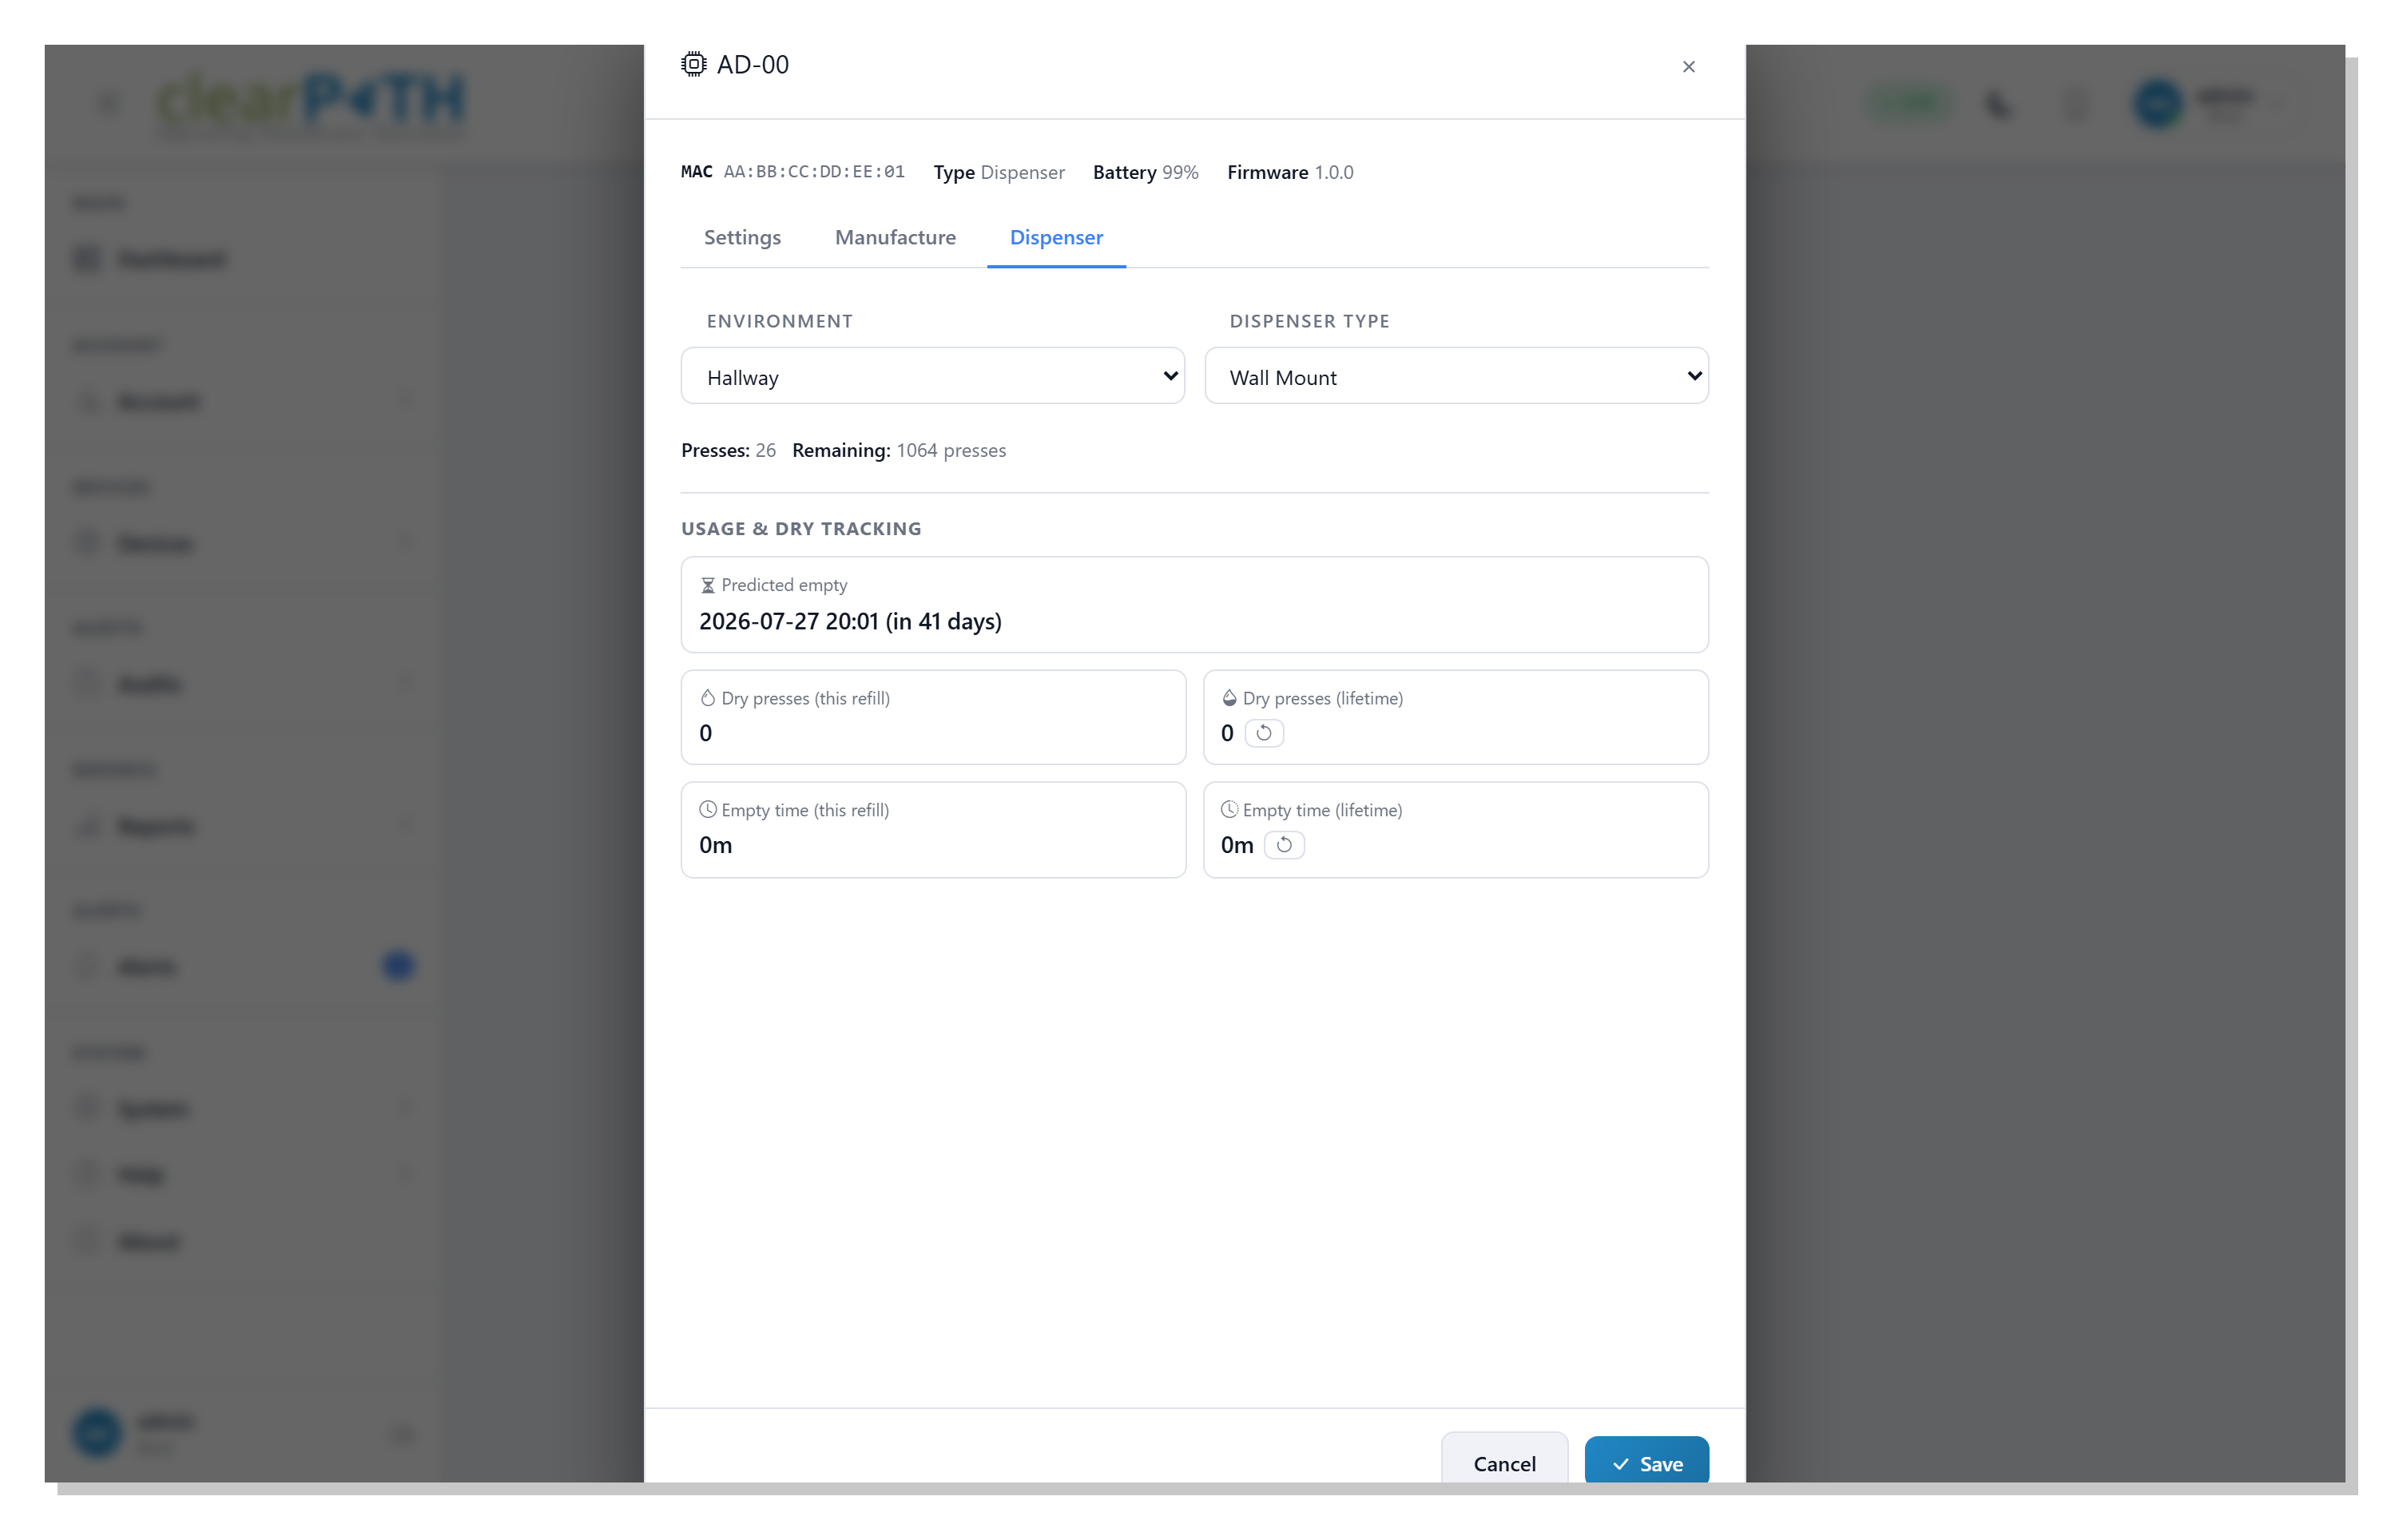
For a dispenser, set where it is mounted and track how it is wearing:
Environment—Hallway,Patient Environment,Cafeteria,OfficeorNursing Station.Dispenser Type—Point of CareorWall Mount.
The Usage & Dry Tracking panel shows the predicted empty date and
counts the dry presses — presses made while the container was already
empty — both since the last refill and over the dispenser’s lifetime,
together with how long the dispenser has spent empty. Use the reset button
beside a lifetime figure to start its count again, for example after
servicing the unit.
Click Save to apply your changes.
11.4. Dispenser Catalog
The Dispenser Catalog is your account’s reference list of dispenser manufacturers and models. Each entry records the fluid type, refill part number, container capacity, and volume per press for a model. A dispenser points at a catalog entry instead of carrying those specifications itself, so a correction made once in the catalog flows through to every dispenser that uses it.
To open the catalog, go to Account | Advanced | Dispenser Catalog.
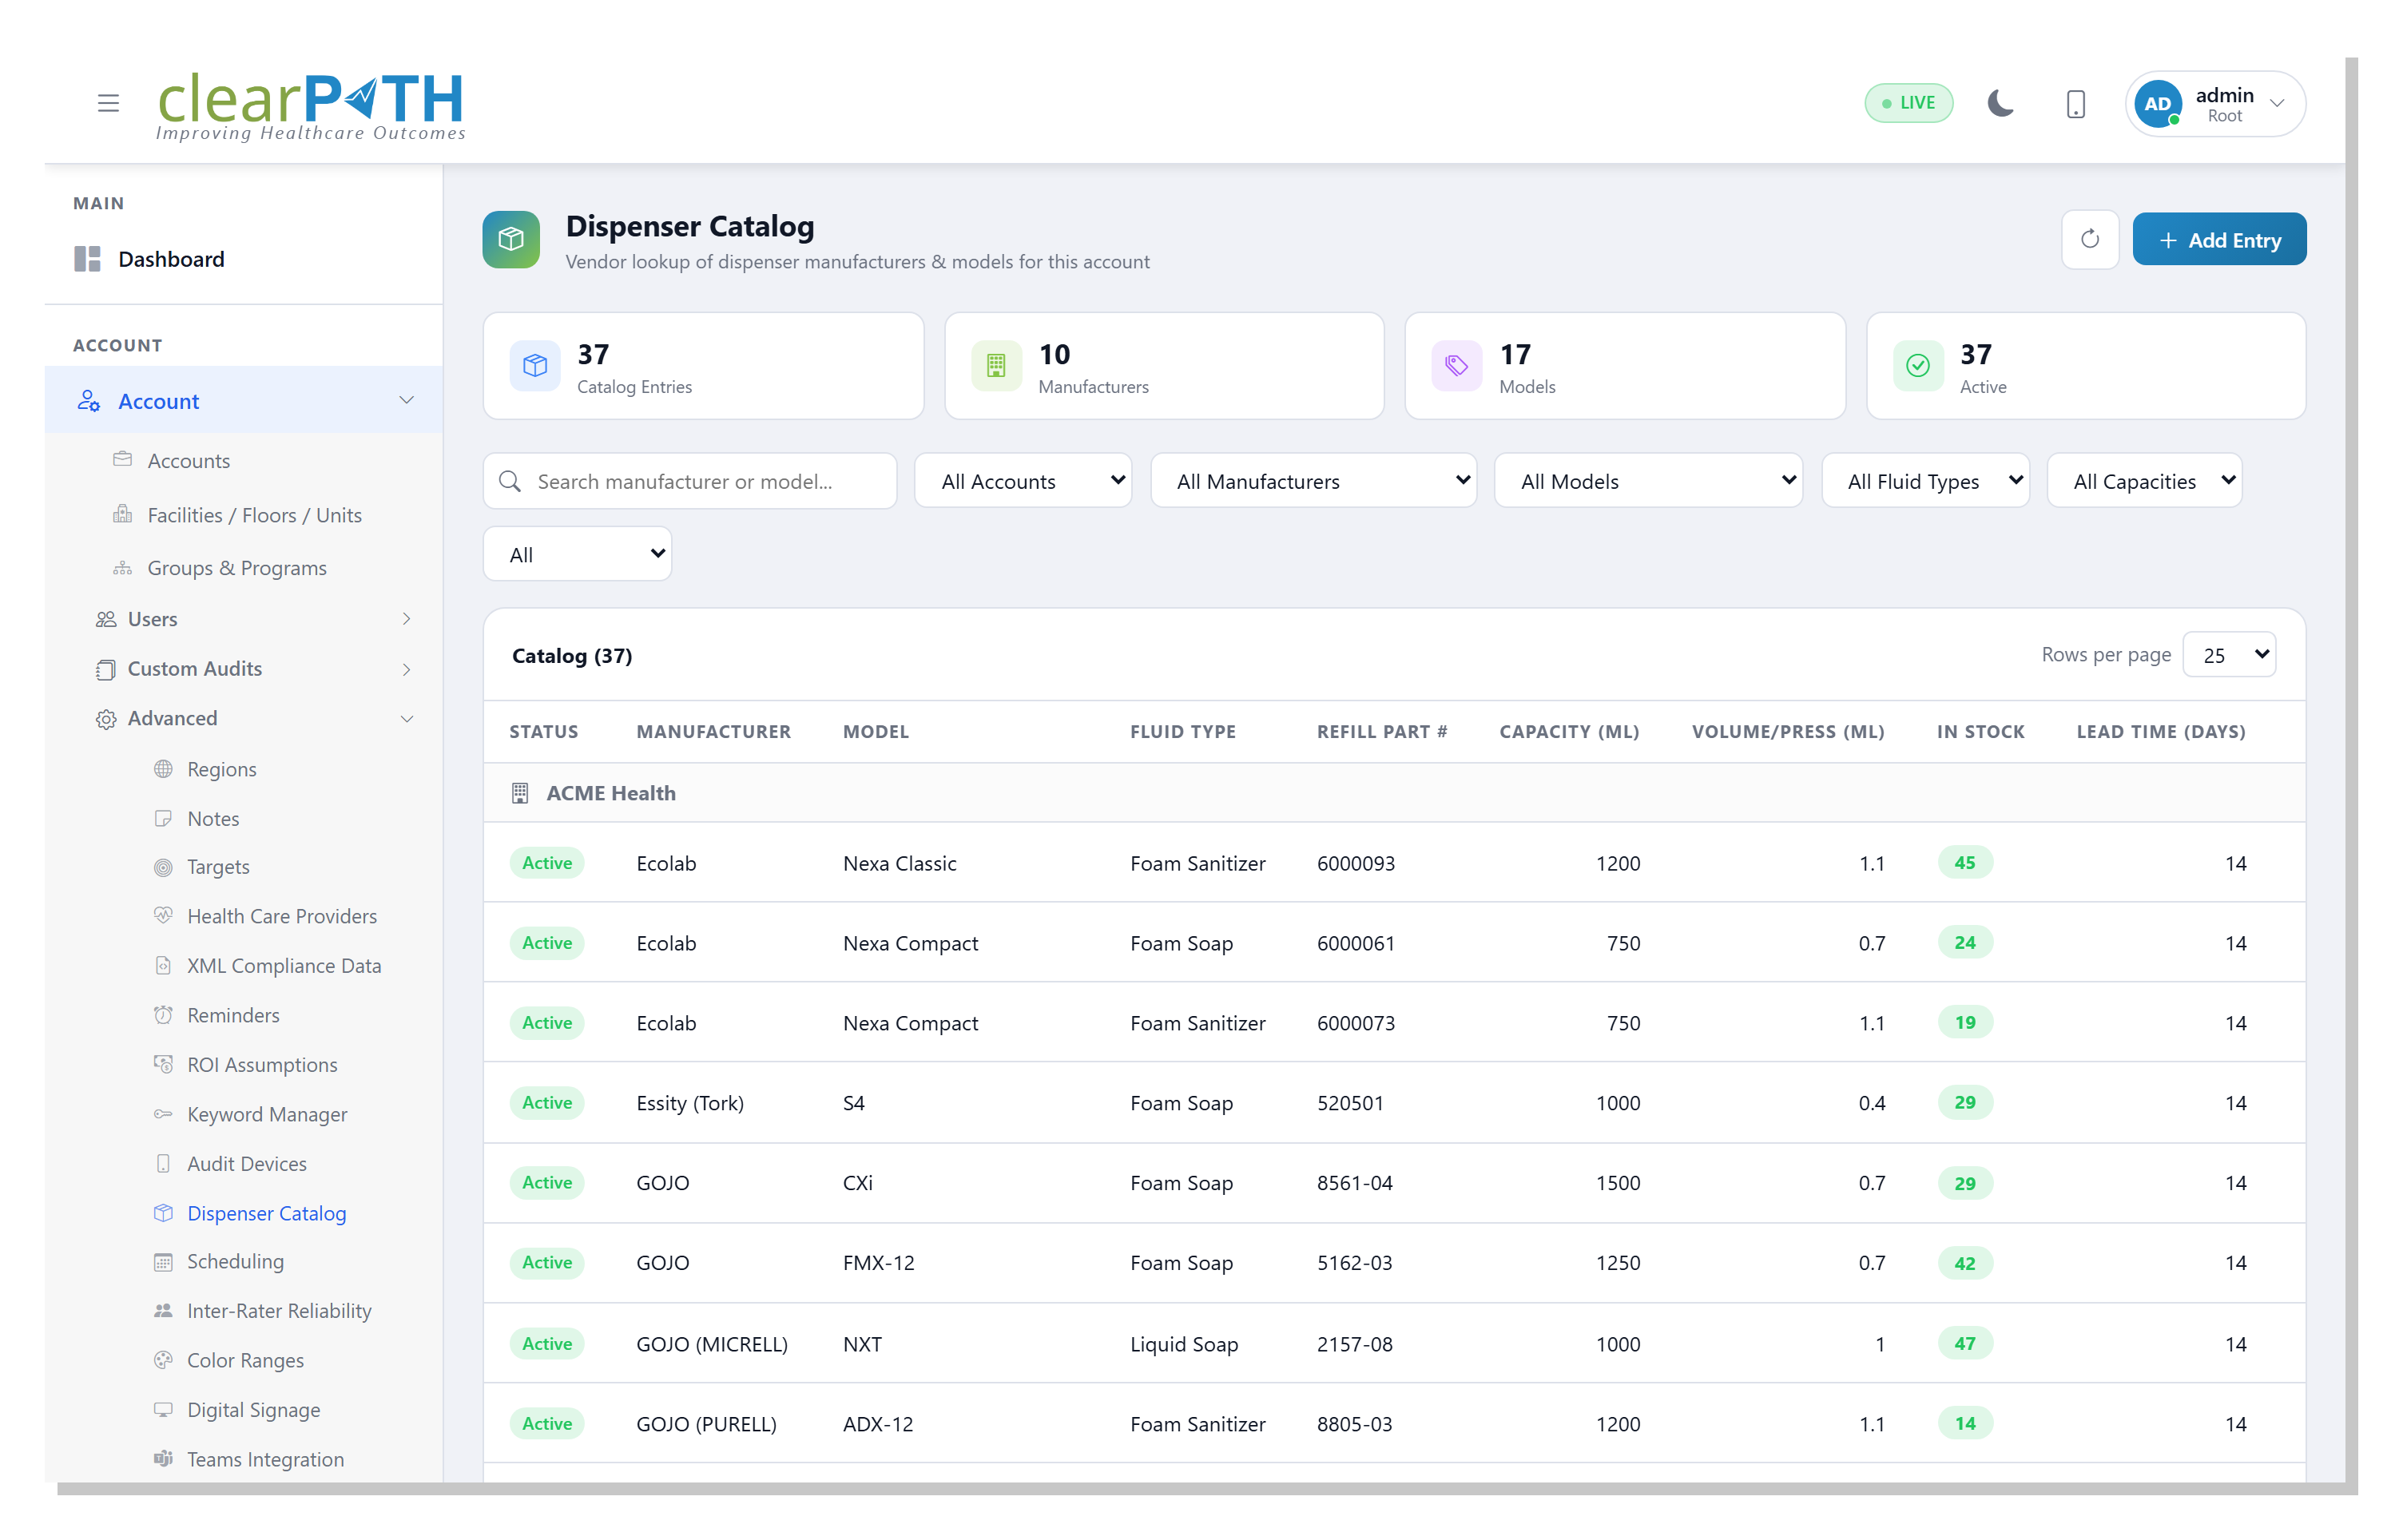
11.4.1. Stat chips
The cards at the top show the number of Catalog Entries, distinct
Manufacturers, distinct Models, and how many entries are
Active.
11.4.2. Filters
Search by manufacturer, model, fluid type, or refill part number, and
filter by Manufacturer, Model, Fluid Type, Capacity, or
Status.
11.4.3. Columns
Each row lists the Status, Manufacturer, Model, Fluid
Type, Refill Part #, Capacity (mL), Volume/Press (mL), the
number of refills In Stock, and the supplier Lead Time (days).
The In Stock figure is colour-coded against demand: red when there are
too few refills on hand to cover the supplier lead time, amber when stock
covers the lead time but is below a full month’s supply, and green when
there is a month or more of stock (or no active use). Hover over it for the
detail behind the colour.
11.4.4. Row actions
The three-dot menu on each row offers Edit to change the entry and
Delete to remove it. Deleting an entry leaves any dispensers that used
it without a catalog reference; their fluid calculations fall back to
default values until you reassign them.
11.4.5. Adding or editing an entry
Click Add Entry in the page header, or Edit on a row, to open the
editor.
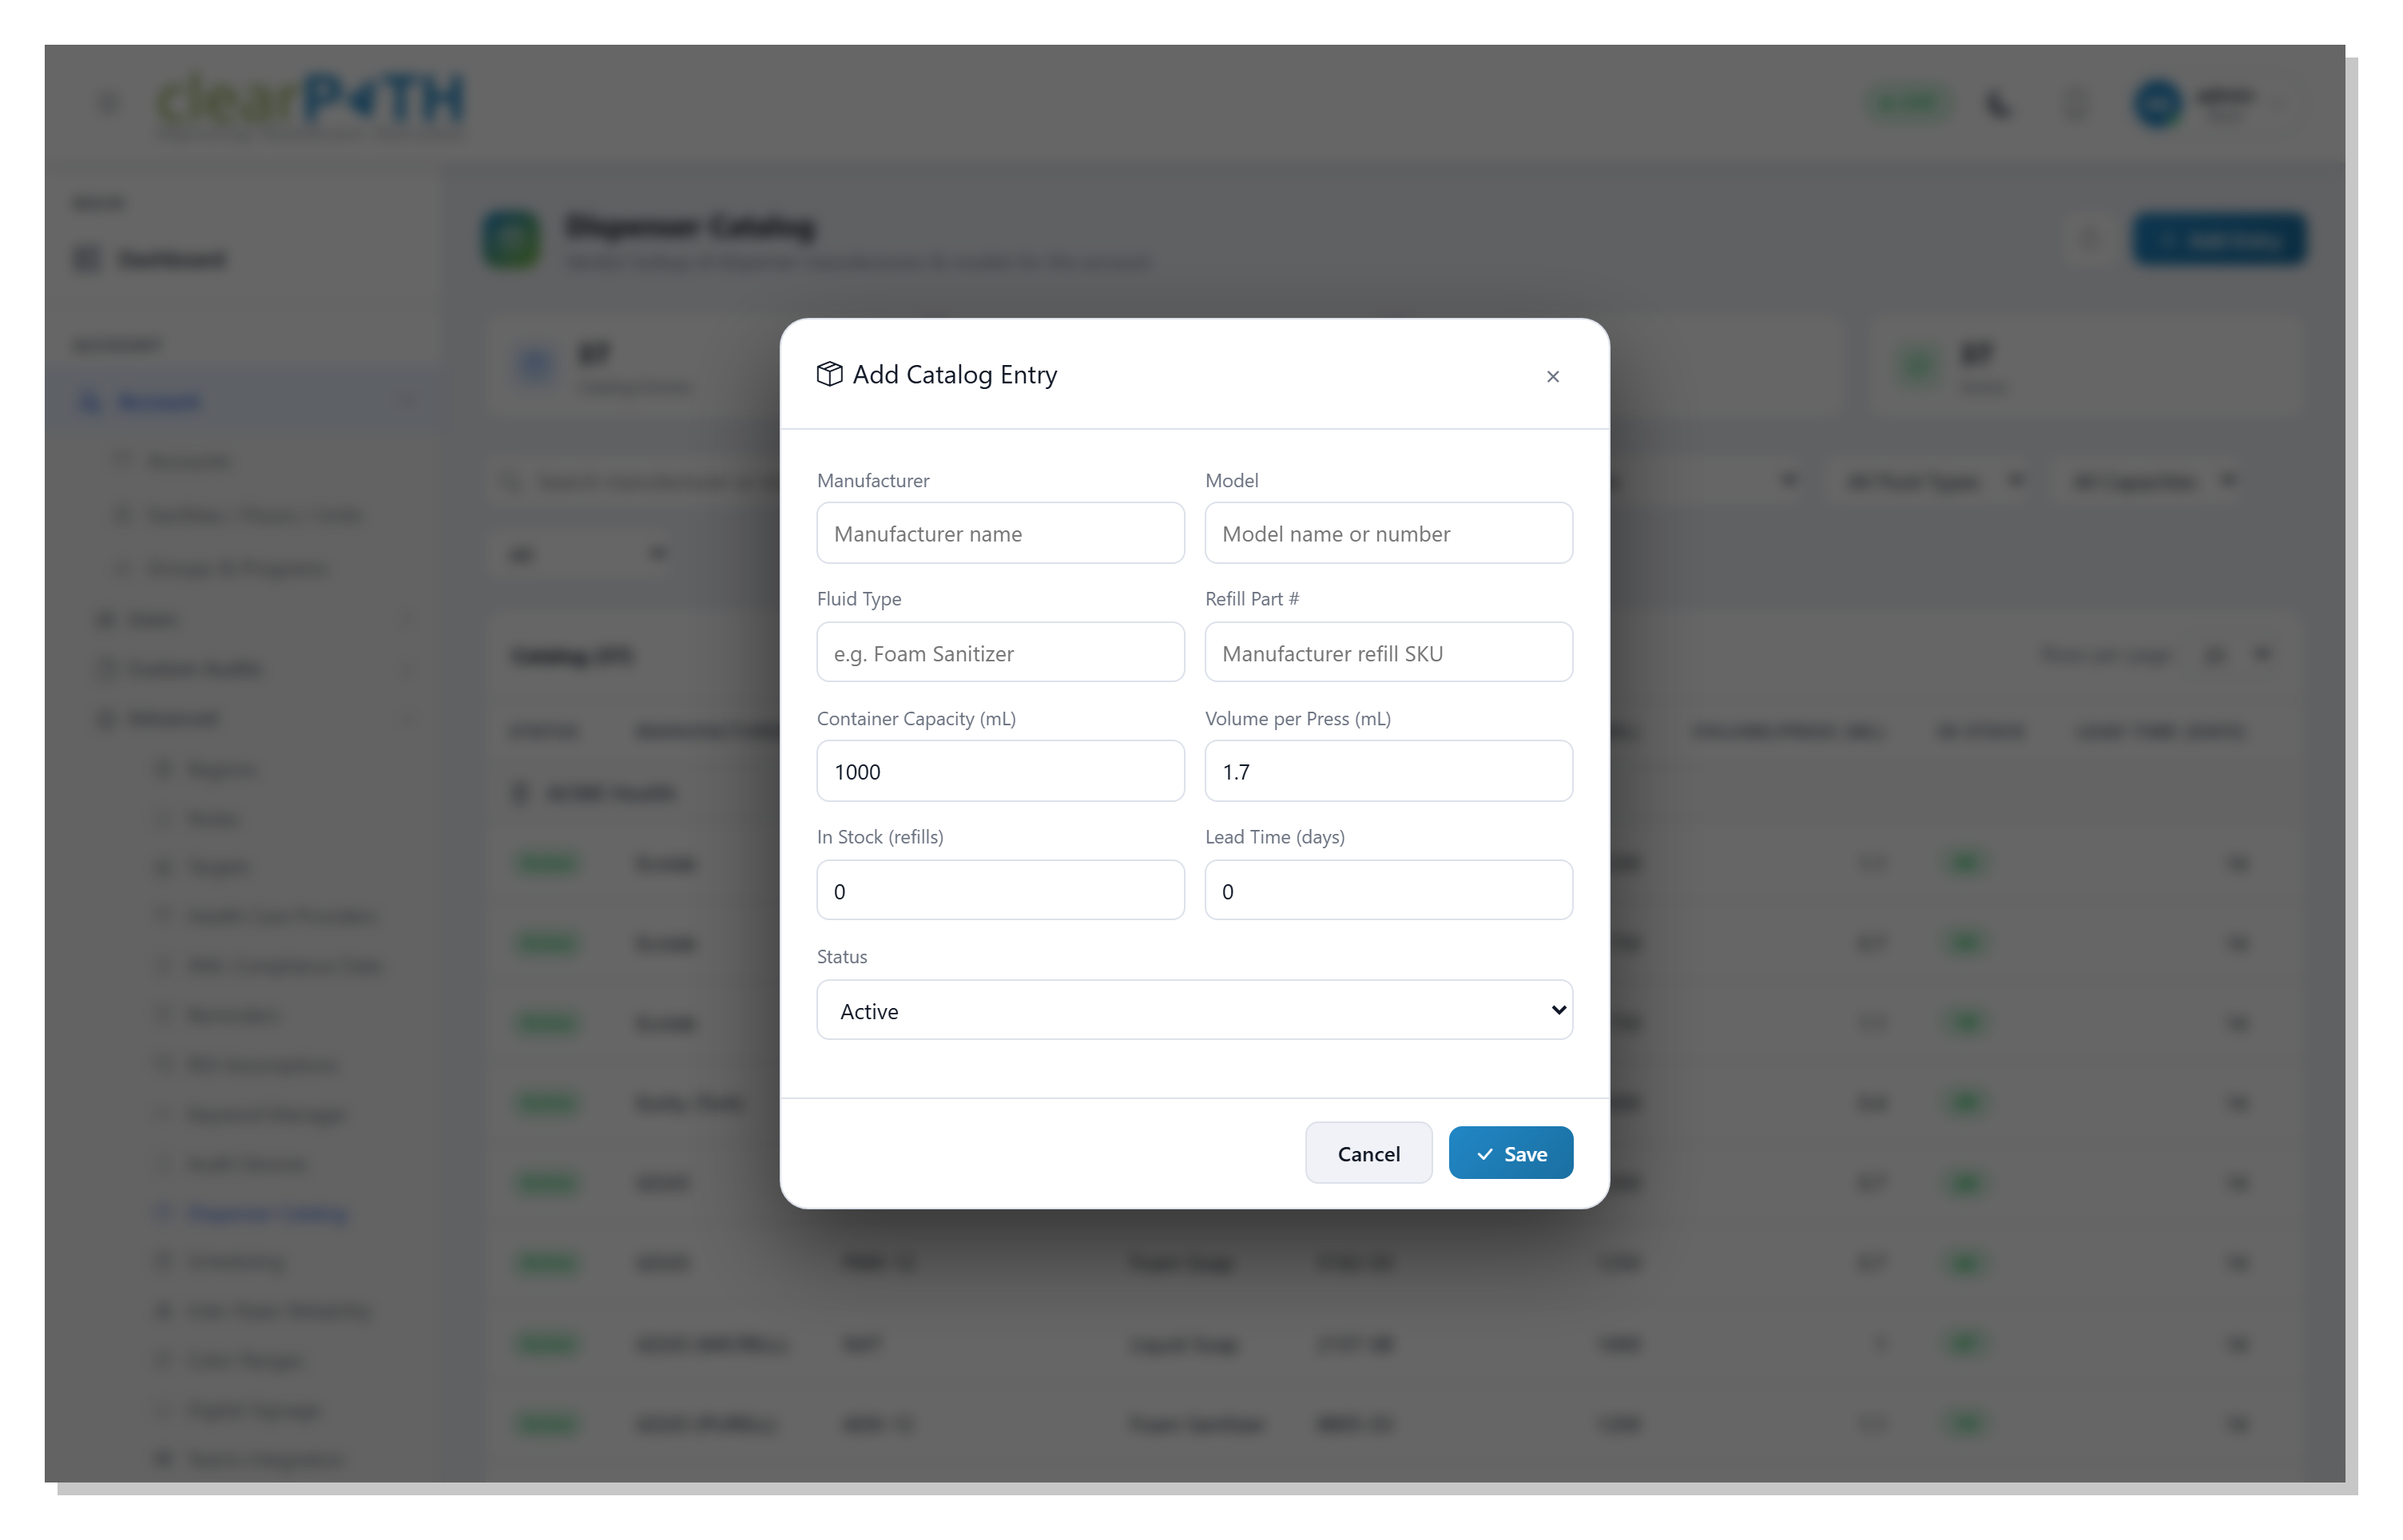
ManufacturerandModel— the vendor and model name or number.Fluid Type— for exampleFoam SanitizerorLiquid Soap.Refill Part #— the manufacturer’s refill part number, handy for reordering.Container Capacity (mL)— how much fluid a full container holds.Volume per Press (mL)— the fluid released by one press. Together with the capacity, this is what lets clearPath estimate the fluid remaining and the days to empty.In Stock (refills)— how many spare refills you hold for this model.Lead Time (days)— how long a reorder takes to arrive, used to flag when stock is running short.Status—ActiveorInactive.
Click Save to store the entry.