22. Authentication
clearPath controls access through three layers:
Users — the individual accounts that log in.
Roles — the permission sets that say what a user can do.
Auditor Groups — optional groupings that let you report on observations by the team of auditors that recorded them.
Plus a security add-on that applies across all three:
Two-Factor Authentication — a second sign-in challenge for users you want to protect more strongly.
22.1. Password Requirements
Every user account is protected by a password that must meet your account’s password policy. The policy is made up of a minimum length and a set of character-class rules. The defaults are:
Minimum length: 8 characters.
At least one uppercase letter (
A–Z).At least one lowercase letter (
a–z).At least one number (
0–9).At least one symbol (for example
!,@,#,$,%).
Administrators can tighten these rules for their account. Raising the policy does not invalidate existing passwords; users are held to the new rules the next time they change their password.
22.1.1. Password Strength Meter
As a password is typed, clearPath scores it and shows a strength indicator using one of five bands:

Very WeakWeakGoodStrongVery Strong
The score combines the password’s length, the mix of character types
used, and the absence of obvious weak patterns such as long runs of
repeated characters or simple sequences. A password that only just
clears the minimum requirements may still score low — aim for
Good or higher.
Tips for a strong password:
Use a passphrase of three or more unrelated words instead of a single word with substitutions.
Mix uppercase, lowercase, numbers, and symbols.
Avoid names, dates, and words that appear in your profile.
Do not reuse a password from another service.
Passwords are never stored in a form anyone can read. For details on how they are protected, and for the full set of security features (two-factor authentication, failed-login auto-blocking, the blocked IPs list, and the threat map), see Security.
22.2. Users
To open the Users list, go to Account | Users | User Accounts.
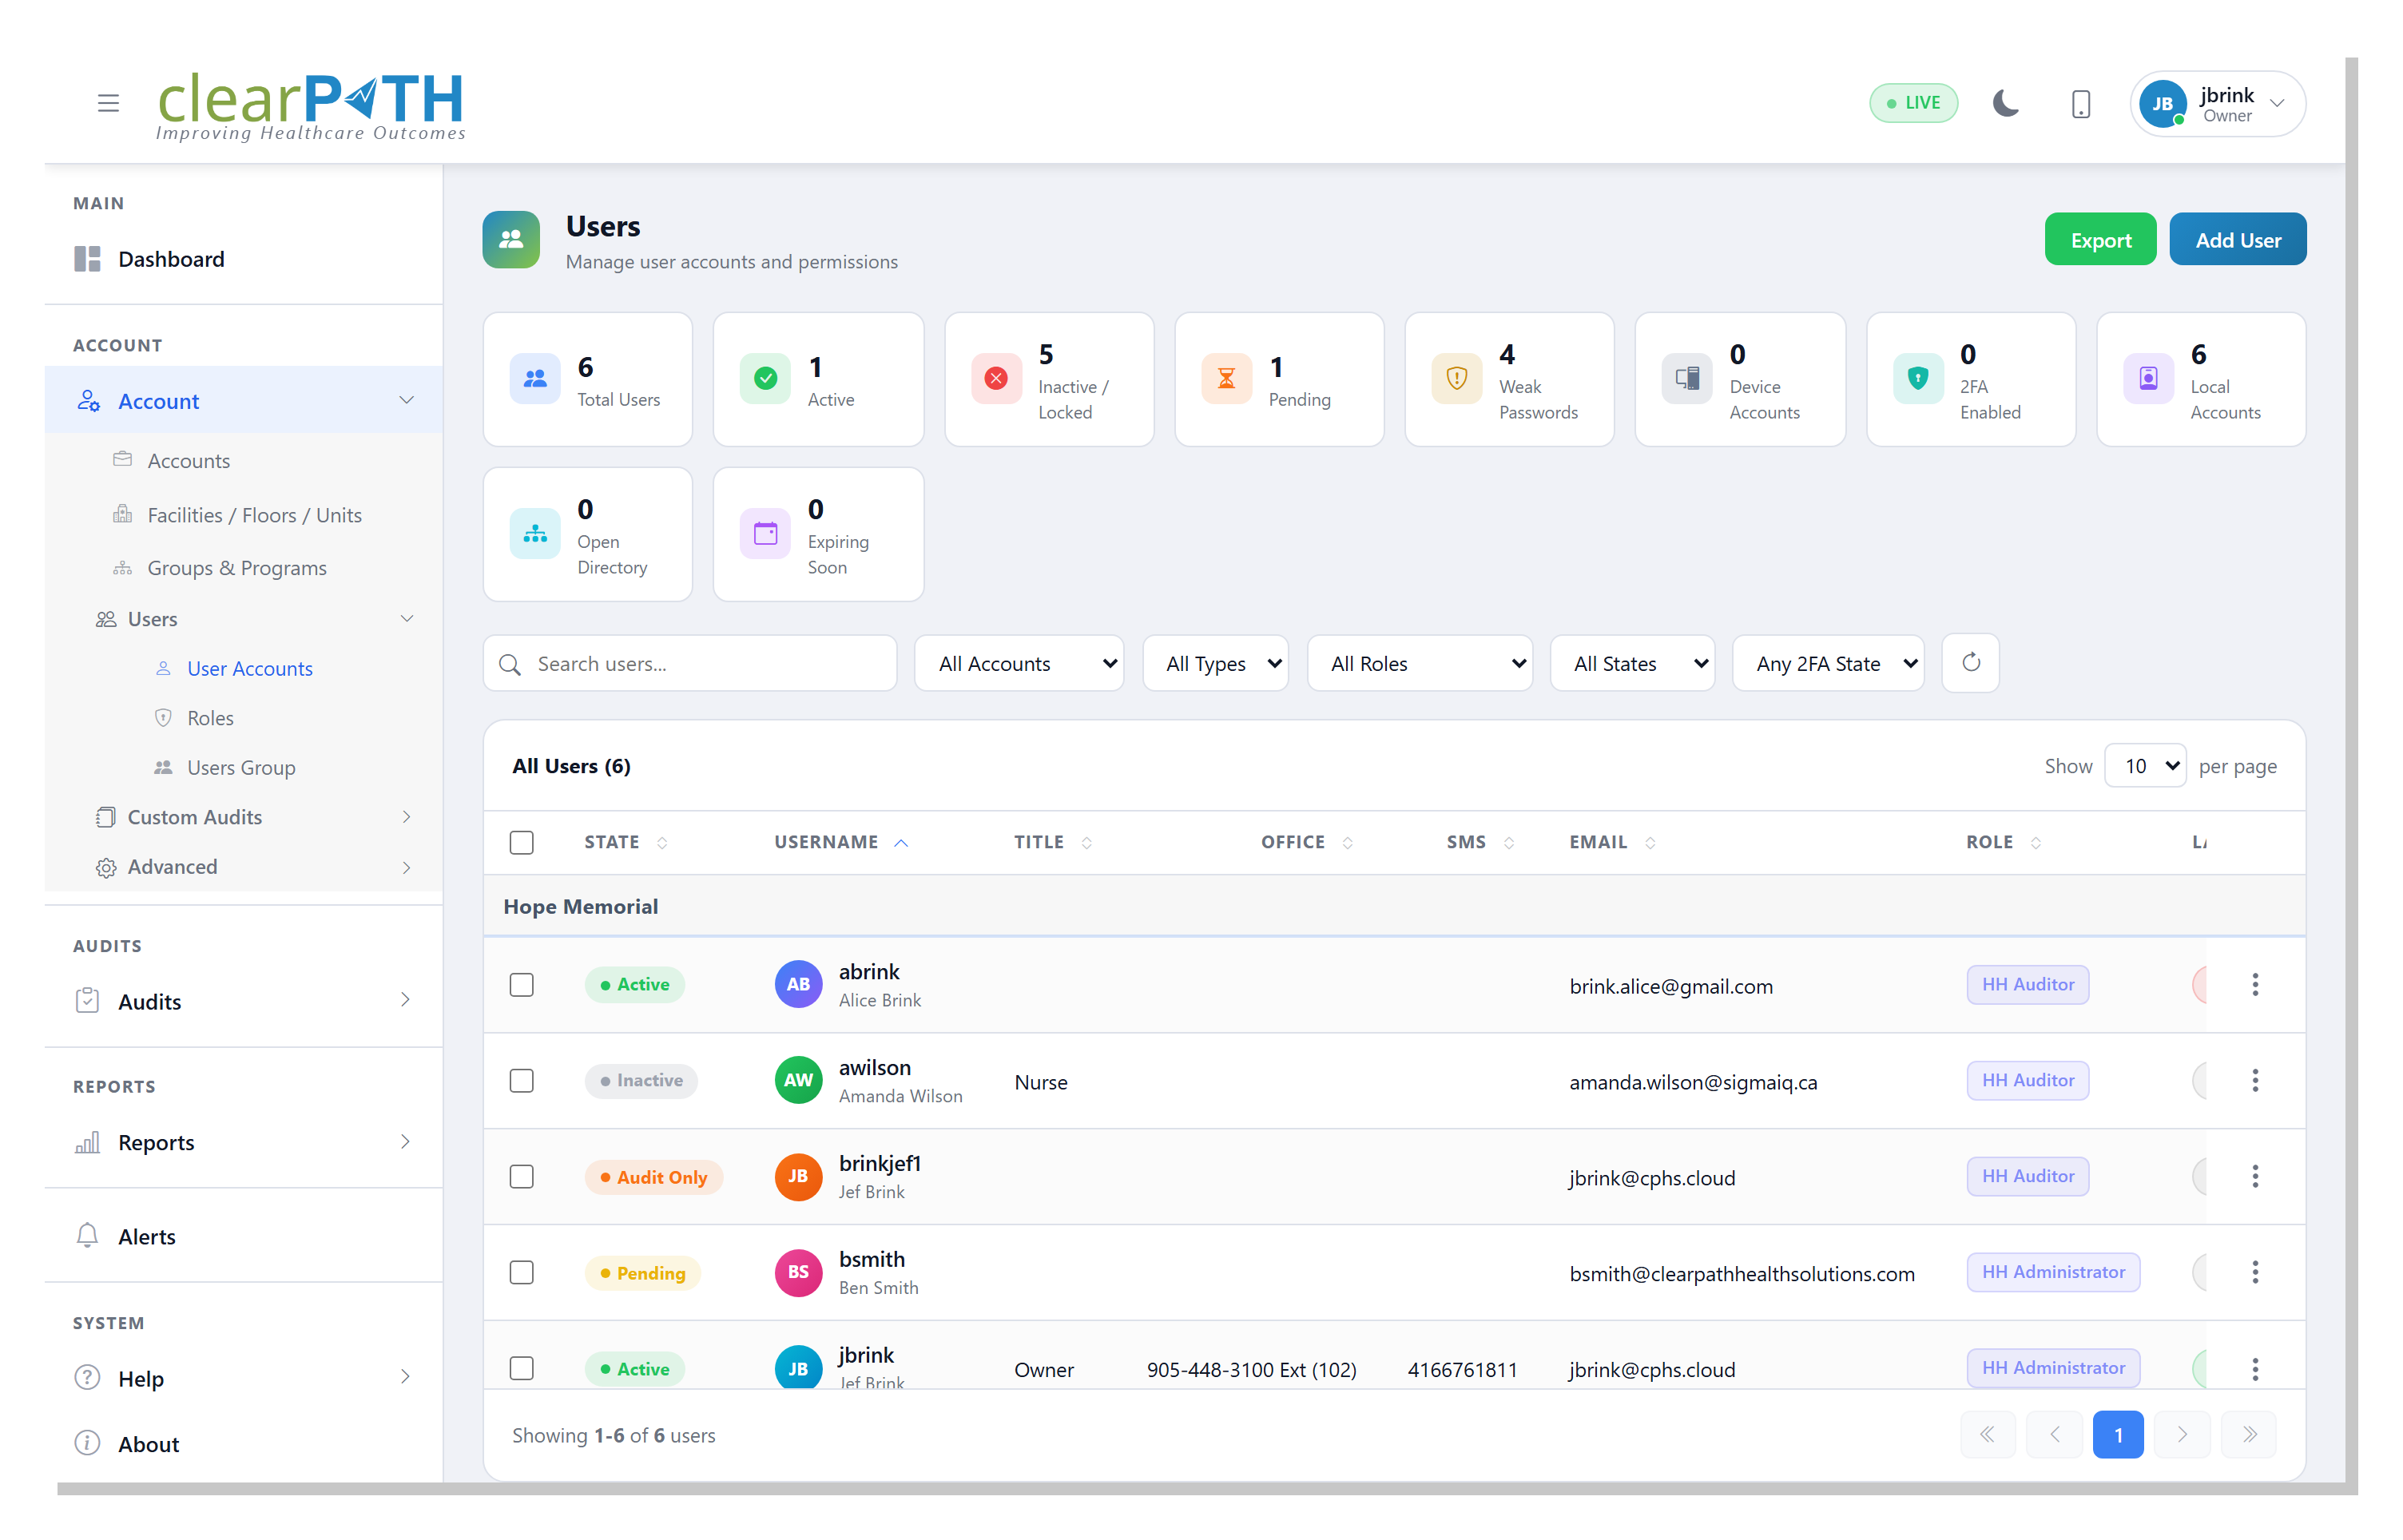
Each row is one user account with the columns you would expect (name, username, email, role, status, last sign-in).
22.2.2. User Editor
Click a user (or pick Edit from the row menu) to open the
editor. Information is grouped into tabs.
22.2.2.1. General
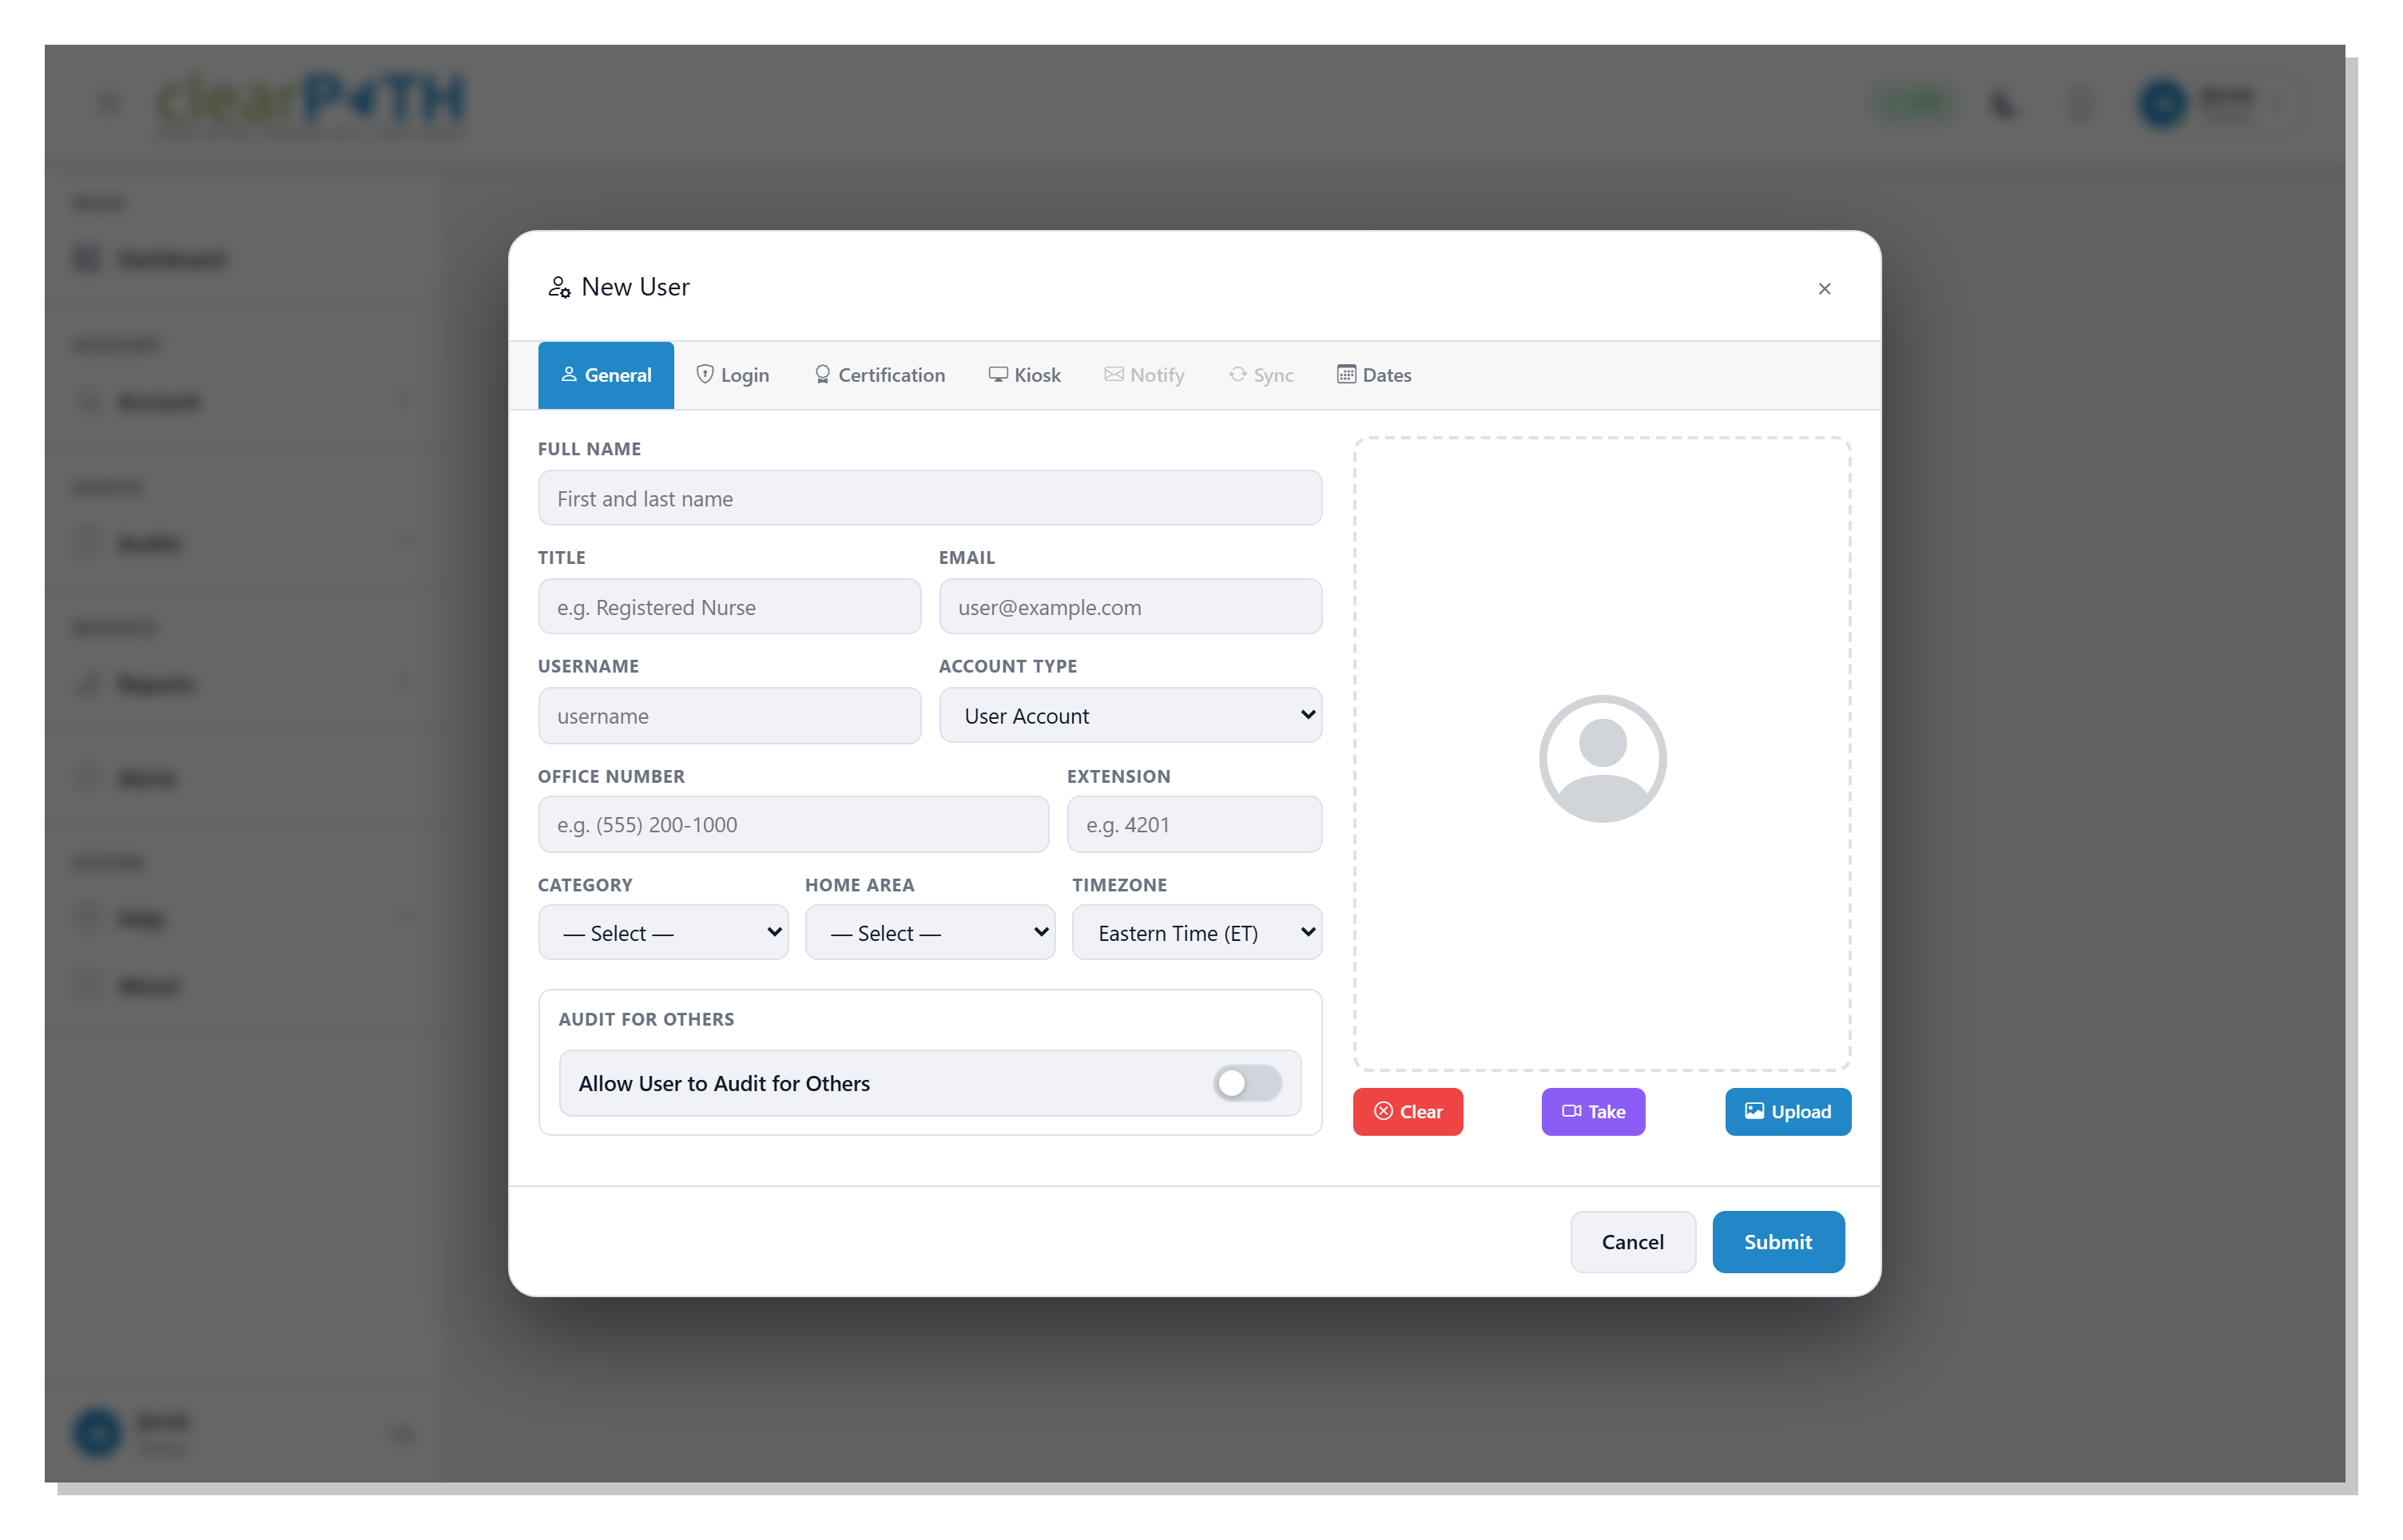
Basic profile information — name, title, email address, role, facility and unit assignment.
22.2.2.2. Login
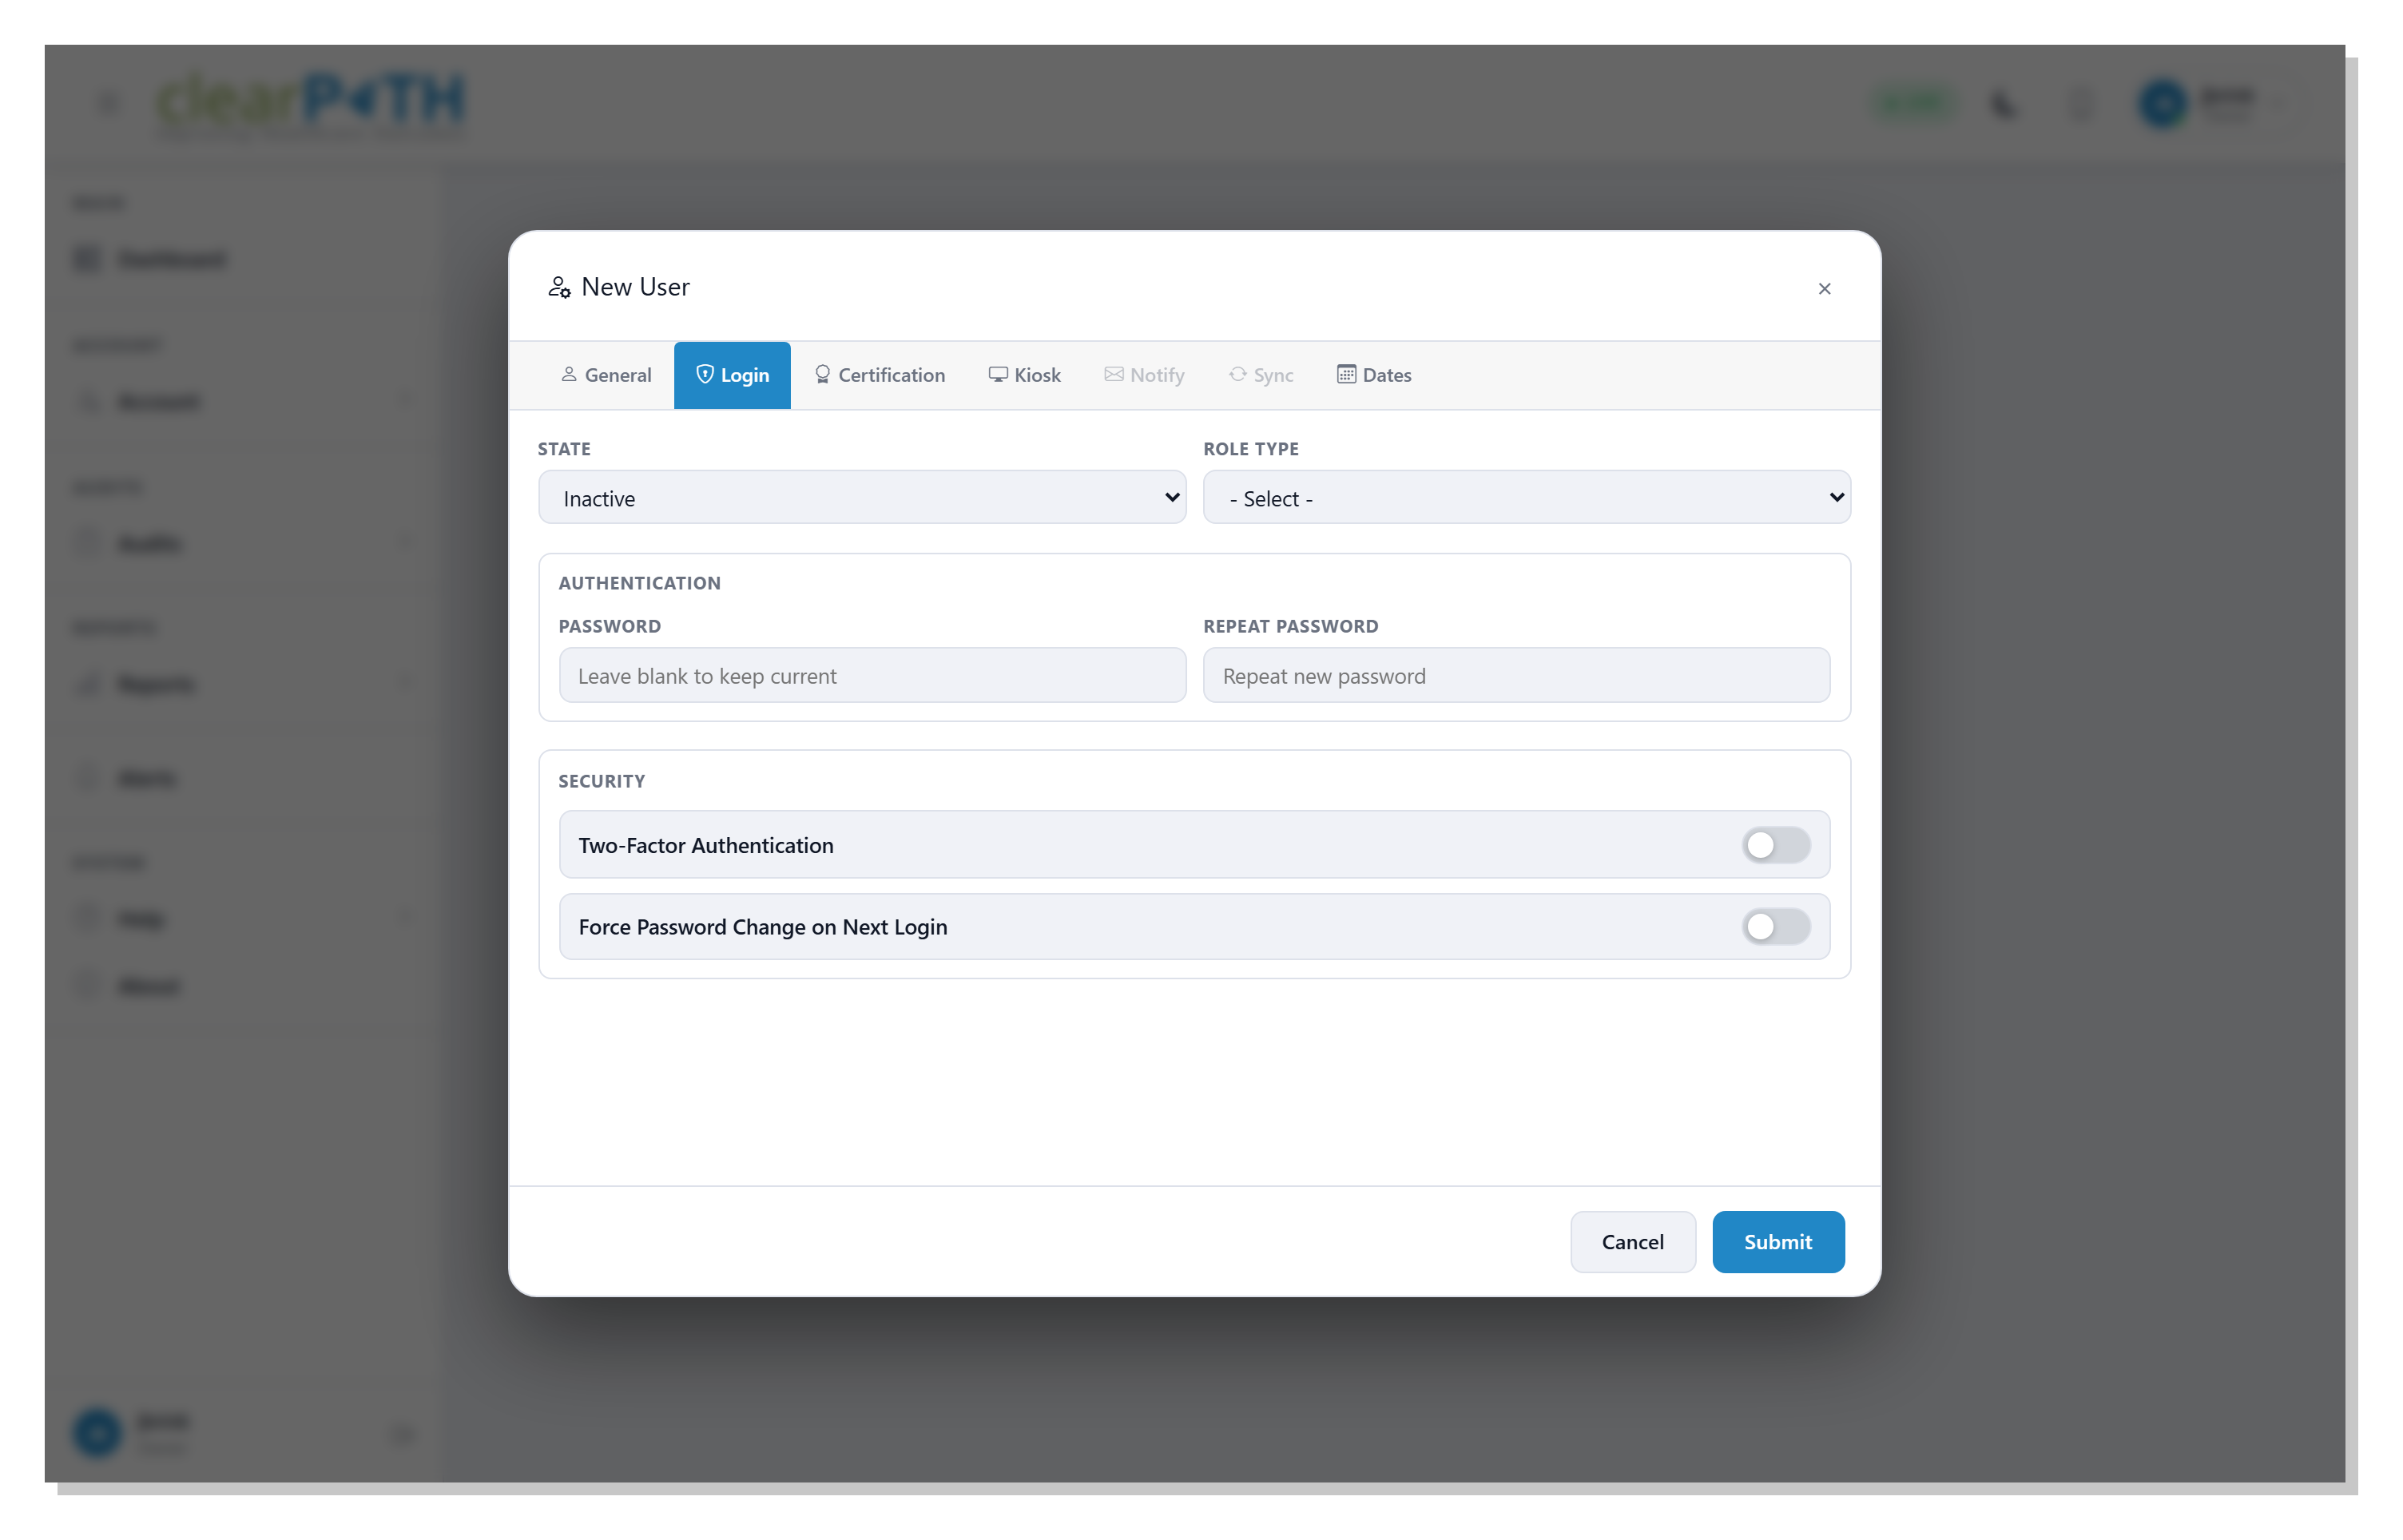
Sign-in settings — username, password reset, and the Two-Factor
Authentication toggle (see Two-Factor Authentication).
22.2.2.3. Kiosk
Configures the user as a kiosk-only account that can show the dashboard on a shared screen but cannot otherwise change data.
22.2.2.4. Notify
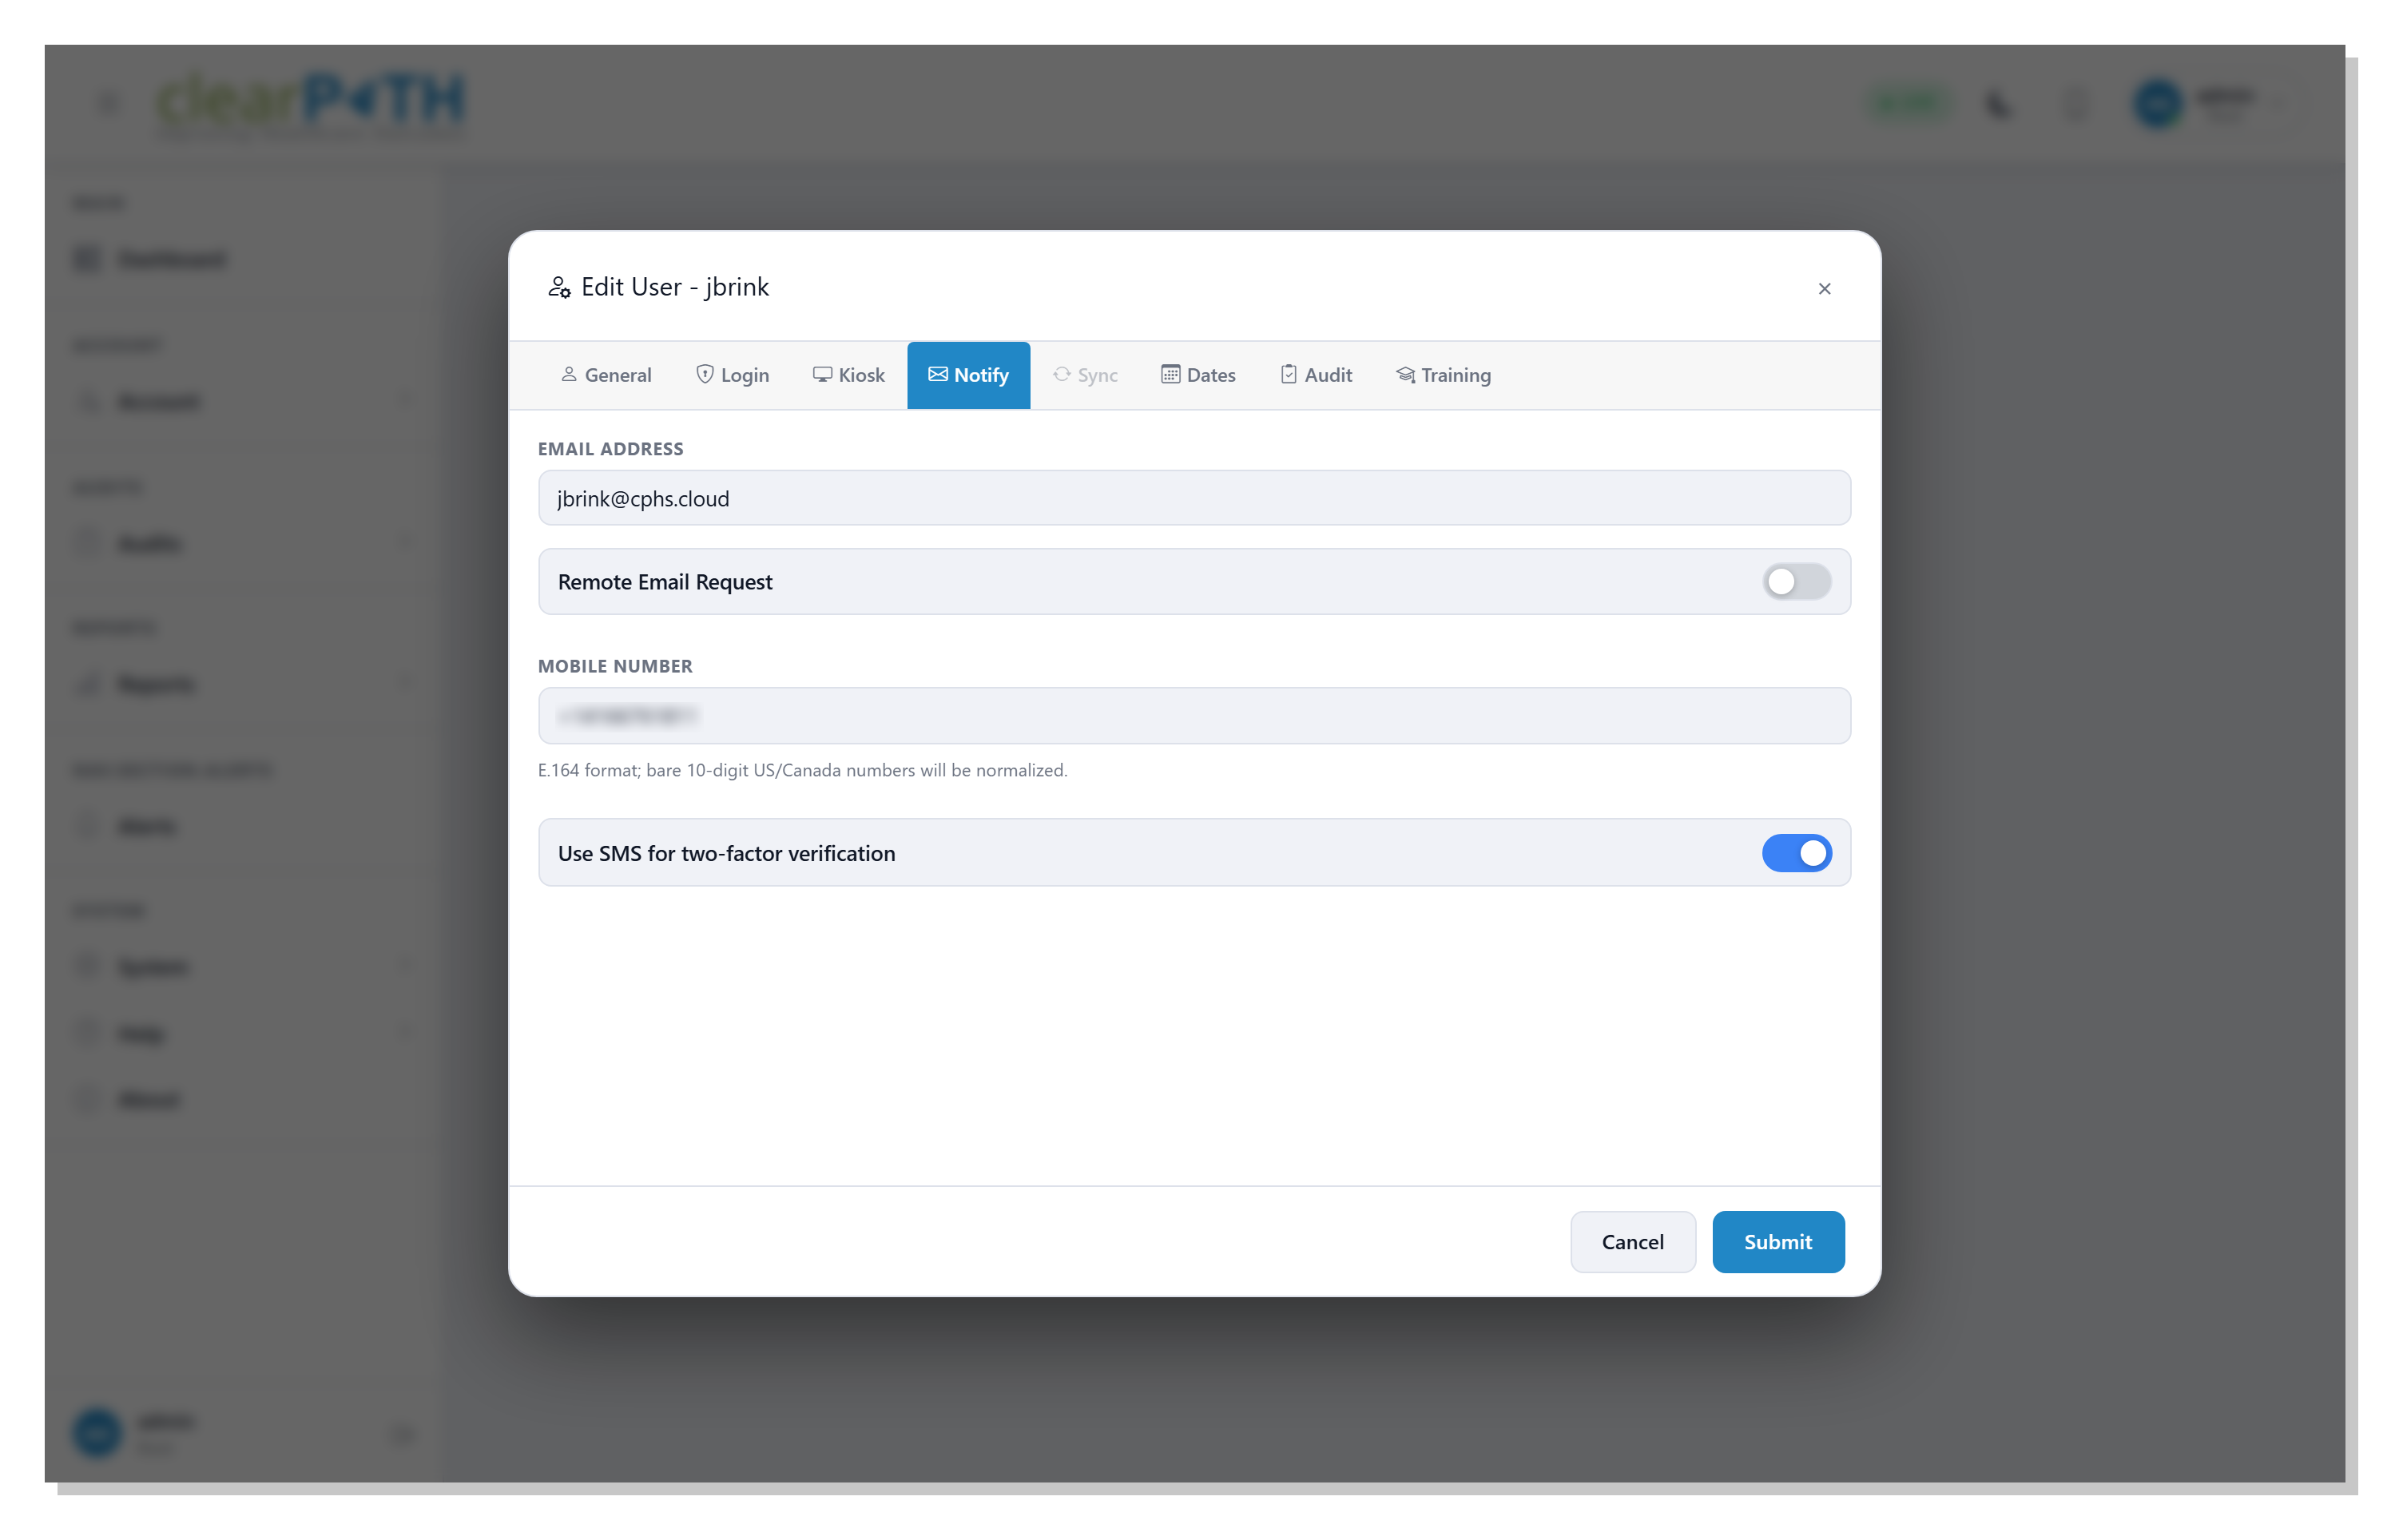
How clearPath reaches this user when something needs their attention, and how they prefer to verify their sign-in.
Email Address— where reminders, distribution links, password reset emails, and any other system mail are sent. This mirrors the email on the General tab; updating one updates the other.Remote Email Request— when on, lets the user request a one-time email from outside the app (for example to receive a password reset link without first signing in).Mobile Number (SMS)— the user’s mobile phone number, in international format (E.164 — a leading+, then the country code, then the number). Bare 10-digit North-American numbers are automatically prefixed with+1. Numbers outside the 8-to-15 digit range are rejected and saved as blank.Use SMS for two-factor verification— when on (and a mobile number is set), the user can receive their six-digit sign-in code by text message instead of using an authenticator app. The toggle is automatically disabled while the mobile number is blank. See Two-Factor Authentication for the full sign-in flow.
22.2.2.5. Dates
Account start and end dates, used together with the role’s
Auto Expire setting to automatically disable users whose
term has ended.
22.2.2.6. Audit
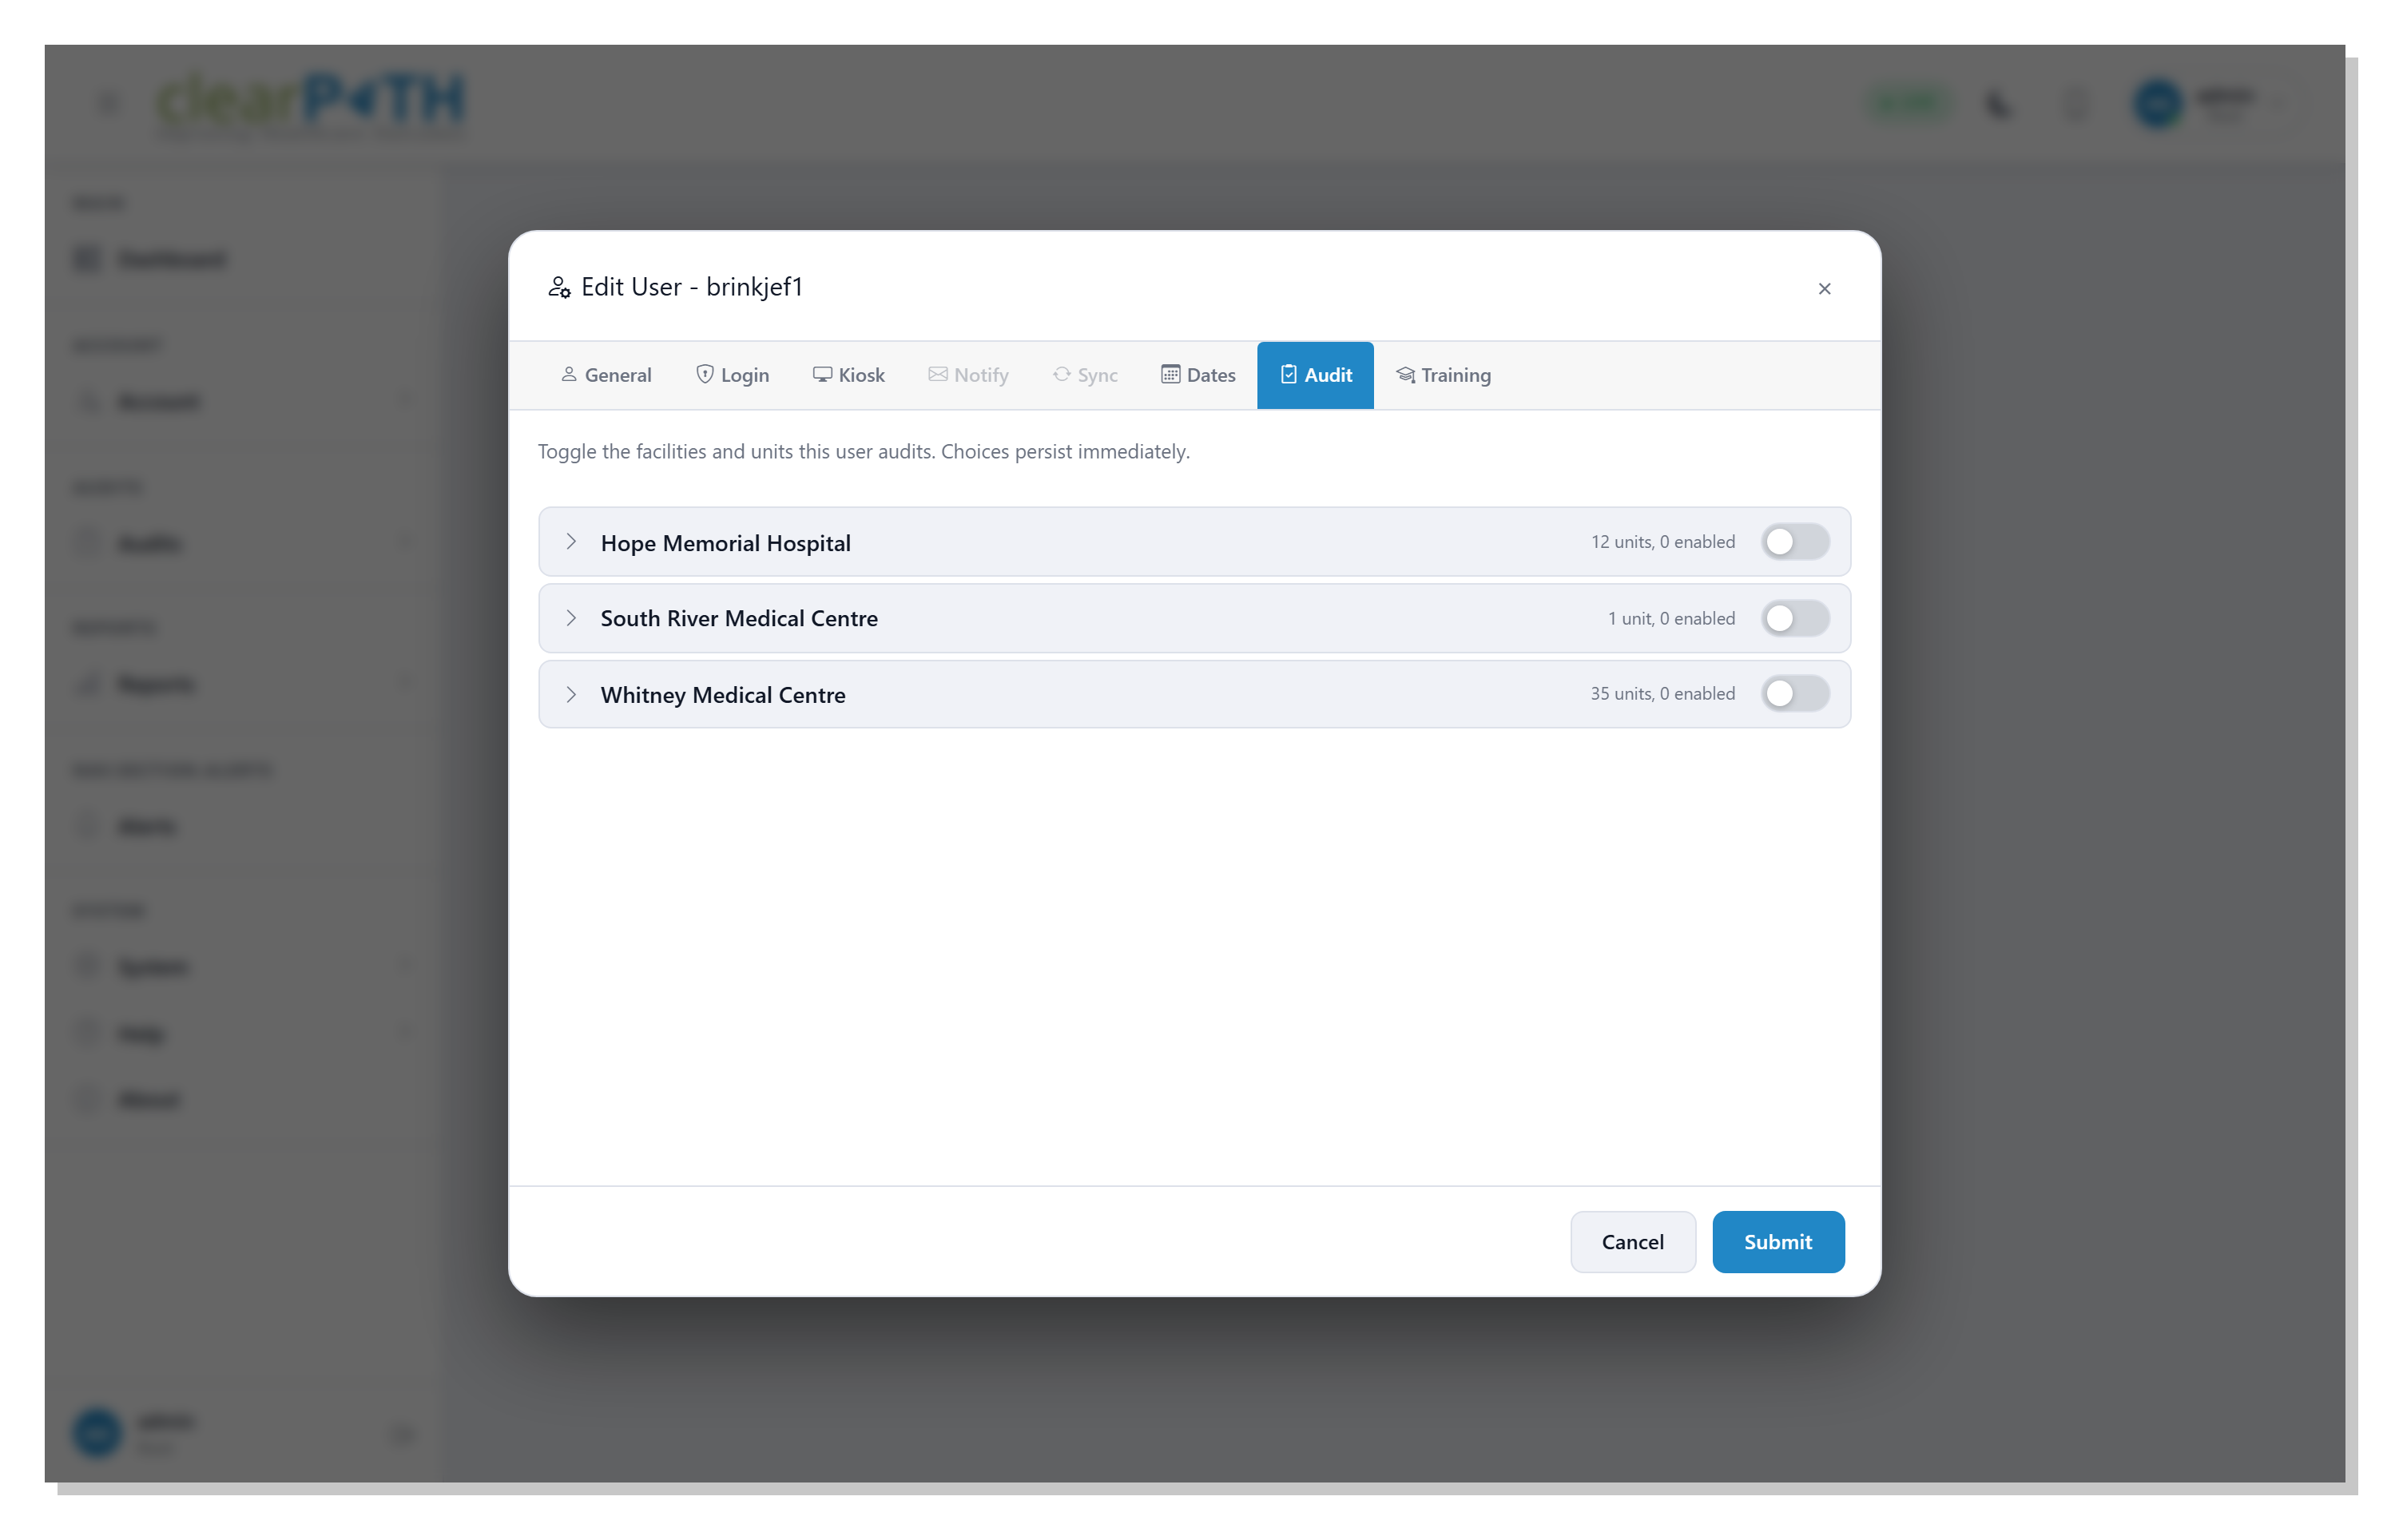
Controls which facilities and units this user is allowed to audit. Each facility in the user’s account is shown as a collapsible row with a count of how many units it contains and how many are currently enabled for this user. Click a facility row to expand it and reveal the units underneath.
Toggling the facility switch turns auditing on or off for every unit in that facility at once.
Toggling a unit switch enables or disables that single unit without changing the rest.
Choices save immediately — there is no separate
Submitstep for the toggles on this tab.
A user with no enabled facilities or units can still sign in but will not see any units to audit when running a hand hygiene session.
22.2.2.7. Training
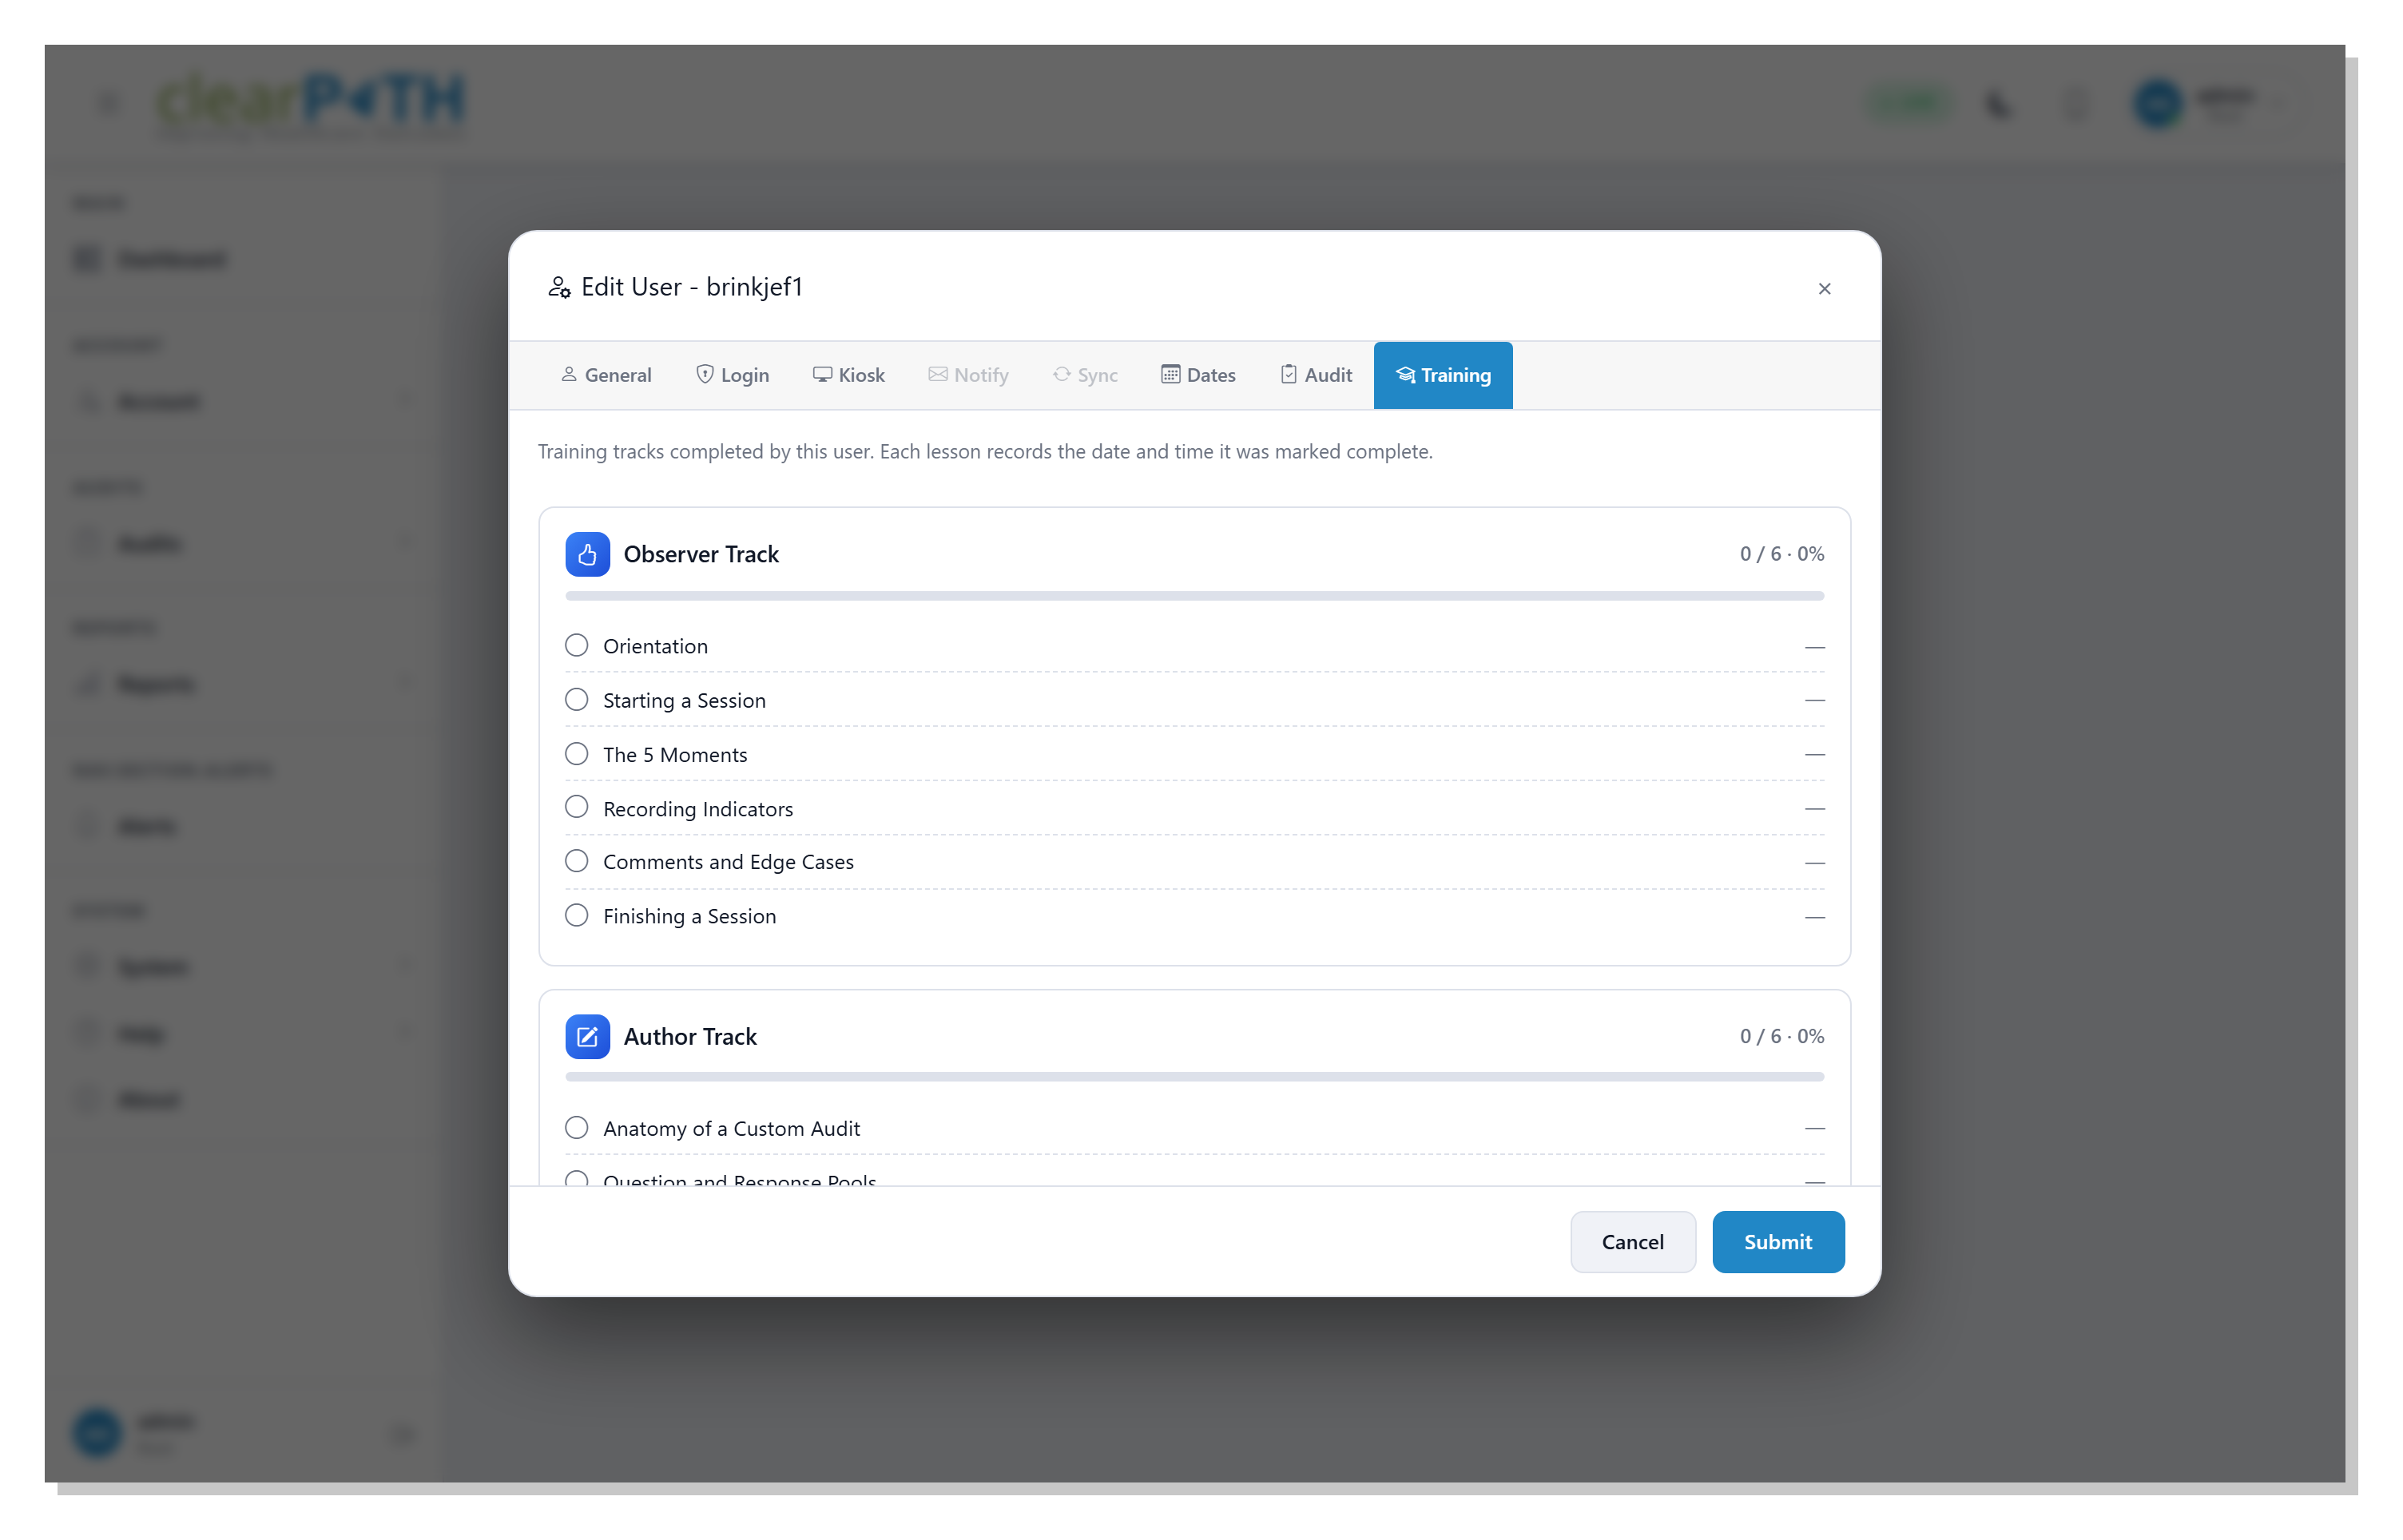
Shows this user’s progress through the clearPath training tracks. Each track is listed as a card with a progress bar across the top and one row per lesson underneath:
The header shows the track icon, the track name, the number of lessons completed out of the total, and the overall percentage.
A circle to the left of each lesson is empty when the lesson is outstanding and filled with a check when the lesson has been marked complete.
The date column on the right shows the date and time the lesson was marked complete; outstanding lessons show a dash.
This tab is read-only — lesson completion is recorded automatically as the user works through clearPath training material. Use it to confirm whether a new auditor has finished the Observer track before signing them up to a hand hygiene session.
22.2.3. Login Sessions
Picking View Logins from a user’s row menu opens that user’s
sign-in history.
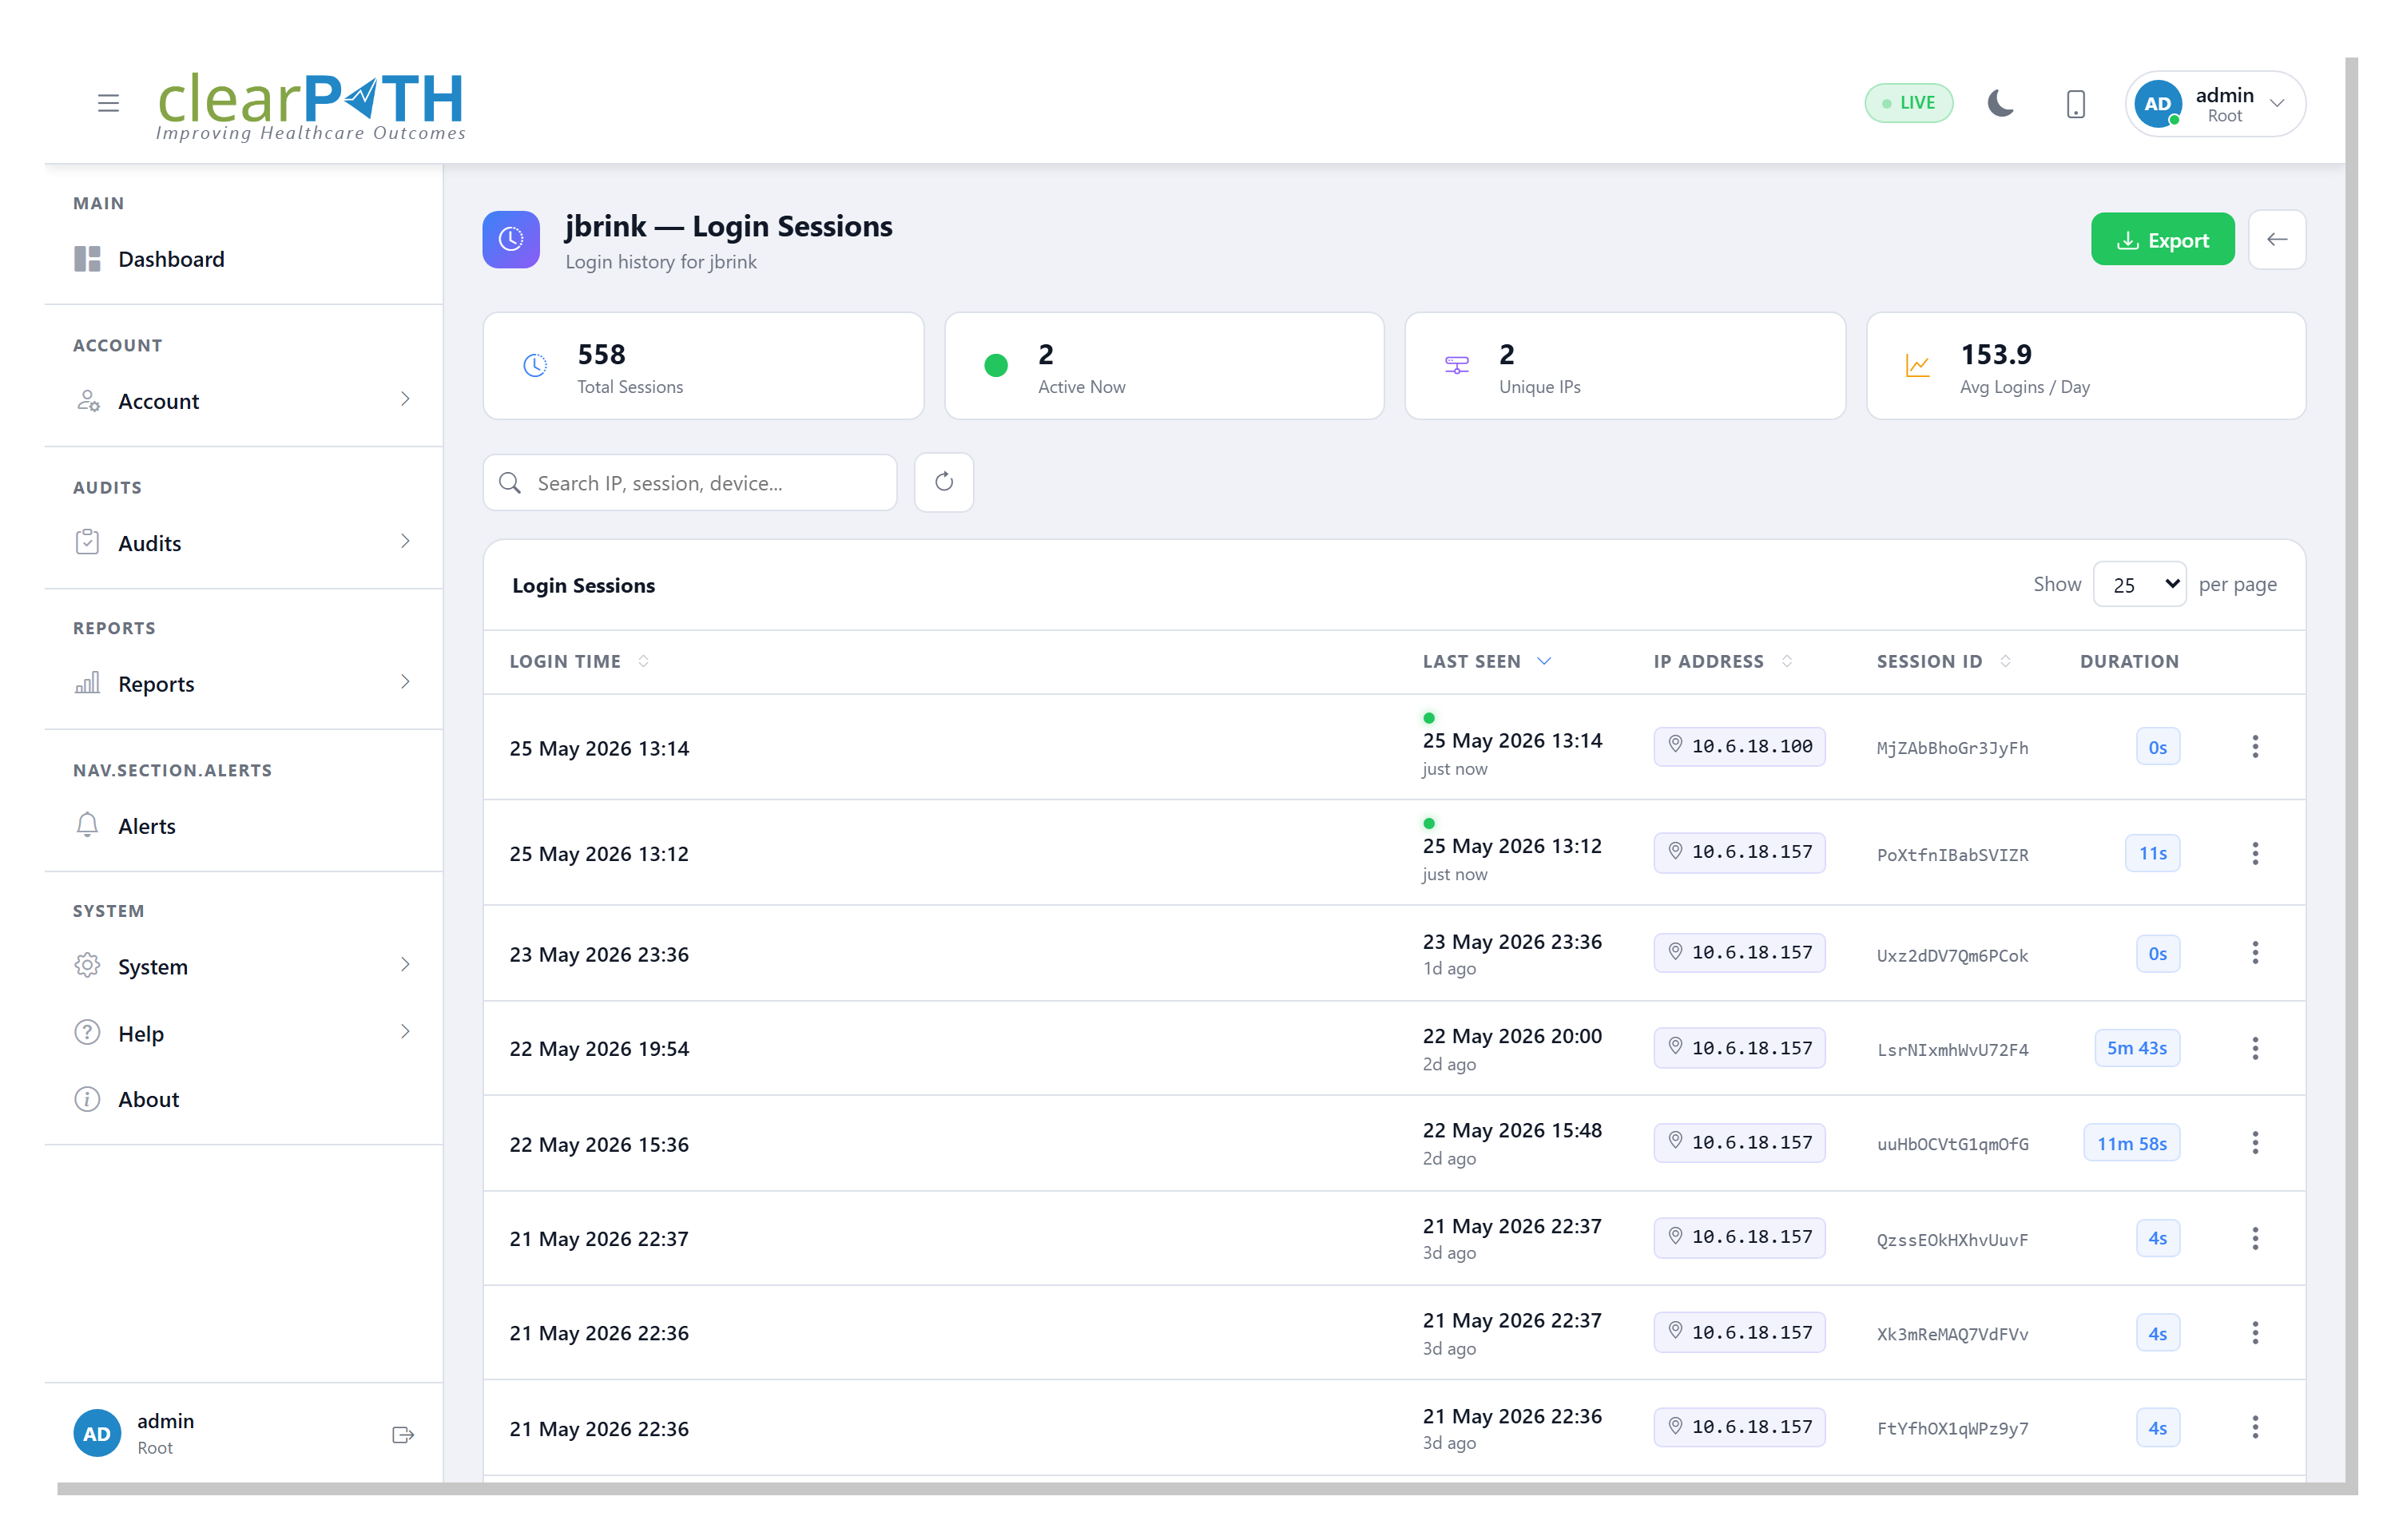
Each row is one login session and shows when the user signed in, the last activity timestamp, the source IP address, and the session identifier. Use it to confirm a user is actively signing in, to spot logins from unexpected locations, or to gather session details for a support ticket.
The search box filters by IP, session ID, or device string.
Click a column header to sort; the table remembers the column and direction between visits.
The IP address column is clickable — it opens a small map showing the approximate geographic location of the source address.
Exportsaves the current (filtered) view as an HTML report.
Sessions roll off automatically once they expire; the list is
read-only — to end a user’s active sessions immediately, use
Logout on the user row menu instead.
22.3. Roles
clearPath controls what a user can do through Roles. Every user is assigned exactly one role; the role’s permissions and unit assignments decide the pages, actions, and units the user can reach.
Typical out-of-the-box roles:
HH Administrator— full access to hand-hygiene configuration, reporting, and auditing.HH Observer— can record audits but cannot change configuration.
You can define as many additional roles as you need.
To open the Roles list, go to Account | Users | Roles.
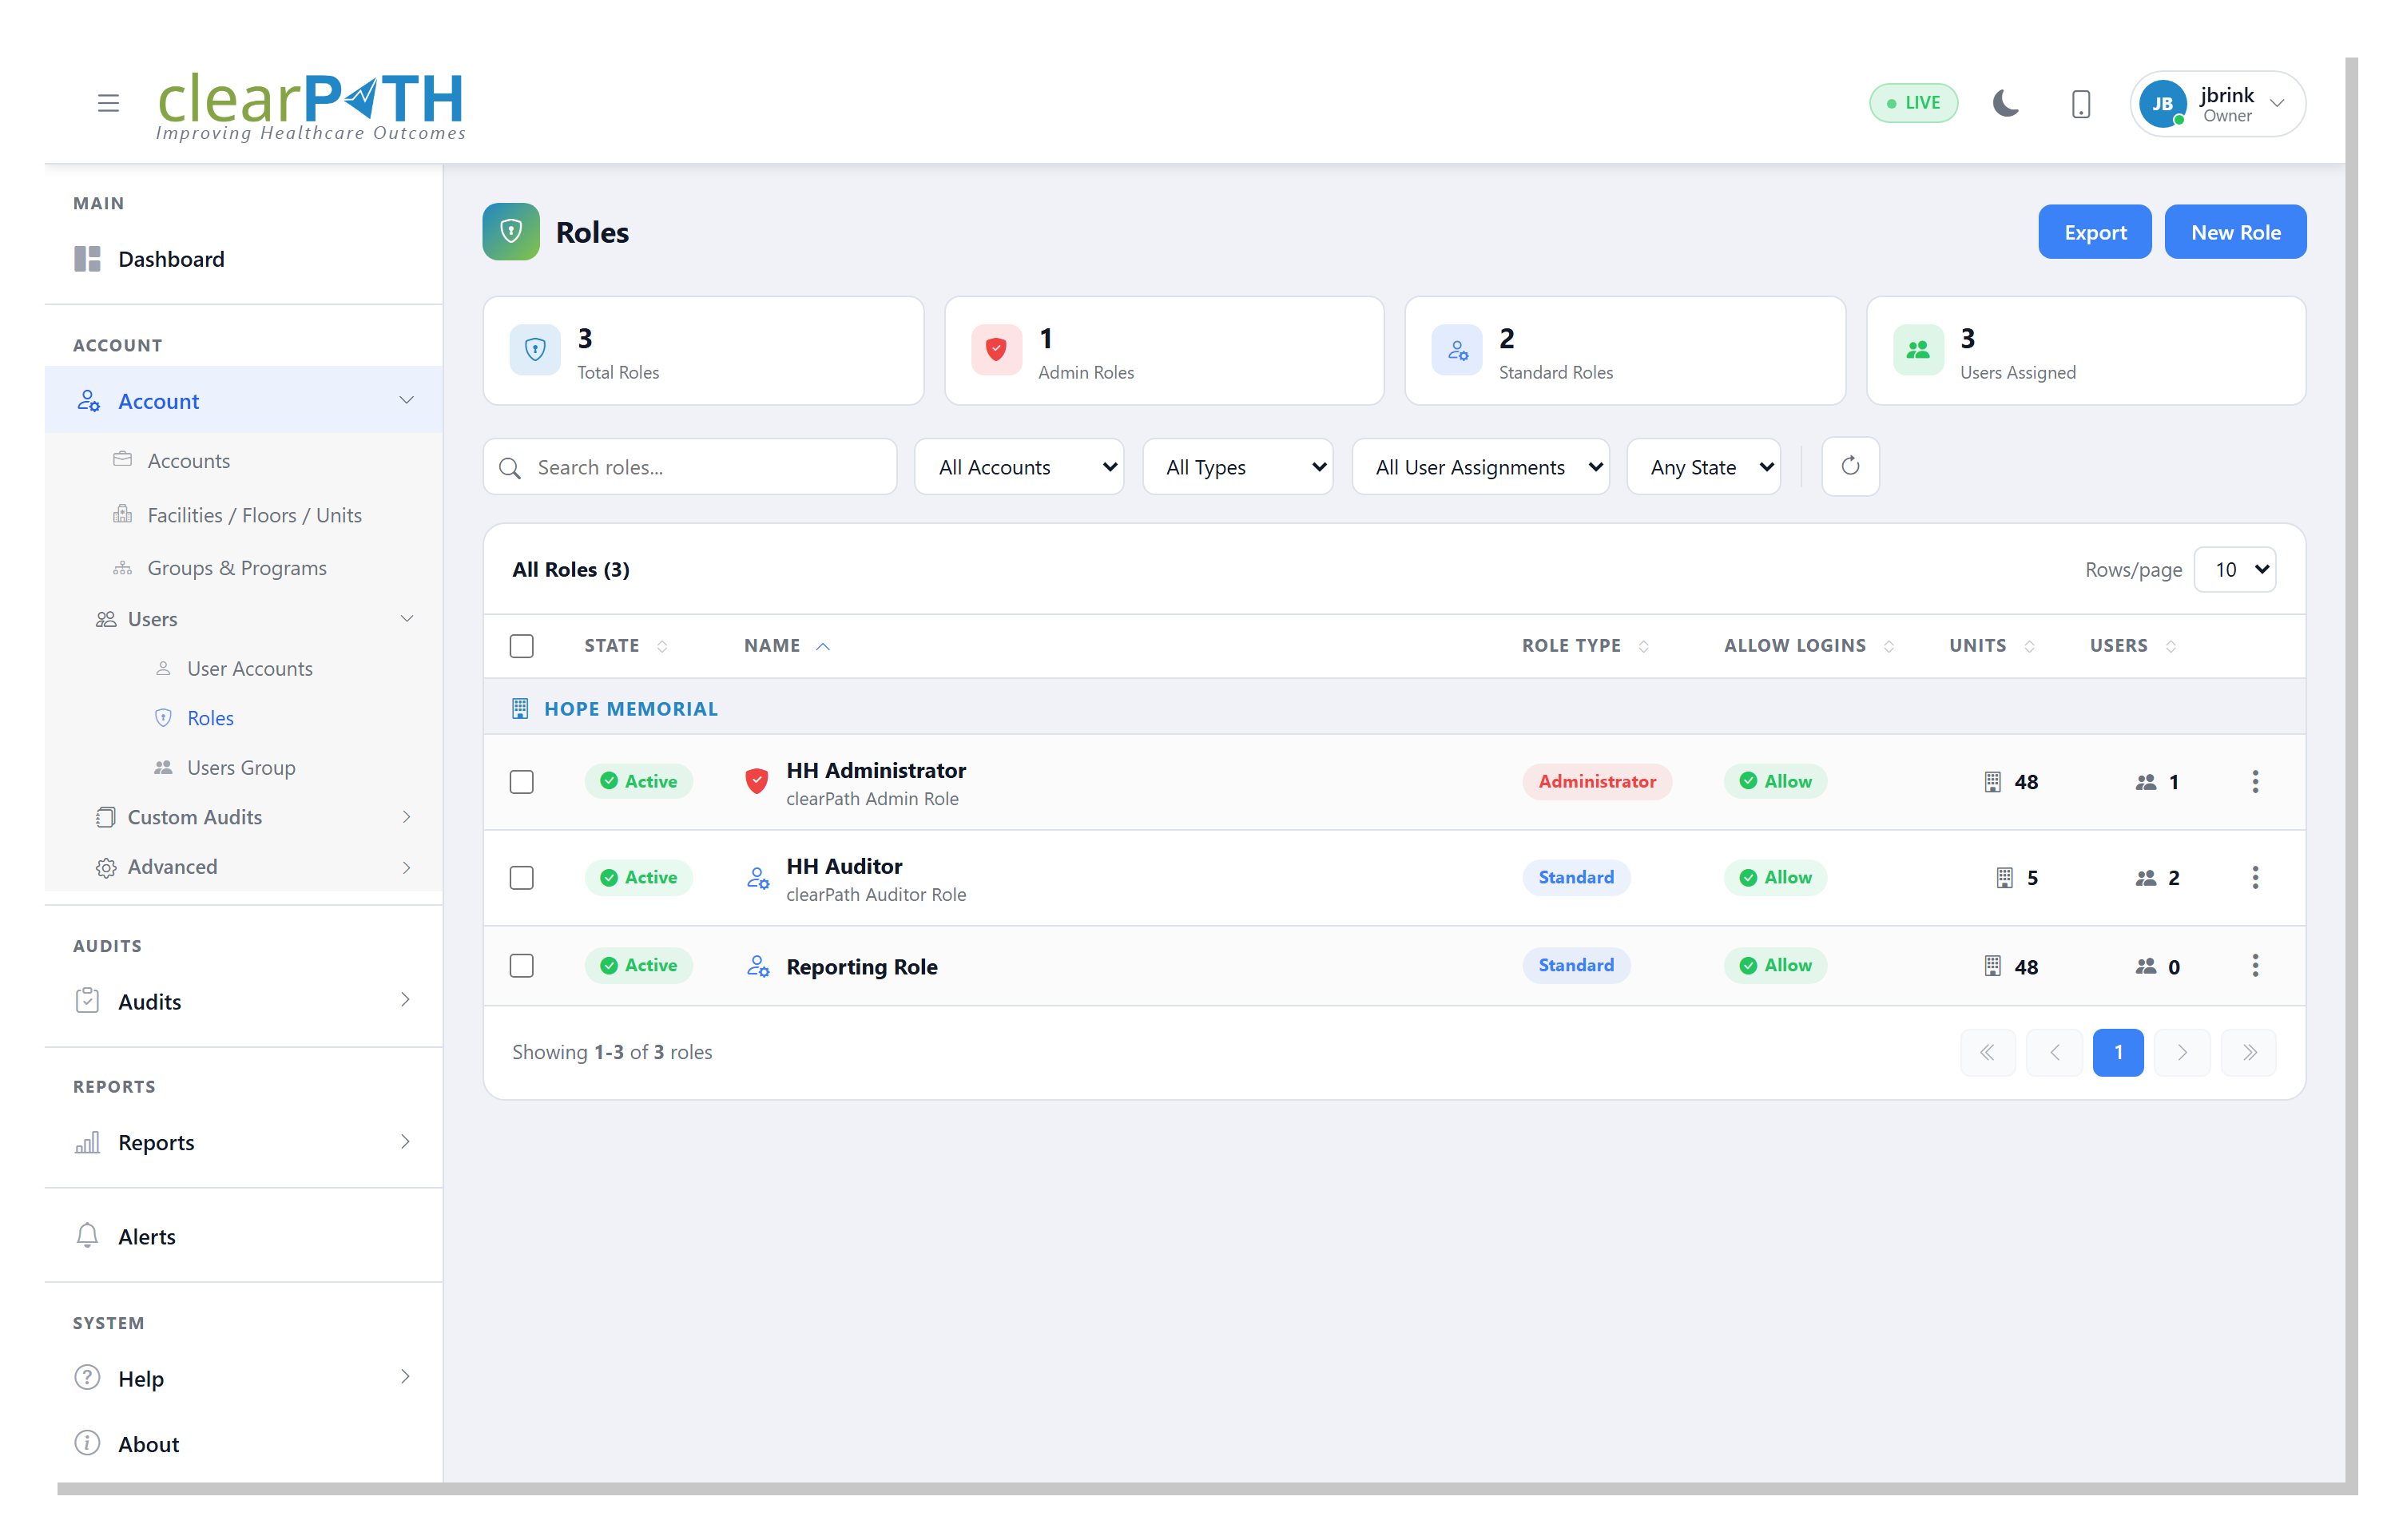
22.3.1. Row Action Menu
Click the three-dot icon at the end of any row:
Edit— opens the Role Editor.Delete— permanently removes the role after a confirmation prompt. A role with users still assigned to it cannot be deleted until those users are reassigned.
22.3.2. Role Editor
The role editor is organized into six tabs.
22.3.2.1. General
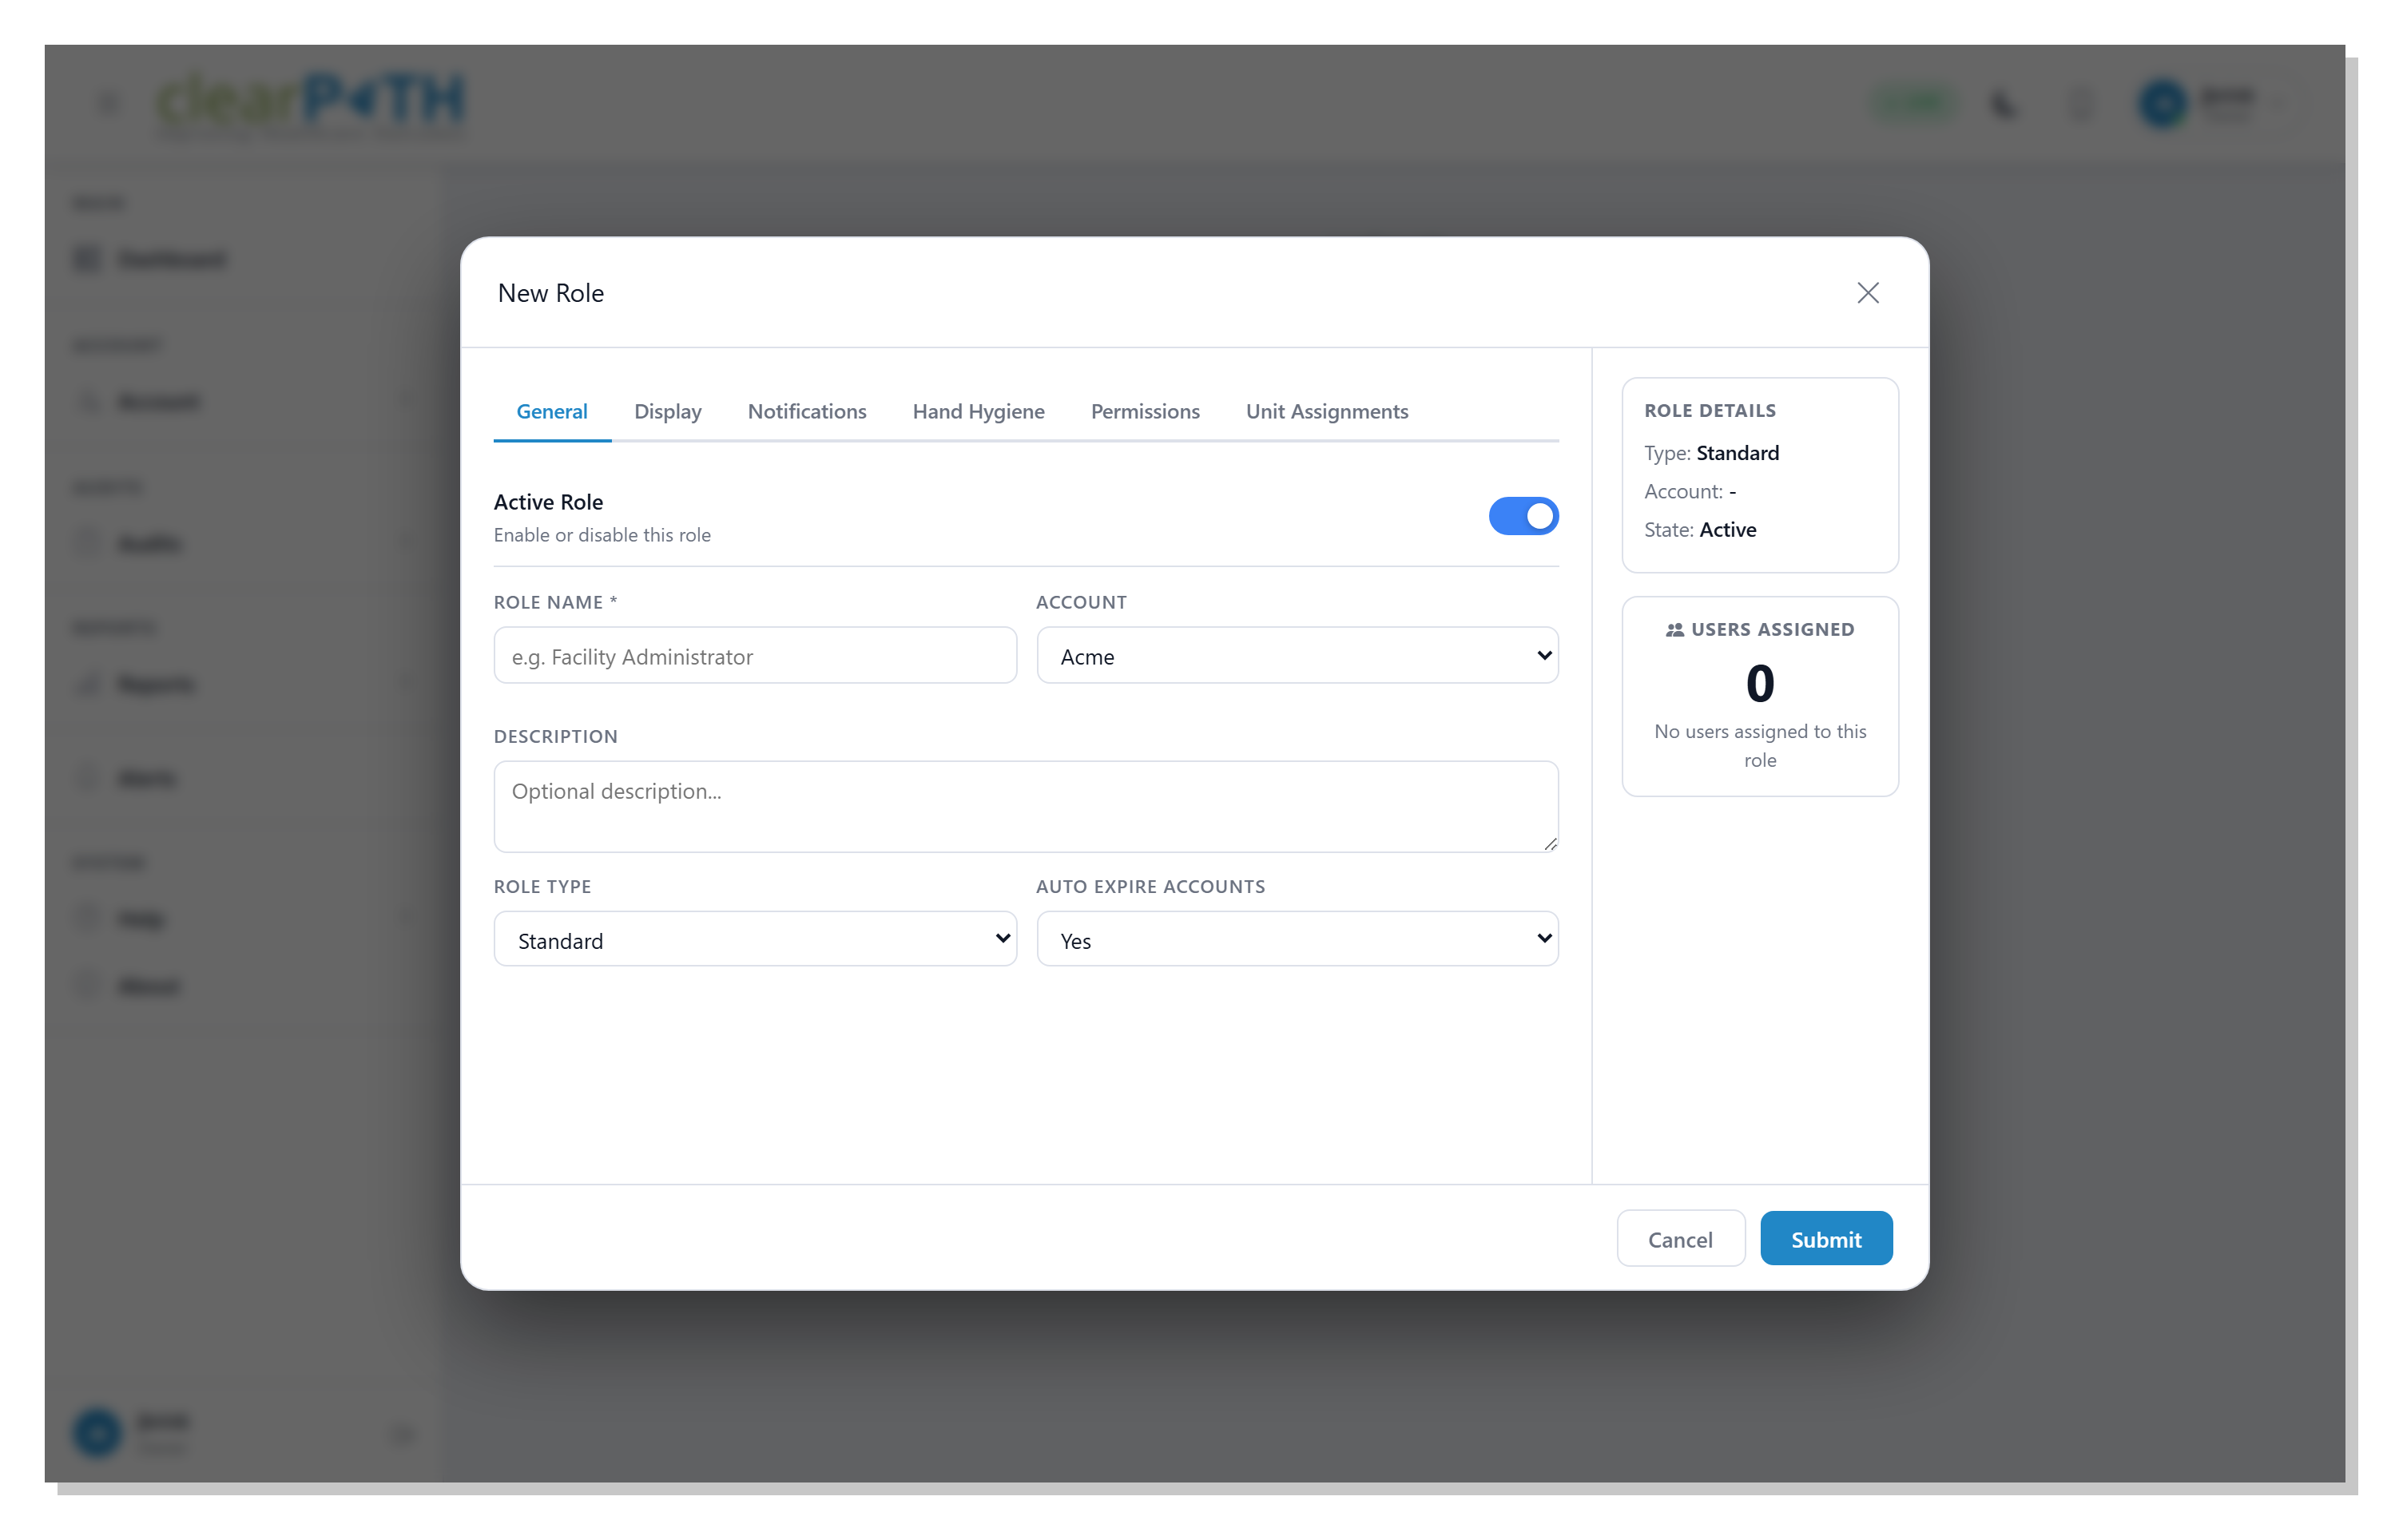
Active Role— toggle the whole role on or off. Disabling a role prevents every user in it from signing in. Useful for seasonal contractor accounts.Role Type—Standard(recommended for auditor-only accounts) orAdministrator. Administrator roles can reach configuration pages that Standard roles cannot.Auto Expire Accounts— automatically disables users in this role once the expiry date on their profile passes.Allow Logins— if disabled, nobody in this role can sign in. Used to lock out a role without disabling each user individually.Allow Audit Backdating— lets users in this role enter a previous date when starting an audit in cp2go.
Warning
Set auditor-only roles to Standard. Standard roles are
restricted to the features an auditor actually uses and cannot
change configuration.
22.3.2.2. Display / Notifications / Hand Hygiene
Per-role visual preferences, notification preferences, and hand hygiene workflow options. These apply to every user in the role unless overridden in the user’s individual profile.
22.3.2.3. Permissions
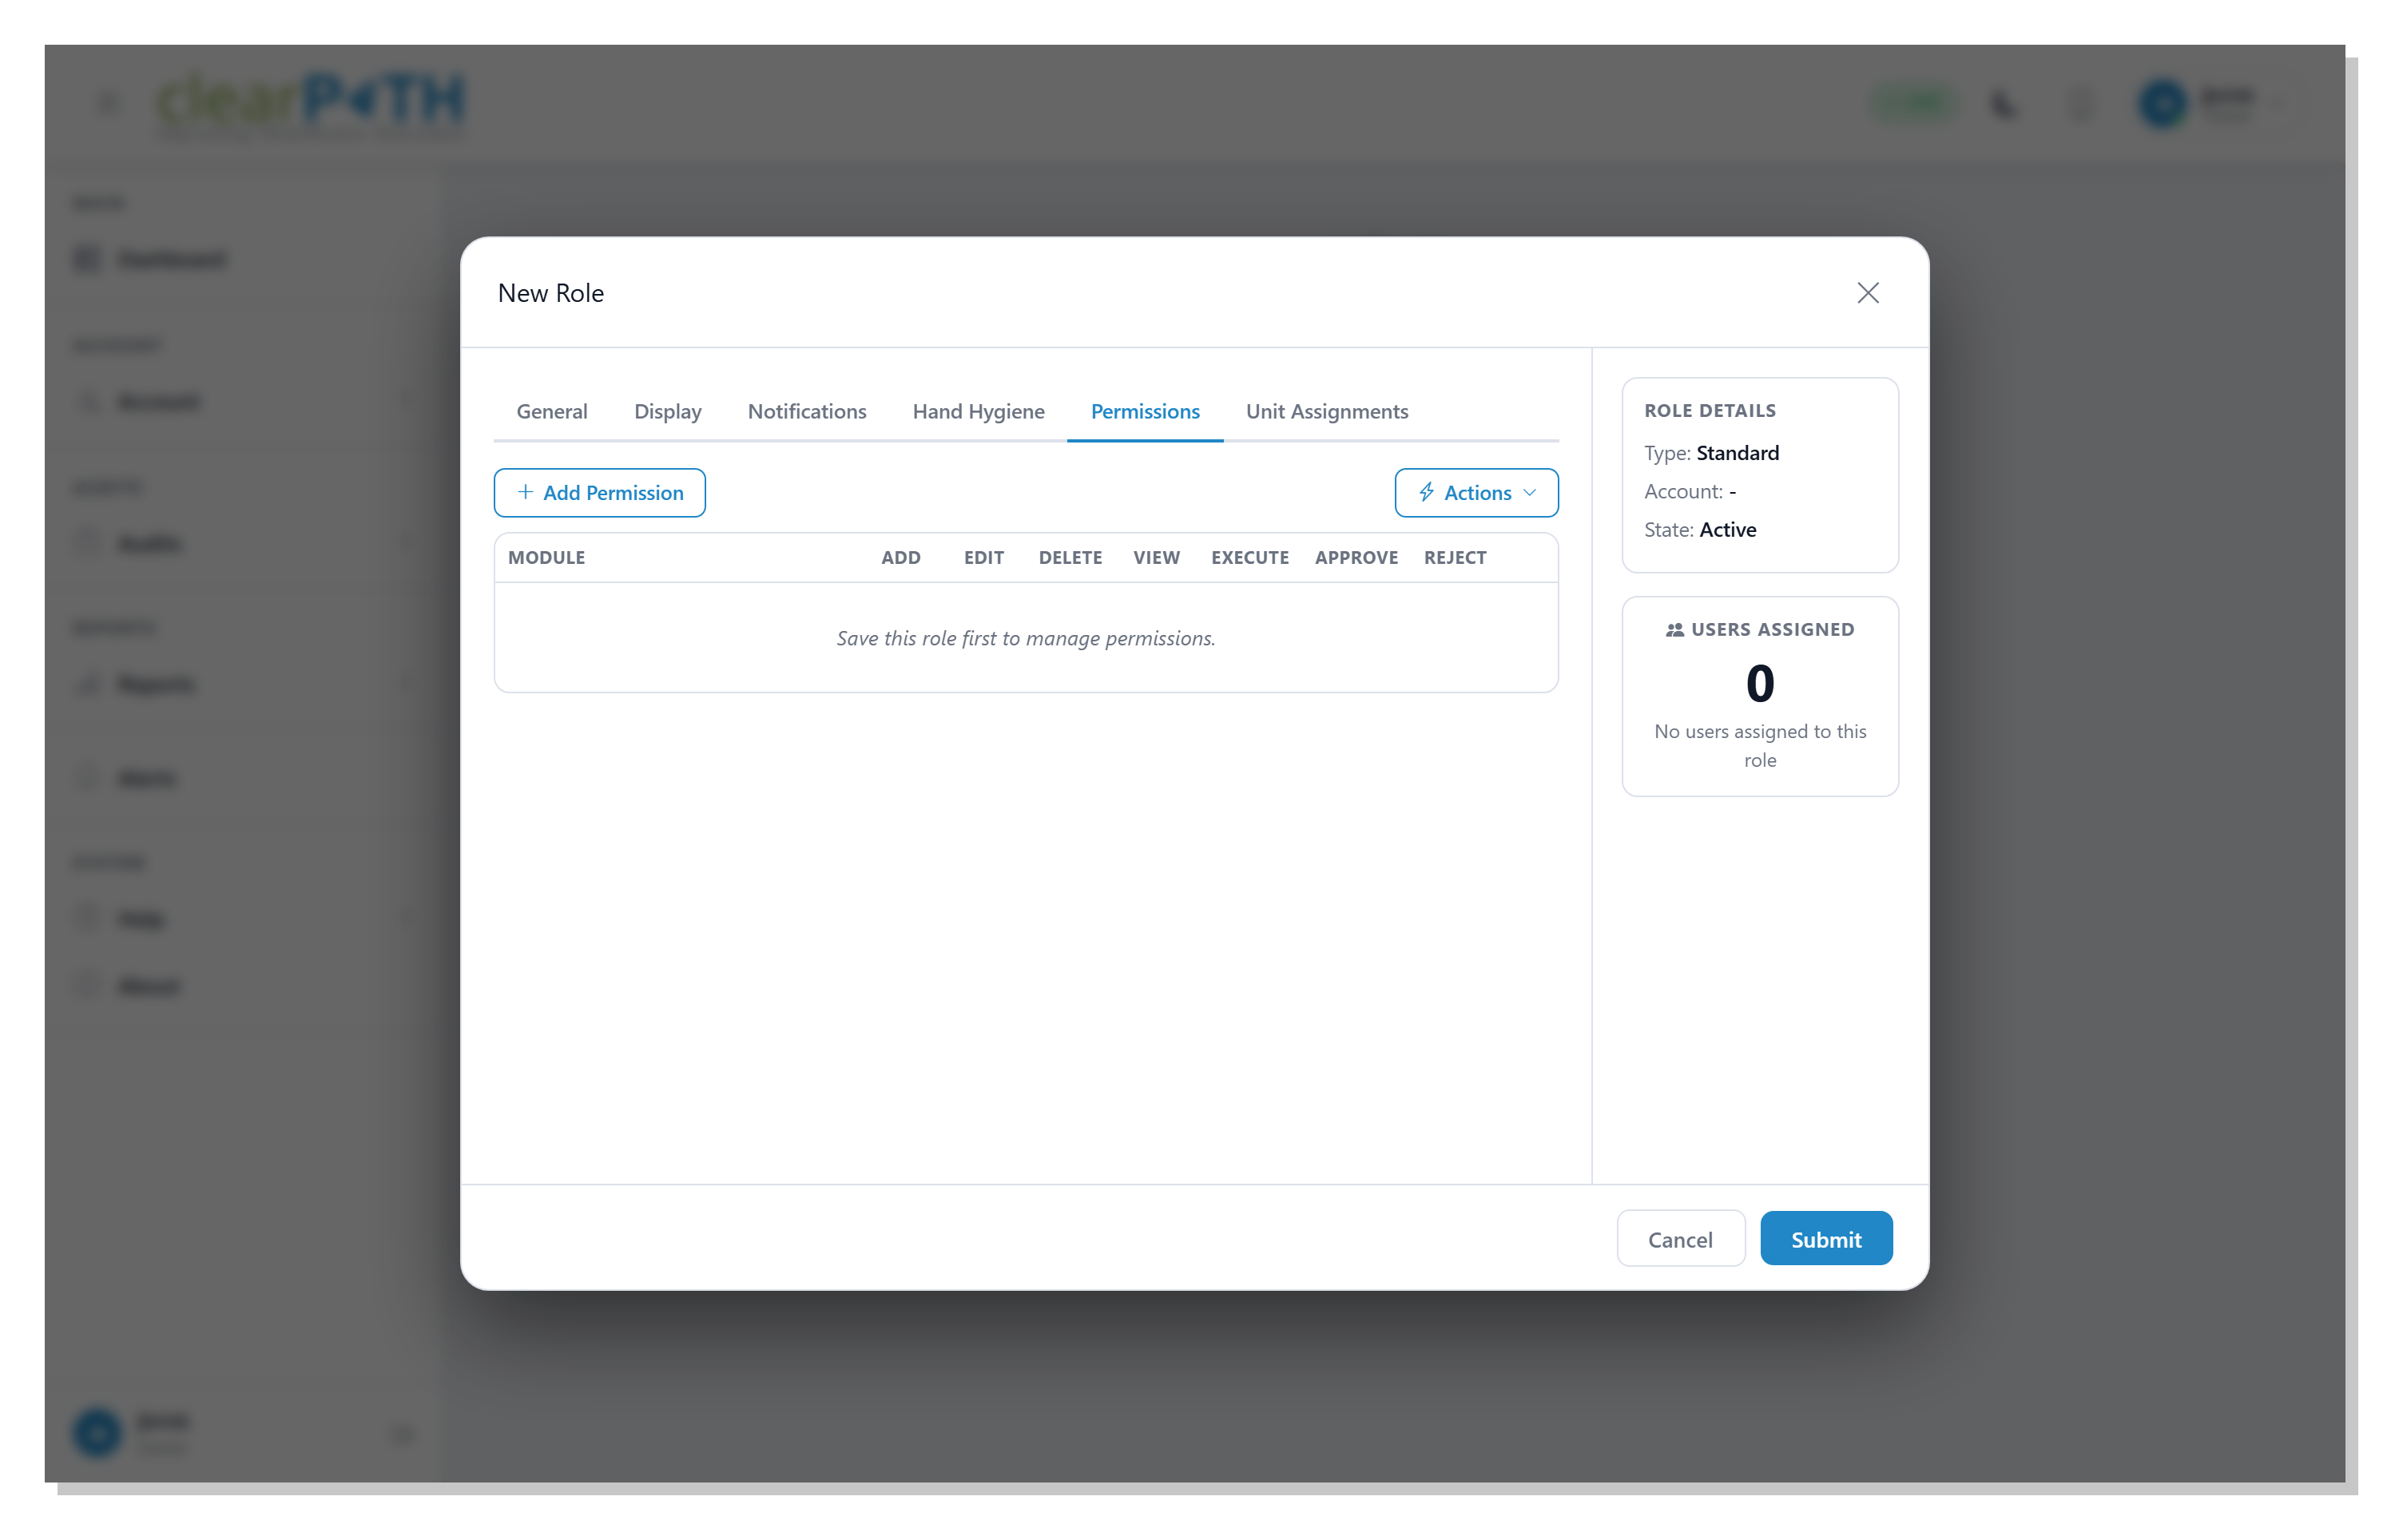
The permission matrix lists every feature in clearPath. Tick each feature the role should have access to; leave the rest unchecked. Permissions are additive — if the matrix does not grant access, the role cannot reach that feature.
22.3.2.4. Unit Assignments
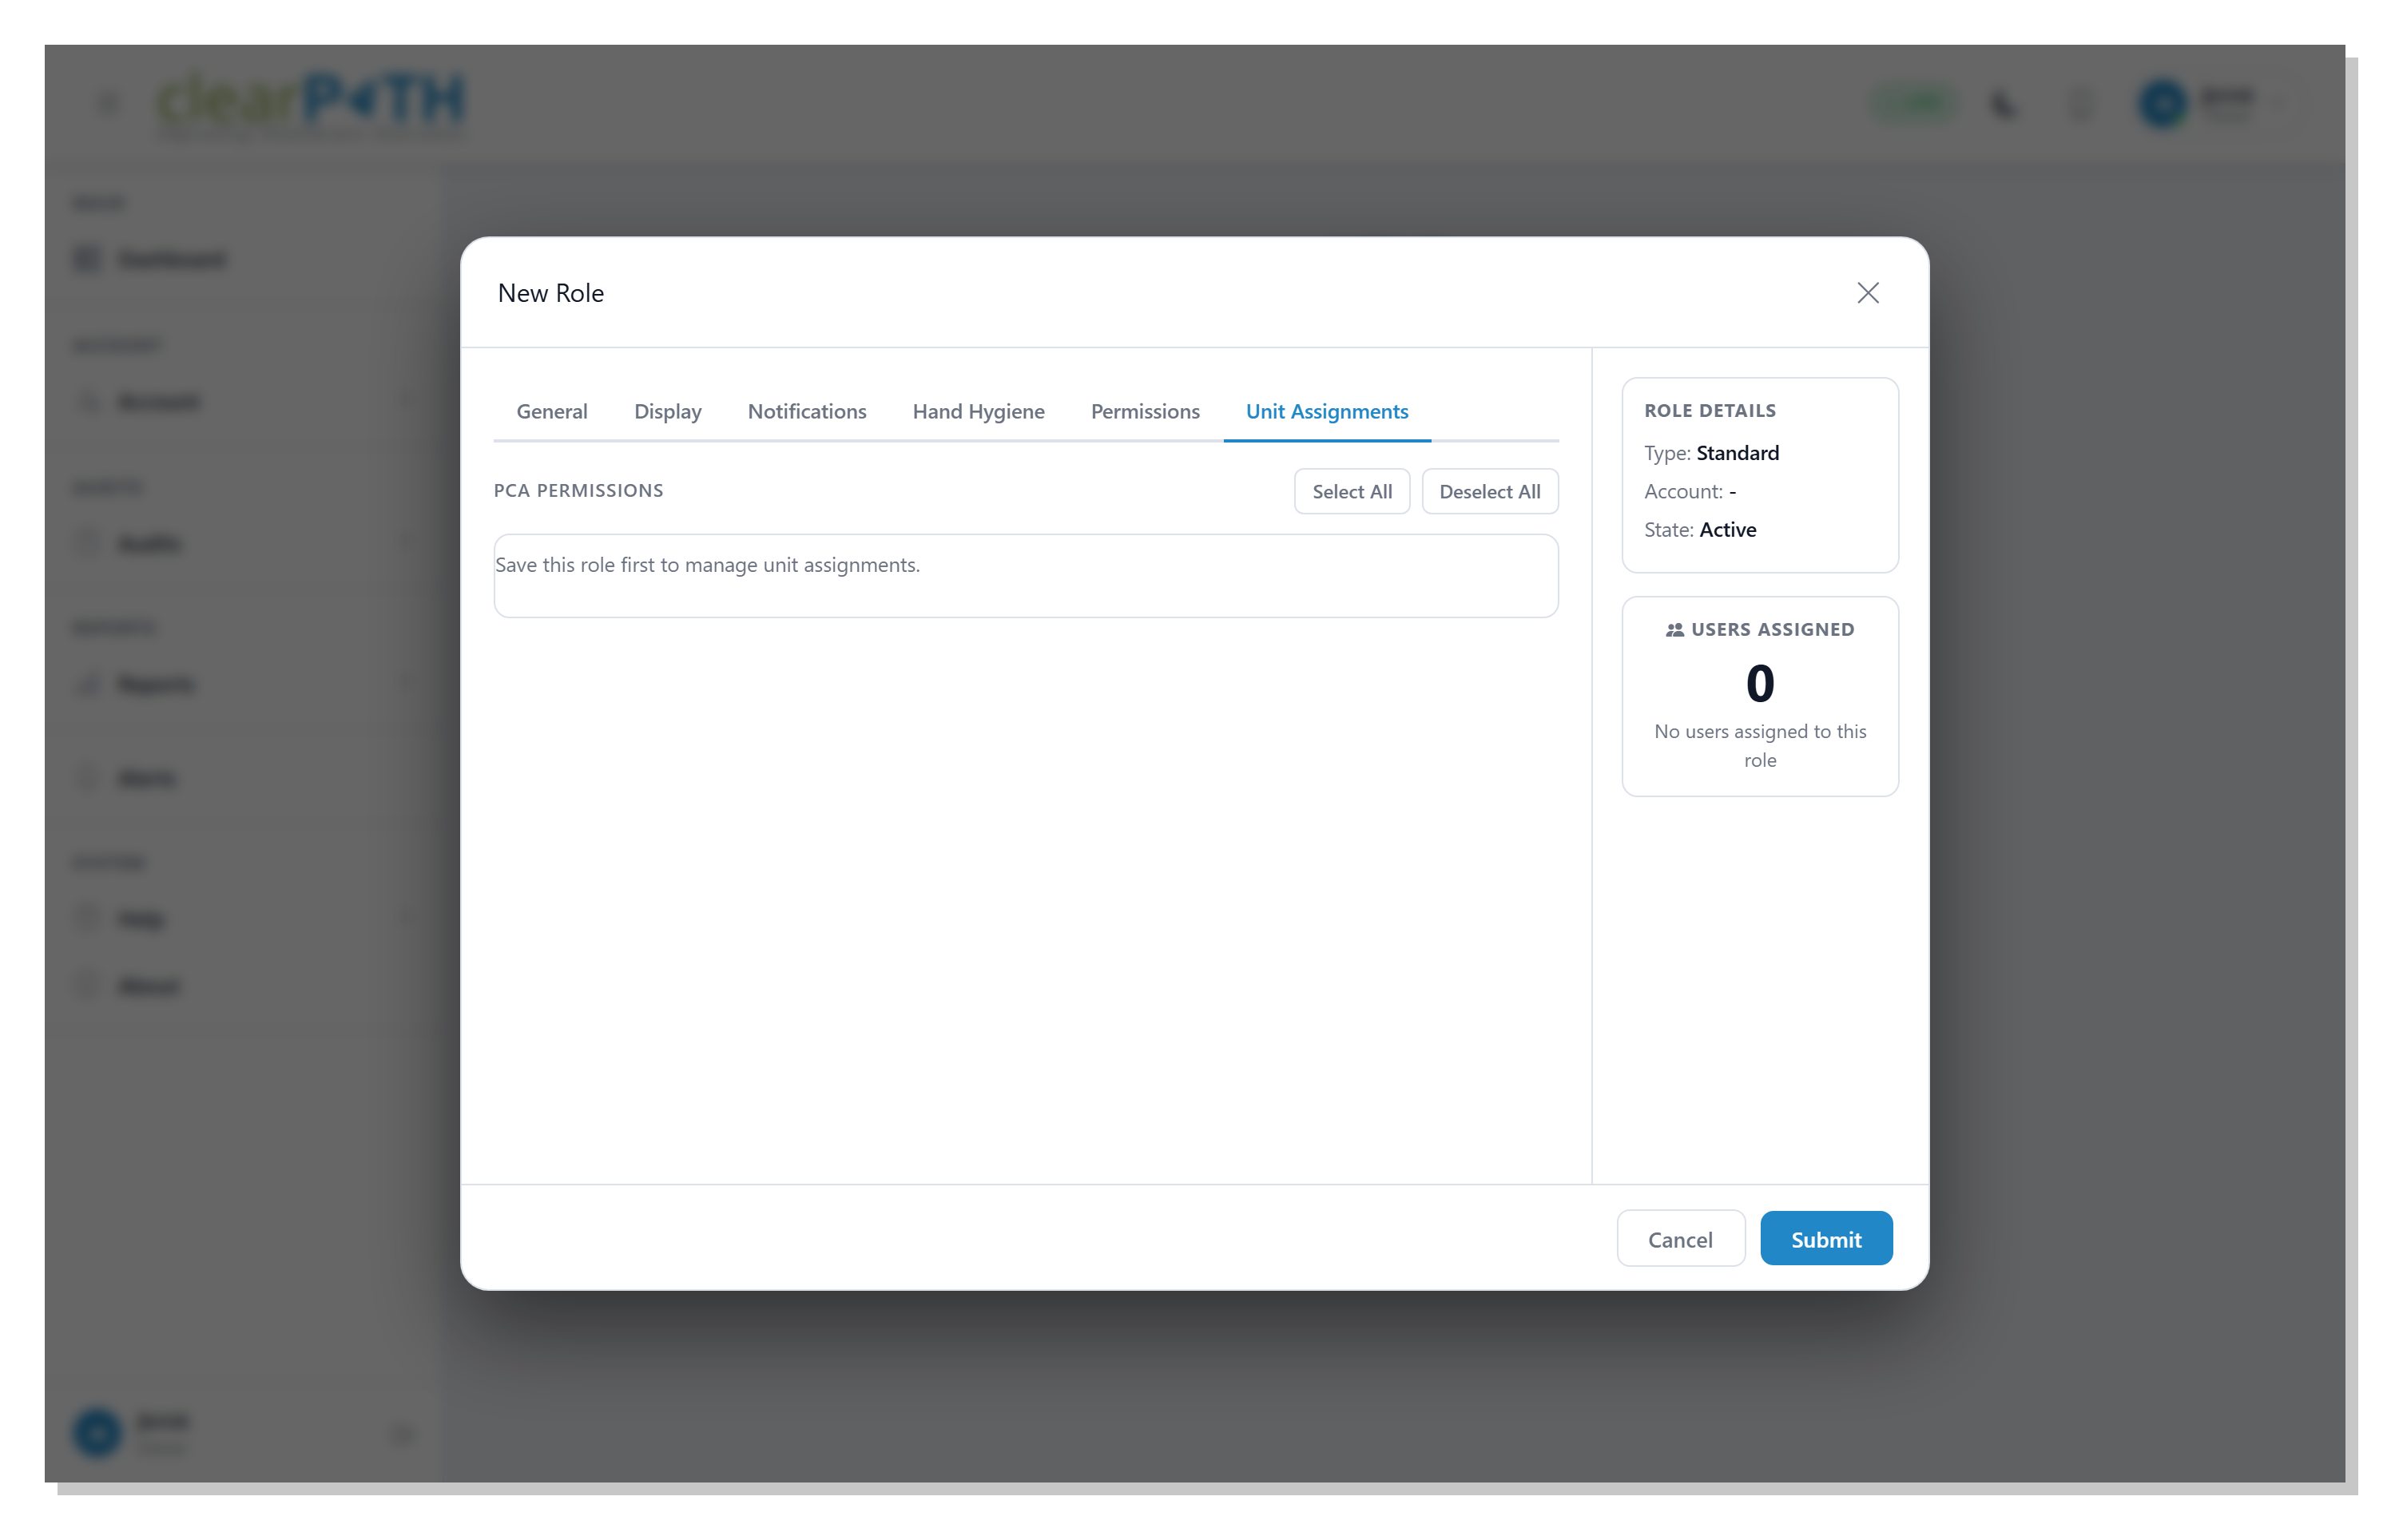
Limit a role to specific units. Tick each unit the role is allowed to audit; leave the rest unchecked. A role with no units ticked can audit in every unit (the default); a role with at least one unit ticked is restricted to the ticked set.
Click Submit to save any changes across the tabs, or
Cancel to discard them.
22.4. Auditor Groups
Auditor Groups let administrators bundle auditors together so their observations can be reported or charted as a single dataset — for example Infection Prevention and Control auditors vs. Hand Hygiene Champions.
To open the list, go to Account | Users | Users Group.
22.4.1. Creating a Group
Click Add a User Category from the action menu, then:
Name the group and give it a description.
Toggle
Activeon.Tick
Include in Dashboardif you want observations from this group to appear on the dashboard.Save.
Users are added to the group from their individual User Editor.
22.4.2. Default Group
One group can be marked as the default. Any new user who isn’t
explicitly assigned to another group is assigned to the default.
clearPath creates and maintains a Default User Category if none
exists.
22.4.3. Deleting a Group
Disable the group first (untick Active) — the trash icon is
only available on disabled groups. Deleting moves every assigned
auditor back into Uncategorized.
22.4.4. How Groups Are Used
Reports — any report definition that scopes by user category.
Dashboard — the
Compliance by Groupwidget reads from this list.Filtering — the audit-session list filters by auditor group.
22.5. Two-Factor Authentication
clearPath supports two ways to verify a sign-in once two-factor authentication (2FA) is turned on for a user:
Authenticator app — the default. A six-digit time-based one-time-password (TOTP) is generated every 30 seconds by an app on the user’s phone (for example Google Authenticator, Microsoft Authenticator, Authy, or 1Password).
Text message (SMS) — an alternative for users who opt in. The same six-digit code is delivered by text message to the mobile number on the user’s profile.
Either channel produces a valid code. A user can use whichever is more convenient on the day — there is no “primary” channel that has to be picked at sign-in.
22.5.1. Enabling 2FA for a User
Administrators turn 2FA on or off from the User
Editor Login tab. With 2FA enabled:
On the user’s next sign-in, clearPath shows a setup screen with a QR code.
The user scans the QR code with an authenticator app, which then generates a fresh six-digit code every 30 seconds.
The user enters the current code to confirm the pairing and finish sign-in.
To also allow text-message verification, set the user’s
Mobile Number (SMS) and turn on Use SMS for two-factor
verification on the Notify tab.
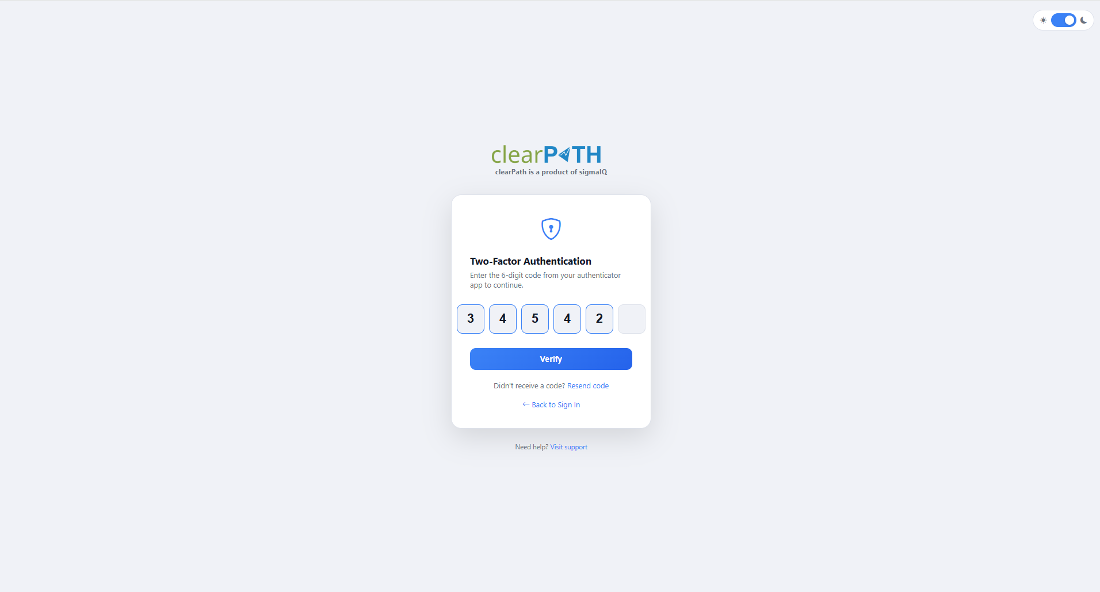
22.5.2. Signing In with 2FA
After entering your username and password you are taken to the 2FA prompt:
Enter the current six-digit code from your authenticator app, or
If you have text-message verification turned on, click
Send
code by SMS
below the code boxes — clearPath texts a fresh six-digit code to your mobile number, which you then enter in the same boxes.
If the code matches, sign-in completes and you are taken to the dashboard.
Note
The Send code by SMS link is only shown when your account is
eligible: 2FA is on, your profile has a mobile number, you have
ticked Use SMS for two-factor verification on your profile,
and your organisation has the SMS feature configured. If any of
those is missing, only the authenticator-app entry is offered.
Codes delivered by SMS are valid for five minutes. If the text message does not arrive (poor signal, wrong number, blocked sender), use the authenticator app instead, or contact your administrator to confirm the number on file.
22.5.3. Lost Device / Reset
If a user loses access to their authenticator (for example when replacing a phone), an administrator can disable 2FA from the user’s editor. The next time the user signs in they are prompted to pair a new authenticator.
A user with text-message verification turned on can still sign in
when their authenticator app is unavailable — just use Send
code by SMS on the verification screen.
22.6. LDAP / Active Directory
LDAP and Active Directory sign-in is available with clearPath Ultimate edition for on-premise deployments. Contact support@clearpathhealthsolutions.com for configuration help.