2. Accreditation Canada
Note
Preview feature. The Accreditation Canada section is shipping in preview while the Required Organizational Practices catalog and the readiness scoring rules are validated with our pilot customers. The catalog tracks the November 2025 ROP list. The user interface and the structure of the Evidence Export may change before the feature exits preview.
The Accreditation Canada section bundles the tools that clearPath provides for hospitals, long-term-care homes, and community organisations preparing for an Accreditation Canada / HSO survey under the Qmentum cycle. It is built around the ten Required Organizational Practices (ROPs) that surveyors assess on every visit, plus the existing hand-hygiene observation system that supports the Infection Prevention and Control standards:
Survey Readiness — a single dashboard with a ten-cell ROP heat map, risk-screen completion, open action plans, and the trailing twelve-month hand-hygiene compliance trend.
ROP Catalog — the ten current ROPs grouped by category, with a one-click drill-down to the tests for compliance and evidence already captured for each.
Action Plans — formal Plan-Do-Study-Act (PDSA) tracking for any ROP that needs corrective action, with the option to link the plan directly to its ROP.
Tracers — generates randomised observation worklists that mirror the surveyor tracer methodology, scoped to a single ROP if desired.
Risk Screens — captures the documented risk assessments and follow-up that support the five Risk-Assessment ROPs (Falls, Skin Integrity, VTE, Suicide, At-home).
Evidence Export — assembles a printable evidence package an accreditation lead can hand to a surveyor.
To open the section, go to Transparency and Standards | Accreditation Canada in the sidebar and pick the page you need.
2.1. Survey Readiness
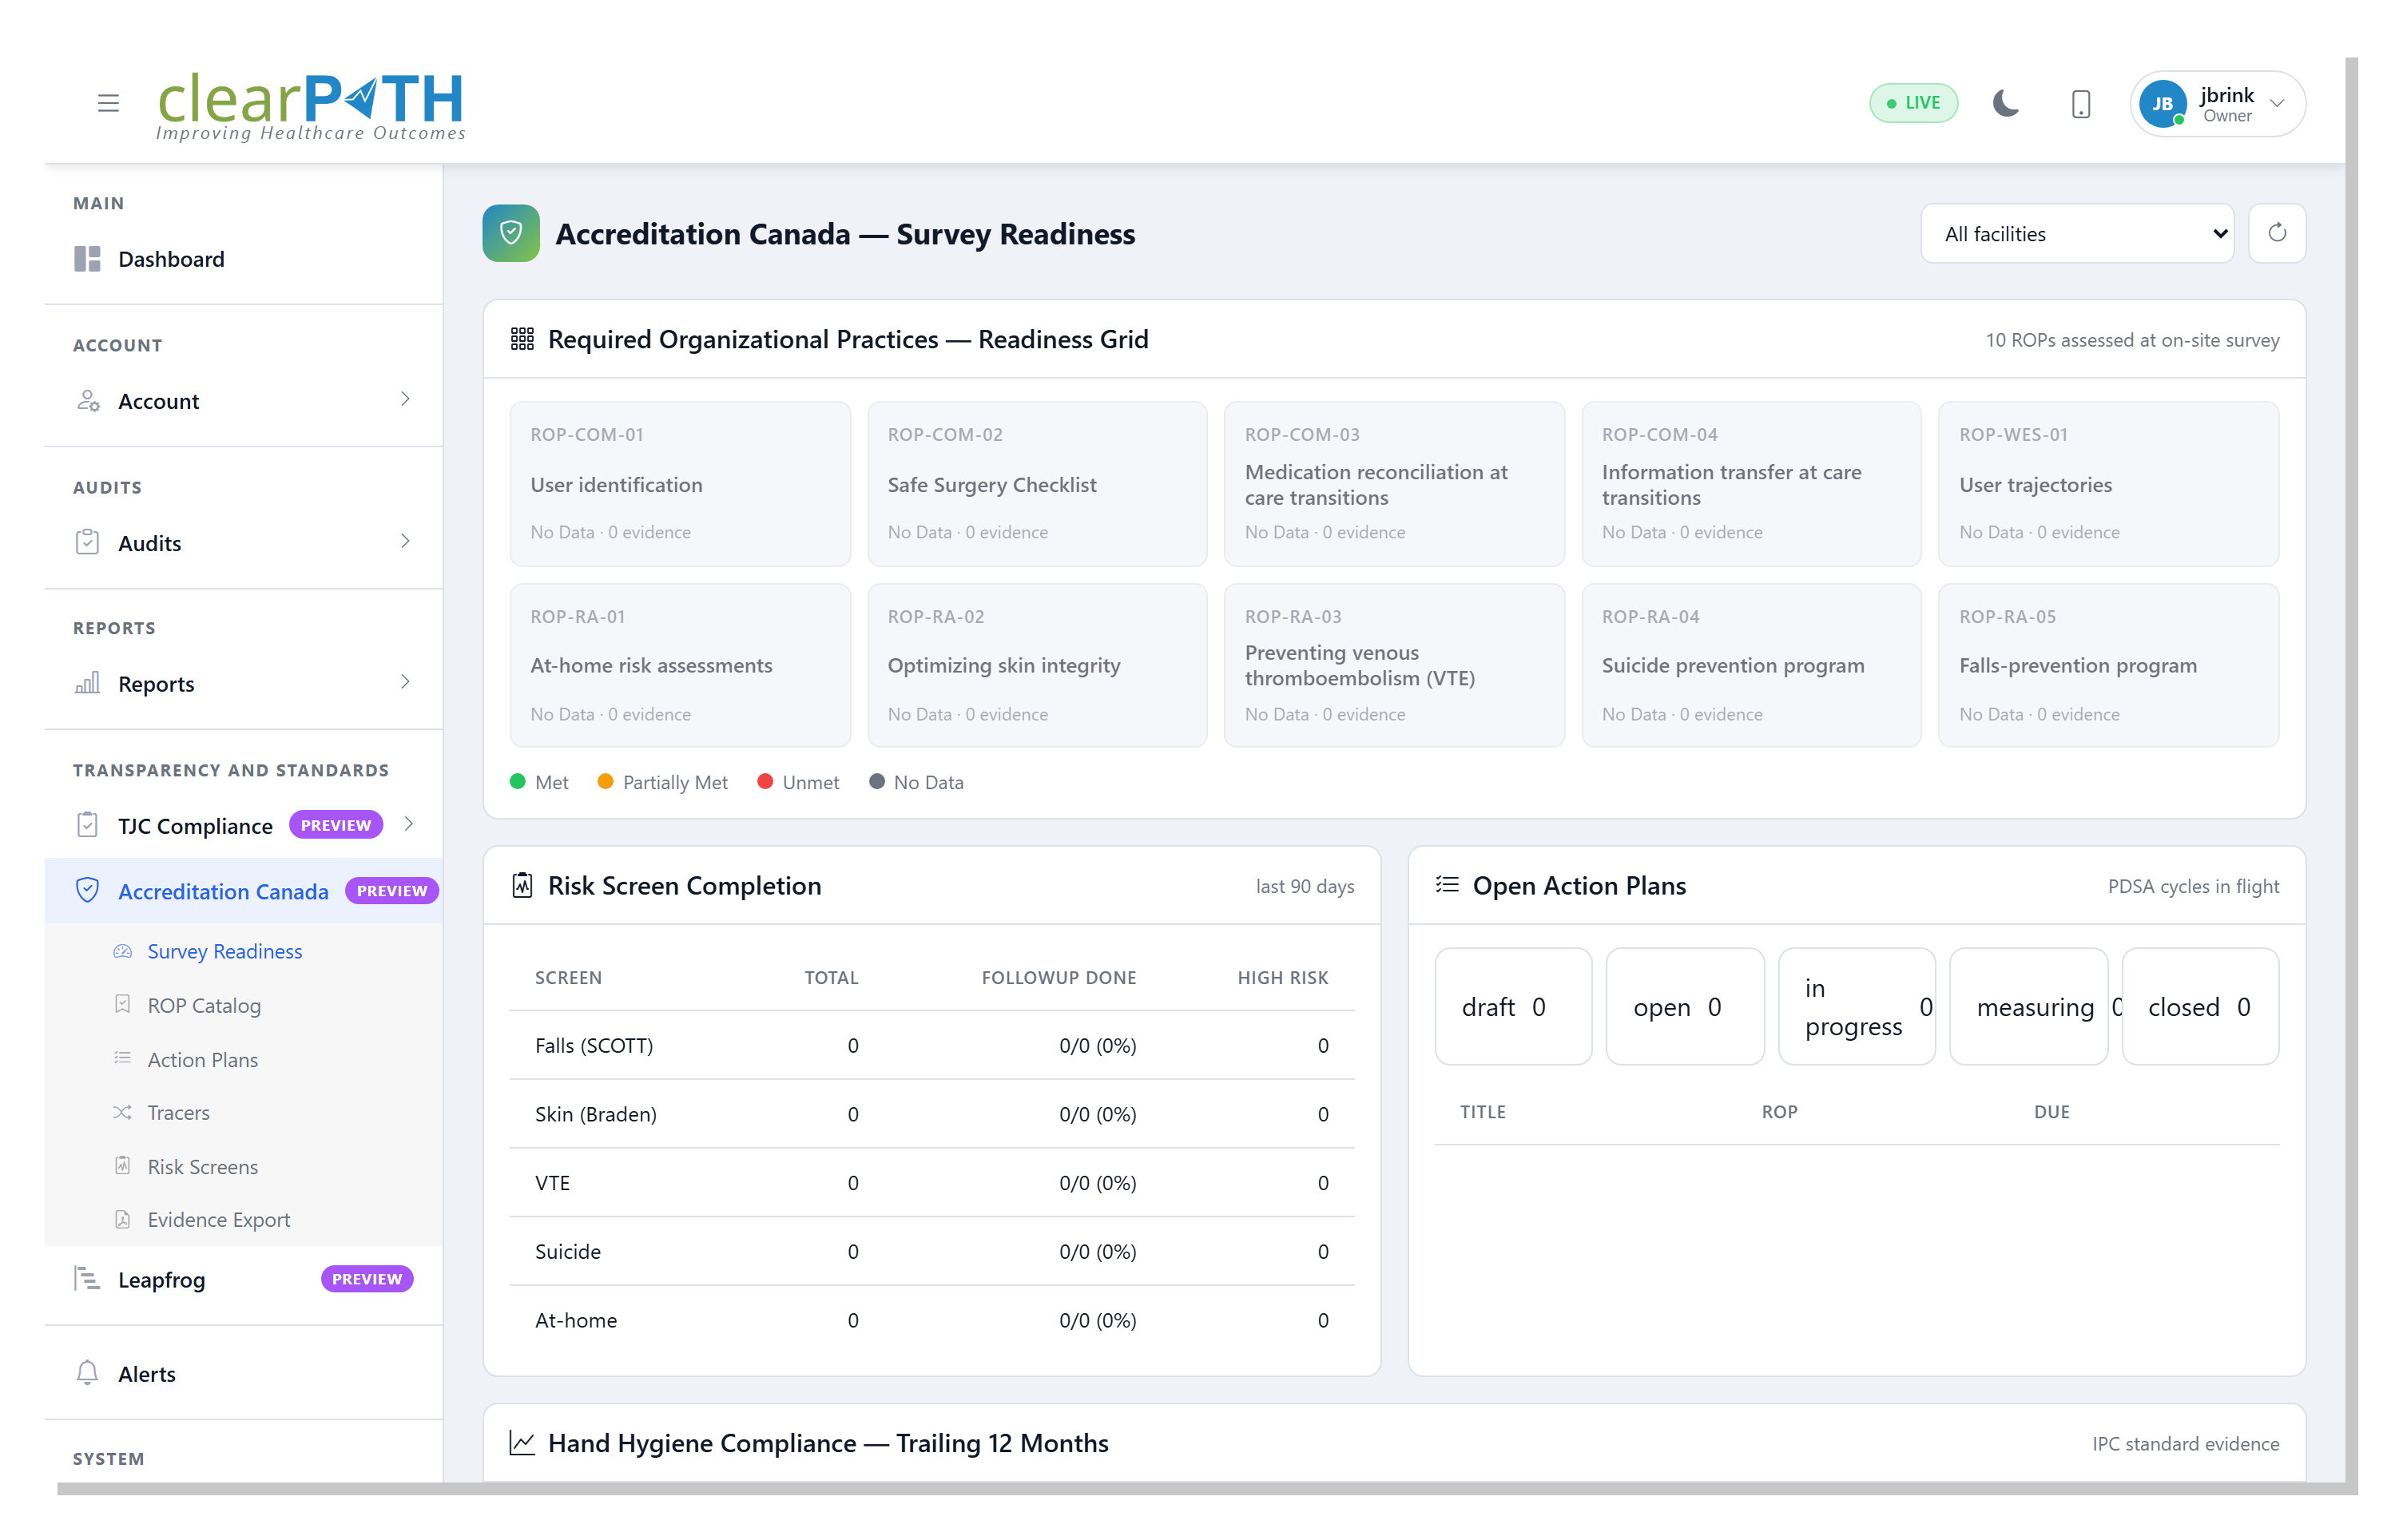
Survey Readiness consolidates the data Accreditation Canada surveyors most commonly ask for into a single page so you do not have to assemble it by hand. The page does not change underlying data — it is a read-only view onto the ROPs, risk screens, action plans, and hand-hygiene observations that the rest of clearPath already maintains.
To open the page, go to Transparency and Standards | Accreditation Canada | Survey Readiness.
2.1.1. Page Header Actions
All facilities— limit every card on the page to a single facility, or leave it onAll facilitiesto see the organisation-wide picture.Refresh — reload all four cards.
2.1.2. Cards
Required Organizational Practices --- Readiness Grid— a ten-cell heat map covering all current ROPs. Each cell shows the ROP code, title, status, and how many pieces of evidence clearPath has on file for it. The cell colour reflects the surveyor rating language: green forMet, amber forPartially Met, red forUnmet, and grey forNo Data. Click any cell to open that ROP’s detail page.Risk Screen Completion— a roster of the five Risk-Assessment ROPs with totals for the trailing ninety days: how many screens were performed, how many of the screens that required follow-up had the follow-up documented, and how many of those screens flagged the subject as high risk.Open Action Plans— five count chips by status (Draft,Open,In Progress,Measuring,Closed) and a list of upcoming-due plans linked to their ROP. Click any title to jump straight to the plan’s editor.Hand Hygiene Compliance --- Trailing 12 Months— a line chart of average compliance per month. Hand hygiene is not itself an ROP under the 2025 list, but it is the single largest body of evidence for the Infection Prevention and Control standards, so the trend is surfaced here for convenience.
2.1.3. Status Pills
Every cell on the readiness grid carries the same status pill colour scheme that Accreditation Canada uses on the survey report itself, so you can scan the page top-to-bottom and spot any ROP that needs attention before the on-site visit.
2.2. ROP Catalog
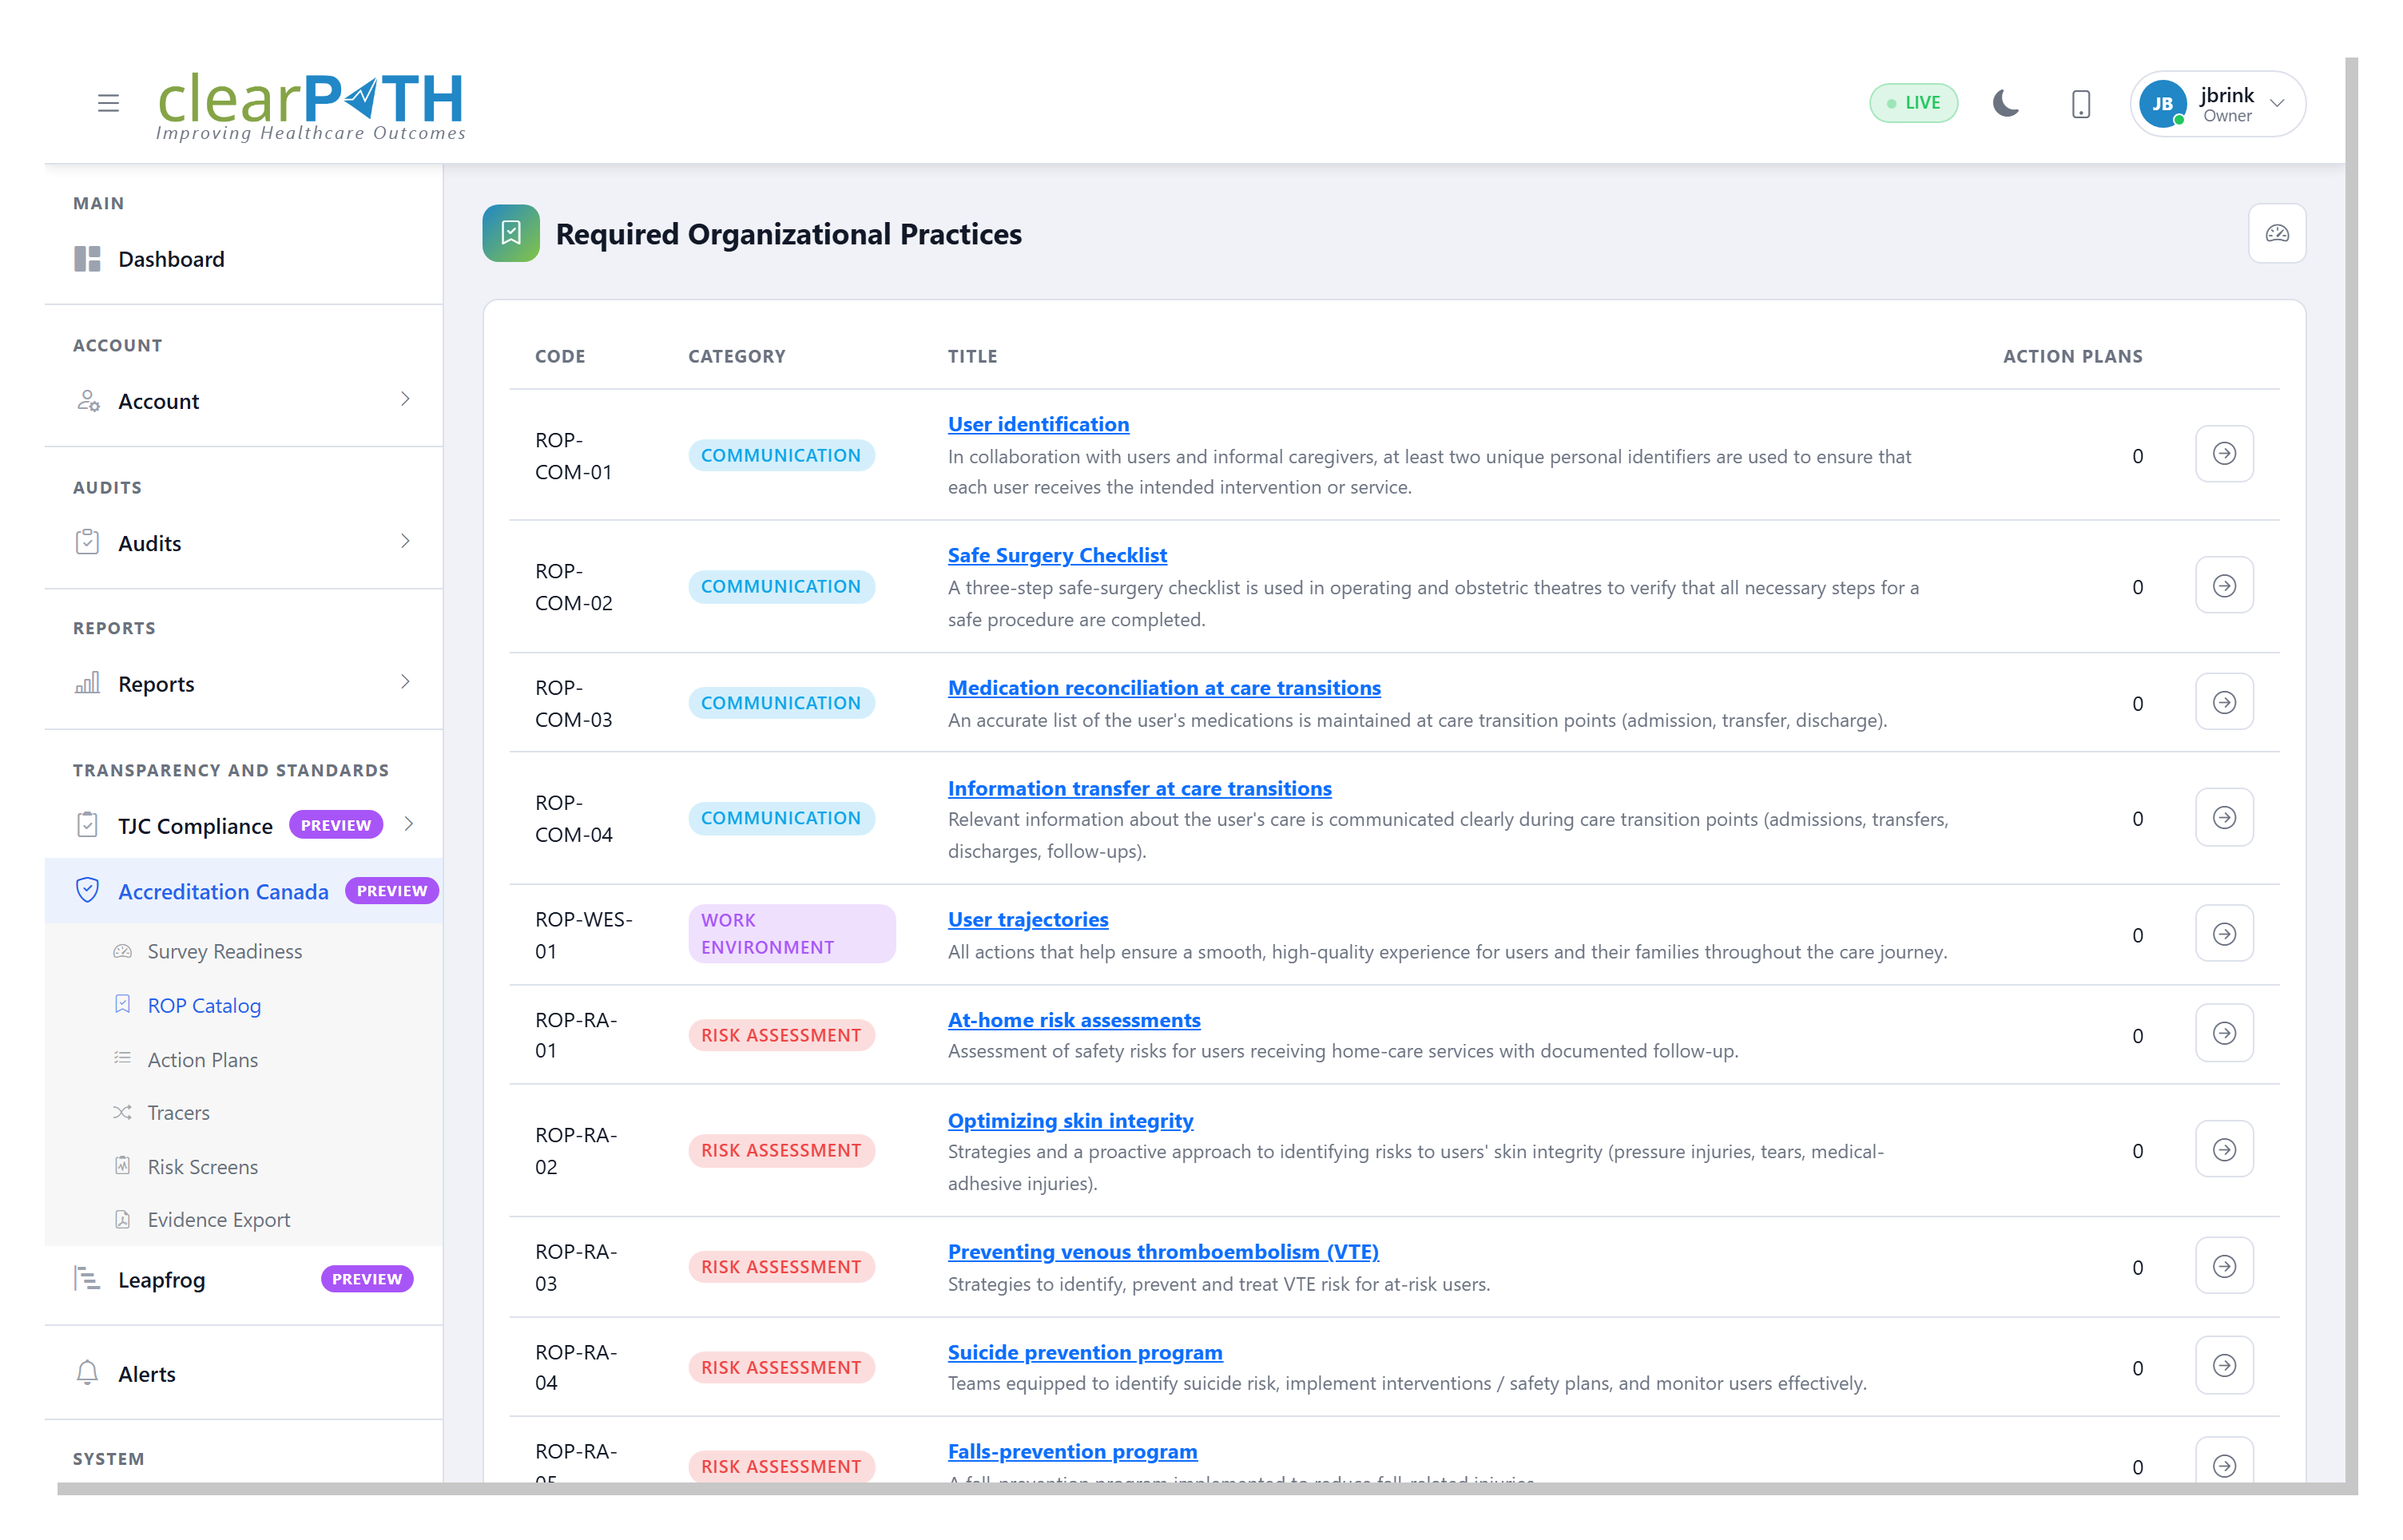
The ROP Catalog lists the ten Required Organizational Practices that Accreditation Canada surveyors assess on every visit, grouped by category:
Communication — User Identification, Safe Surgery Checklist, Medication Reconciliation at Care Transitions, and Information Transfer at Care Transitions.
Work Environment / Staff — User Trajectories.
Risk Assessment — At-home Risk Assessments, Optimizing Skin Integrity, Preventing Venous Thromboembolism, Suicide Prevention Program, and Falls Prevention Program.
The catalog itself is read-only — the ten ROPs are fixed by Accreditation Canada and updated each survey cycle. The page lets you see at a glance how much evidence clearPath holds for each ROP and drill into any single ROP to see the tests for compliance and the linked action plans.
To open the page, go to Transparency and Standards | Accreditation Canada | ROP Catalog.
2.2.1. Row Columns
Each row shows:
Code— the ROP identifier (for exampleROP-COM-01for User Identification).Category— a coloured pill for Communication, Work Environment, or Risk Assessment.Title— the ROP name and a one-line summary of the practice. Click the title to open the ROP detail page.Action Plans— the count of action plans currently linked to the ROP. Click the row to see them.
2.2.2. ROP Detail
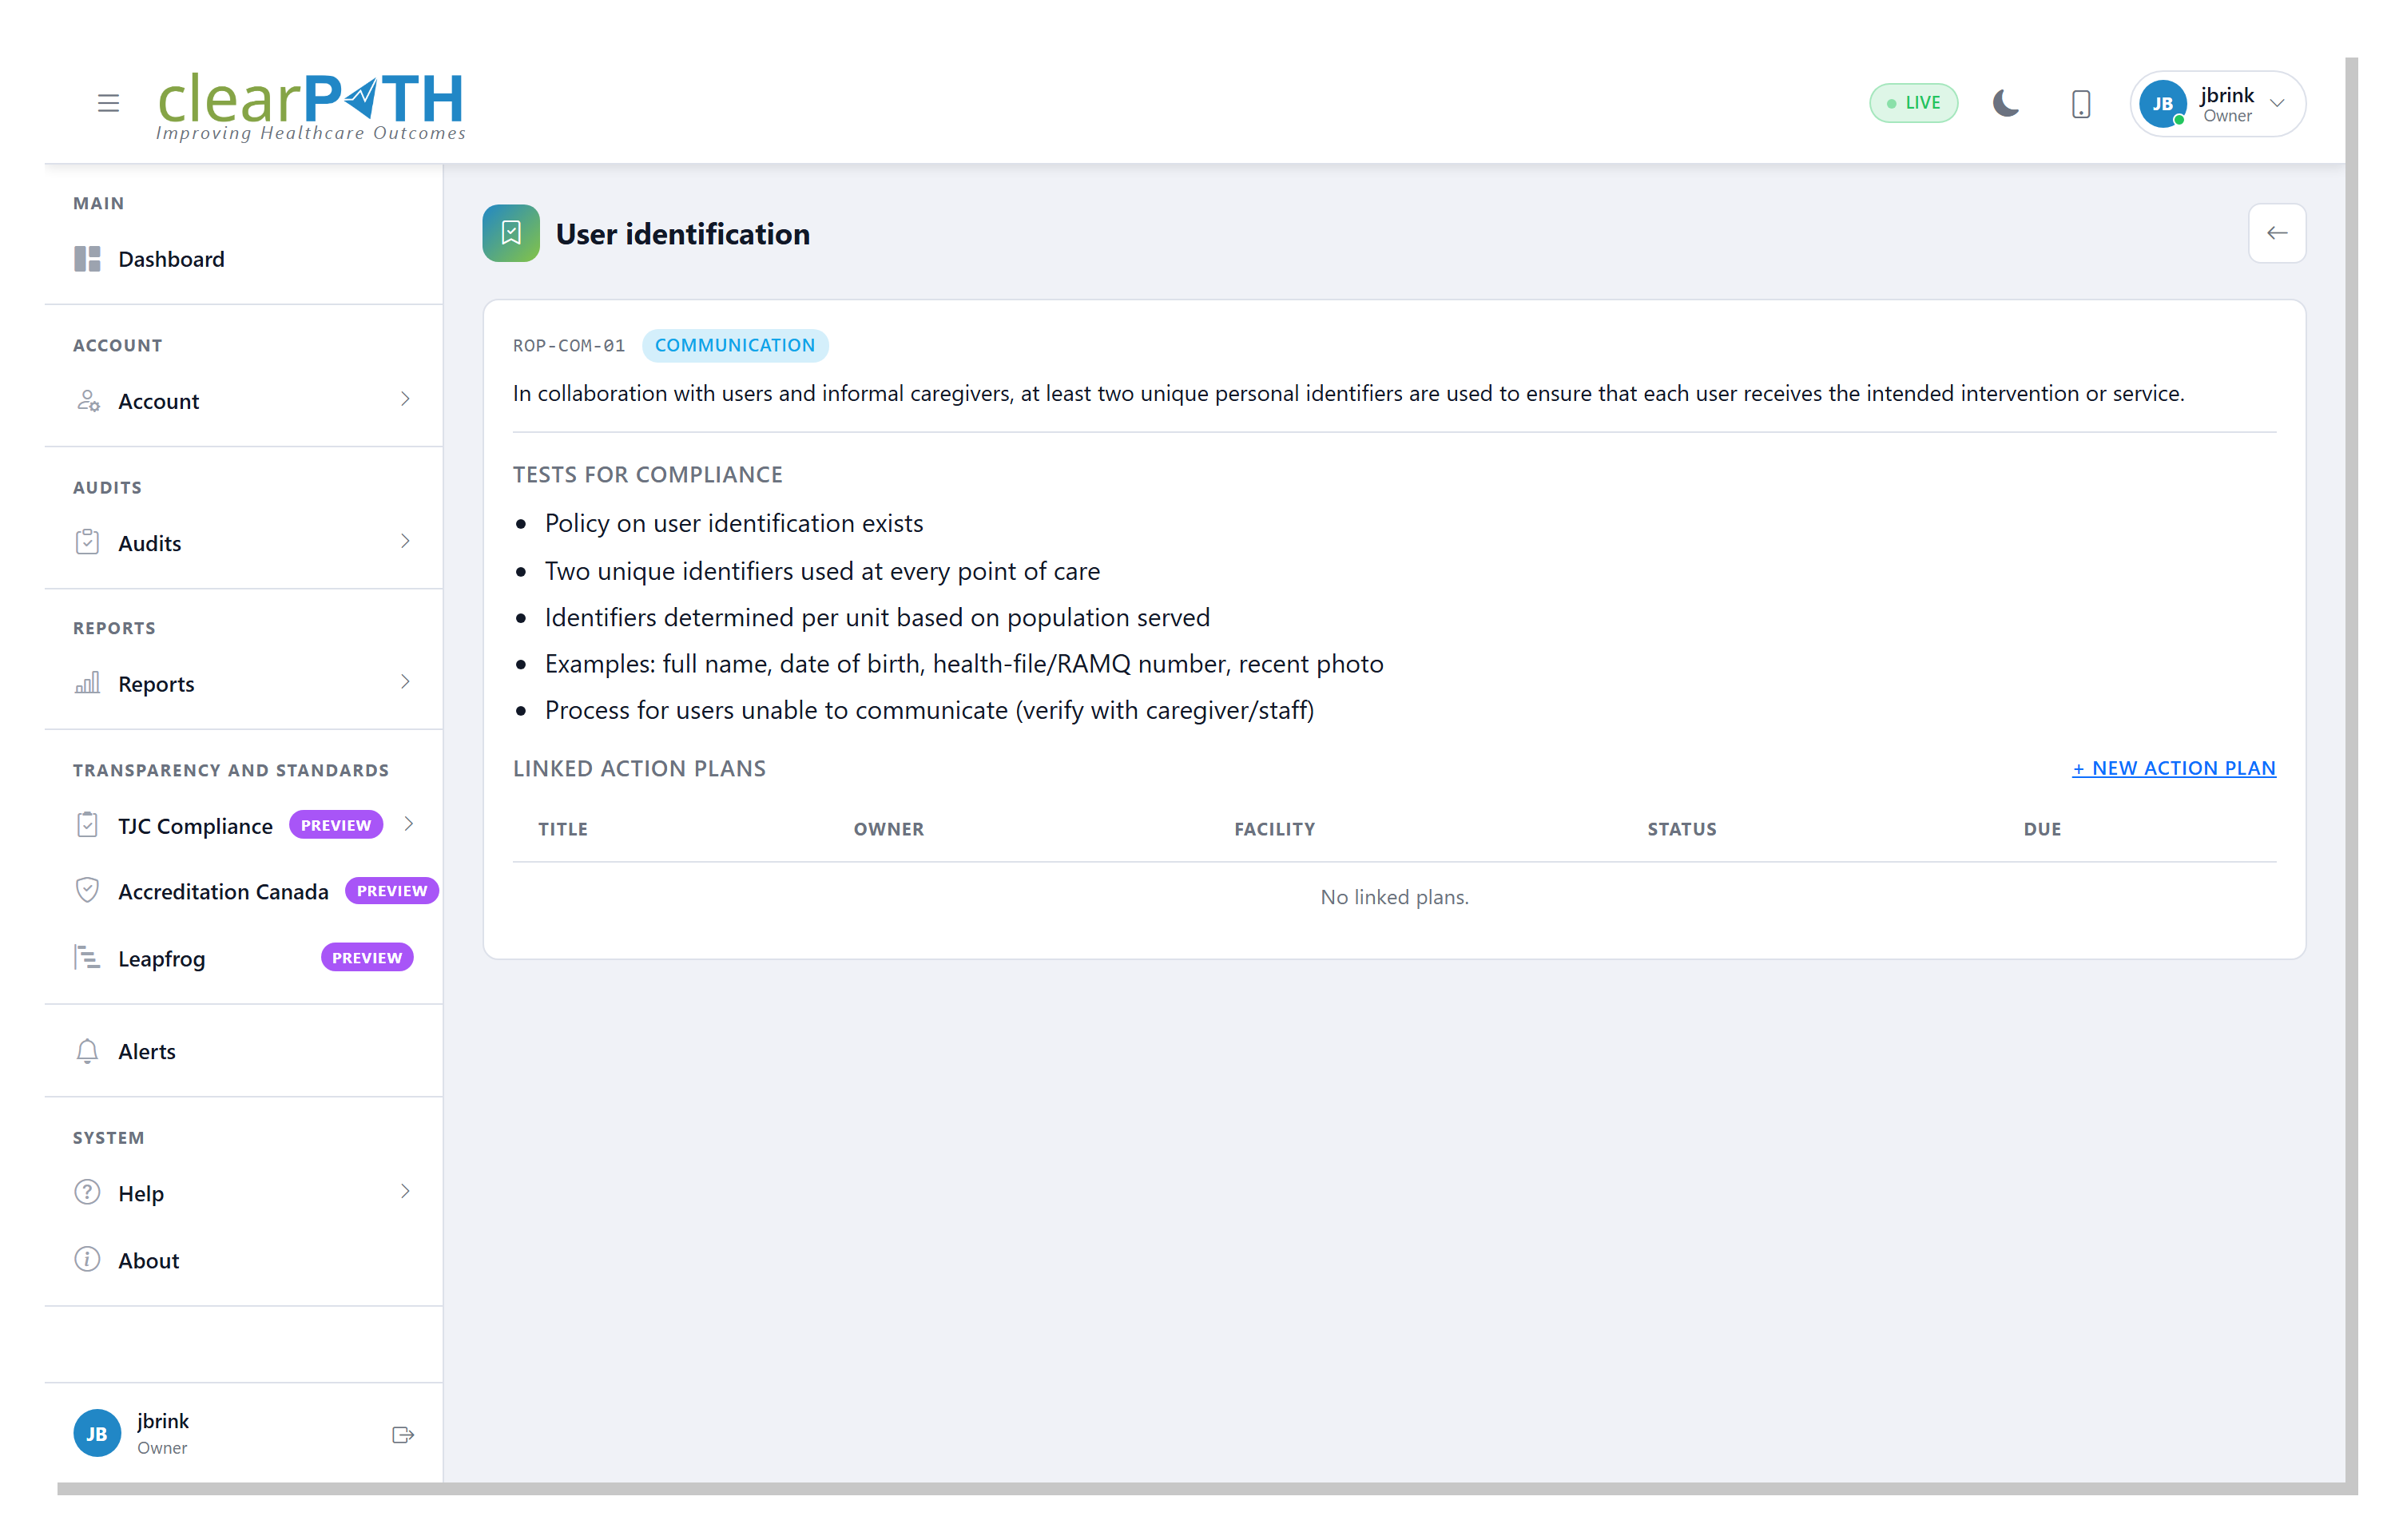
Each ROP has its own page that lays out everything a surveyor will ask about it.
Header — shows the ROP code, the category pill, and a short summary of what the practice requires.
Tests for Compliance — the bulleted list of tests Accreditation Canada applies when assessing the ROP. These come from the current Required Organizational Practices Handbook and are the evidence surveyors look for during patient and system tracers.
Linked Action Plans — every action plan currently tied to this ROP, with title, owner, facility, status, and due date. Click
+ New Action Planto start a fresh plan that is already linked to the ROP.
2.3. Action Plans

A Plan-Do-Study-Act (PDSA) action plan is the formal record of a
corrective intervention. When an ROP, unit, or facility falls below
its target, you create an action plan to document the intervention,
who owns it, when it is due, and how the result will be re-measured.
Accreditation Canada surveyors expect this kind of evidence whenever
a ROP is rated Partially Met or Unmet.
To open the list, go to Transparency and Standards | Accreditation Canada | Action Plans.
2.3.1. Action Plan List
The page shows every action plan in your account, newest by due date first. The toolbar lets you narrow the list quickly.
2.3.1.1. Page Header Actions
New Action Plan— opens the editor to create a new plan.
2.3.1.2. Filtering
Search title or problem...— matches text in the plan title or the problem statement.All ROPs— show only plans linked to a specific ROP.All Statuses— show only plans in the chosen status, or all plans.Refresh — reload the list.
2.3.1.3. Row Columns
Each row shows:
Title— click the title to open the editor.ROP— the ROP code the plan is linked to (blank if the plan is not yet tied to a ROP).Owner— the user assigned to drive the plan to closure.Status— a coloured pill matching the plan’s PDSA stage.Target— the goal percentage the plan is working towards.Actual— the most recent re-measured value.Due— the due date.
The pencil icon on the right of every row also opens the editor.
2.3.2. Action Plan Editor
Click New Action Plan or the pencil icon on a row to open the
editor. The editor uses one form for the basic record plus four tabs
for the four PDSA phases.
2.3.2.1. Basics
Title— the plan name.ROP— pick the Required Organizational Practice the plan addresses, or leave it on-- Select ROP --for a plan that does not target a specific ROP.Owner— the user accountable for driving the plan to closure.Facility— the facility the plan targets, or-- Facility --for an account-wide plan.Status— the current PDSA stage.Start/Due/Re-measure— the timeline. The re-measure date is when you intend to check whether the intervention worked.Baseline %— the compliance percentage that triggered the plan.Target %— the goal percentage.Actual %— the most recent re-measured value, updated as the plan progresses.Problem statement— a short description of the gap between the baseline and the target.
2.3.2.2. Plan / Do / Study / Act
The four tabs each hold a free-form text area for one phase of the cycle:
Plan— the intervention, owners, resources, and how it will be communicated.Do— what was actually implemented, when, and any deviations from the plan.Study— analysis of the re-measurement vs. the baseline. Did the intervention move the metric?Act— adopt, adapt, or abandon. Document the decision and any standardisation or next-cycle changes.
Click Save to commit the plan, Delete (only on existing
plans) to remove it after a confirmation prompt, or Cancel to
return to the list without saving.
2.4. Tracers
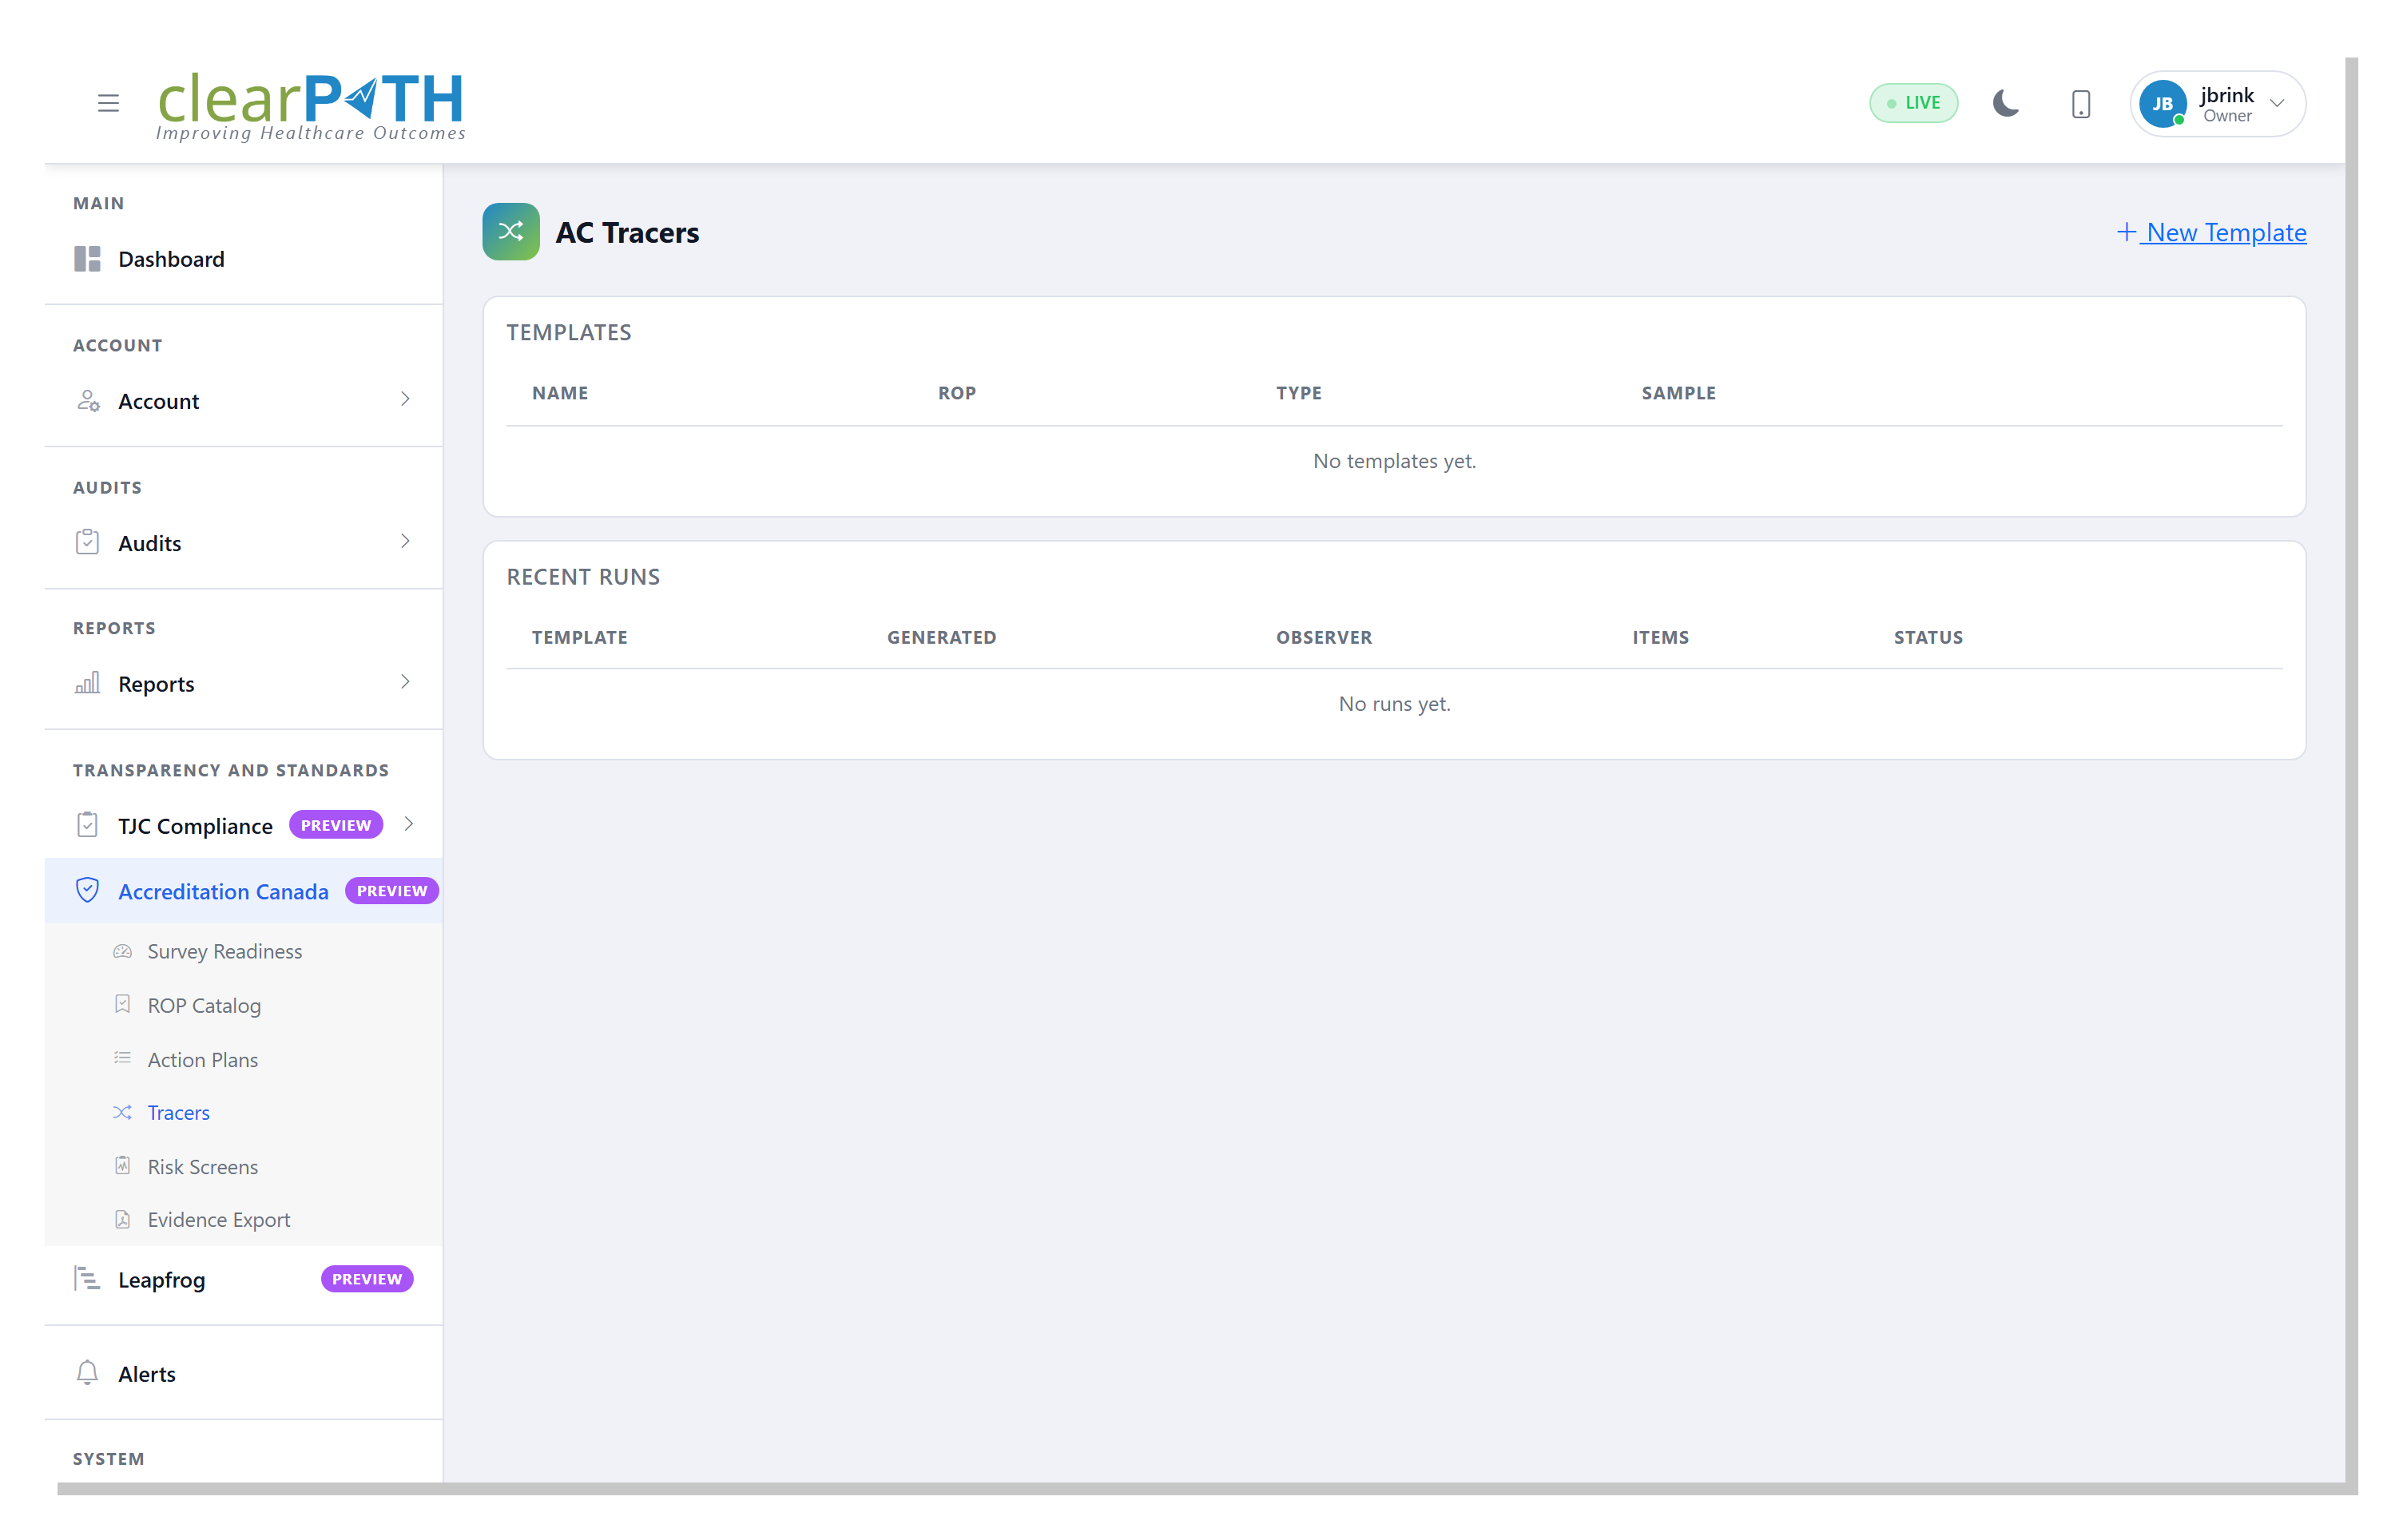
Accreditation Canada surveyors use a tracer methodology when they walk a unit: they pick a real client and follow the documented care path, asking staff to demonstrate that the policies, training, and records line up. The Tracers page lets you mirror that methodology by generating a randomised observation worklist for your own observers, optionally targeted at a single ROP.
A Tracer is the combination of two records:
a template that captures the rules (which facility, how many observations, which moments to include, an optional fixed seed, and the ROP and tracer type the run will exercise); and
a run, which is a specific worklist generated from a template at a point in time.
To open the page, go to Transparency and Standards | Accreditation Canada | Tracers.
2.4.1. Tracer List
The page shows two tables stacked vertically.
2.4.1.1. Templates
Each row shows the template’s name, the ROP code it targets, the
tracer type (Patient or System), the sample size, and a
Generate Run button that immediately produces a fresh worklist.
Page header actions:
New Template— opens the editor to create a new template.
2.4.1.2. Recent Runs
Each row shows when the run was generated, which template produced
it, the assigned observer, the number of items in the worklist, the
number that have been completed, and a status pill (Open,
In Progress, Complete).
Click any row to open the run viewer.
2.4.2. Tracer Template Editor
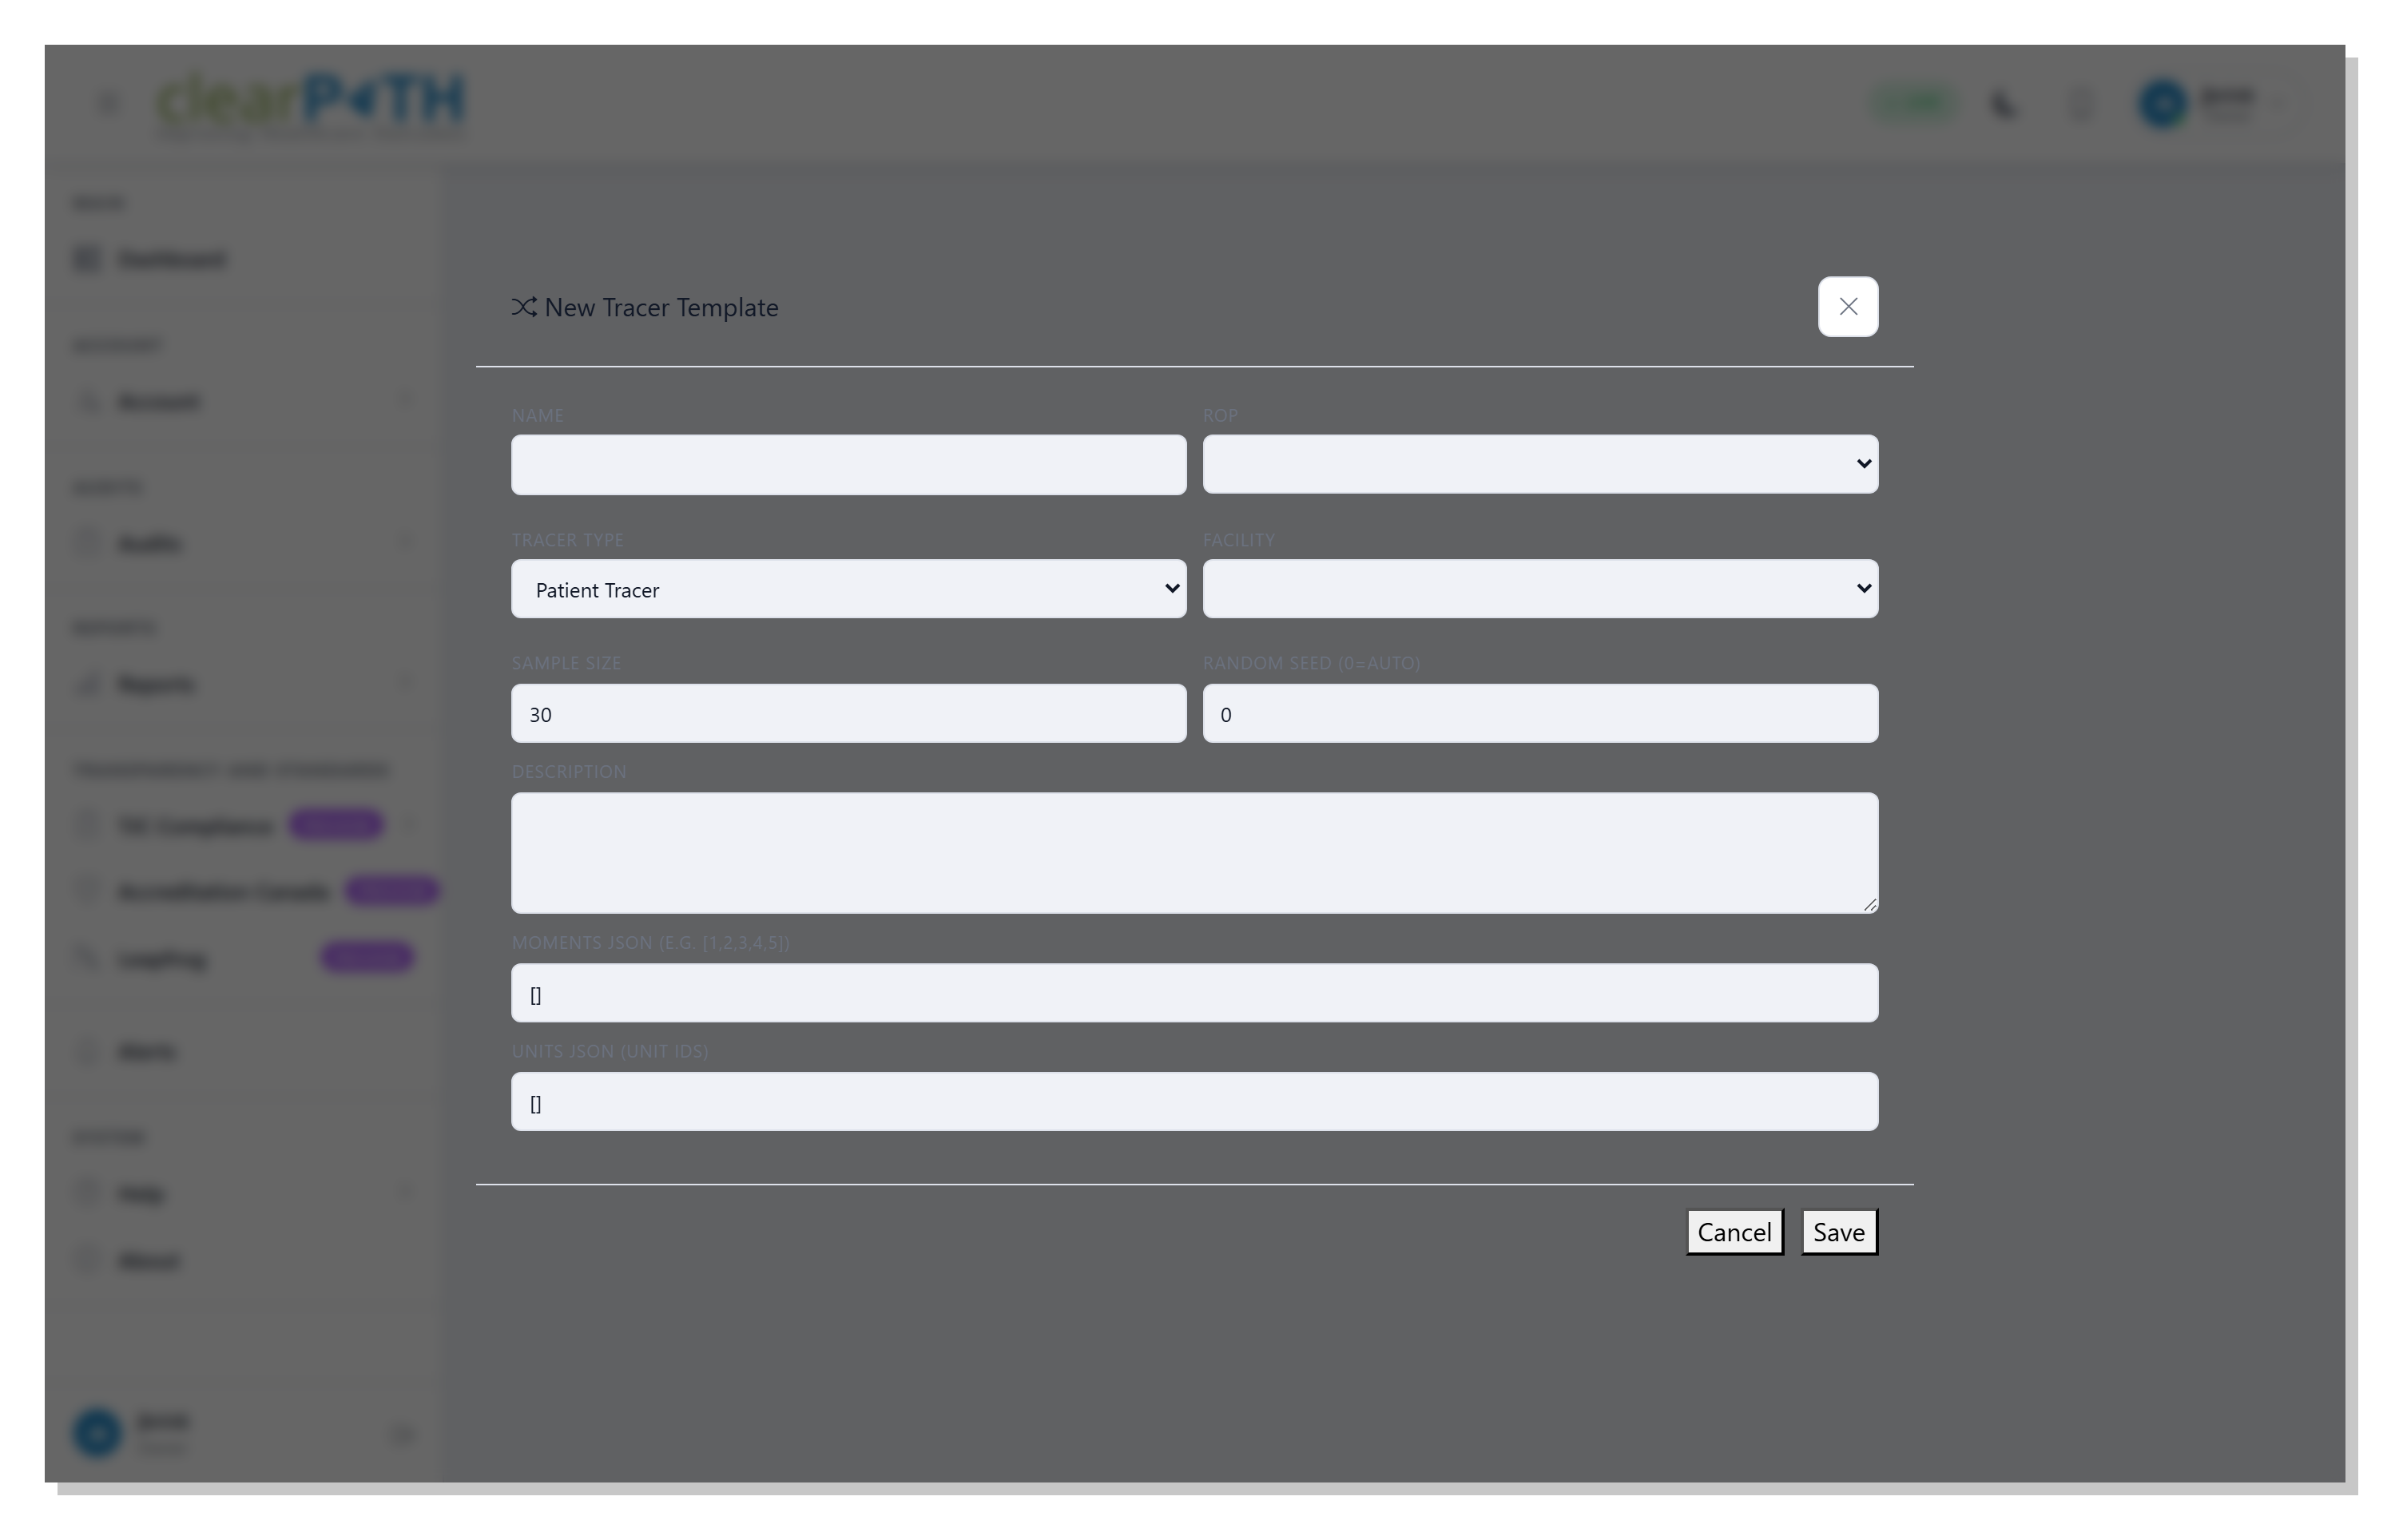
Name— a label for the template (for example Quarterly Falls Tracer).ROP— pick the ROP this template exercises, or leave it on-- Any ROP --for a generic tracer that covers more than one practice.Tracer Type—Patient Tracerfollows a single client through the care path;System Tracerevaluates a system or process across the organisation.Facility— the facility the tracer covers, or-- All facilities --.Sample Size— the number of observations the run should generate (default 30).Random Seed (0=auto)— leave at0to use the current timestamp (every run is fresh and unique). Set a fixed value to reproduce the same worklist every time — useful when a second observer needs to repeat the exact same shadow tracer.Description— optional notes describing when and how the template is used.Moments JSON— a JSON array of the moments to include (for example[1,2,3,4,5]), or[]to include every moment.Units JSON— a JSON array of unit identifiers to restrict the worklist to specific units, or[]for every unit in the facility.
Click Save to store the template, Delete (only on existing
templates) to remove it along with its previous runs, or Cancel
to return to the list without saving.
2.4.3. Tracer Run Viewer
Open a run by clicking its row in Recent Runs or by pressing
Generate Run on a template.
A summary card at the top lists the ROP, the facility, the generation date, the assigned observer, and the seed used. Below it is the worklist itself — one row per observation target, each with a sequence number, a unit, a suggested moment, and an indicator showing whether the observation has been linked to a real session.
2.5. Risk Screens
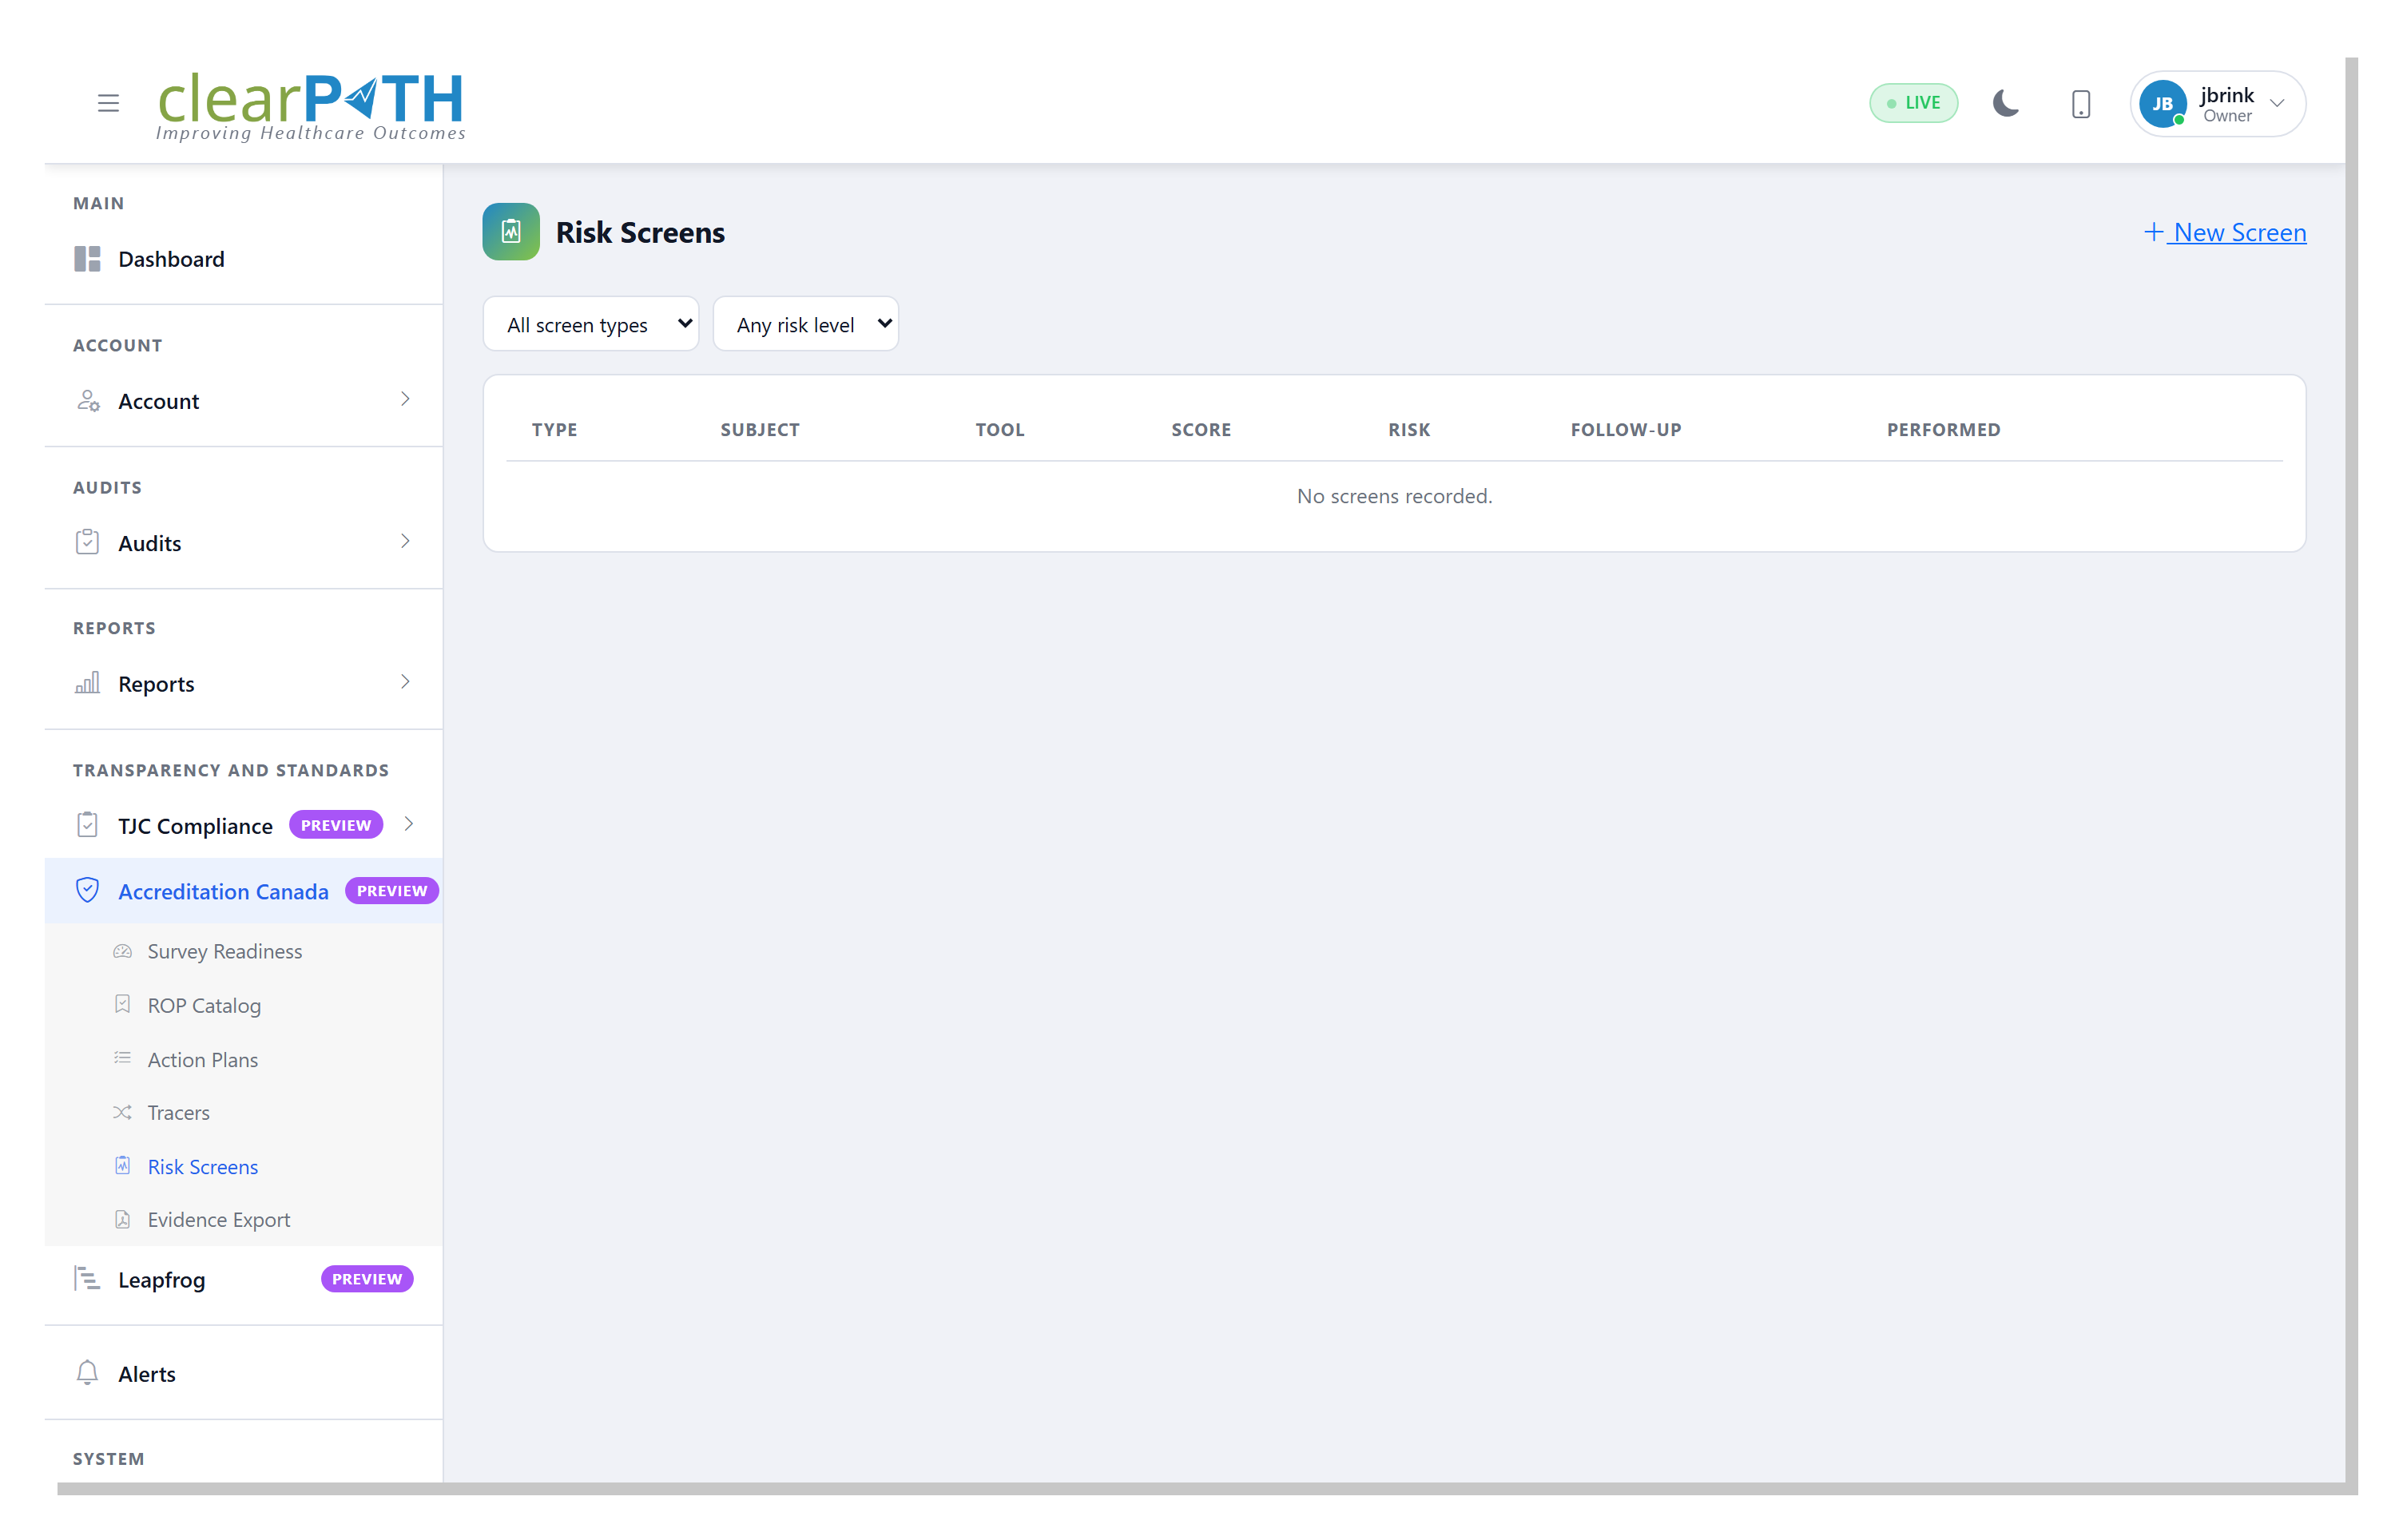
Risk Screens are the documented assessments that satisfy the “screen, intervene, follow-up” tests for compliance under the five Risk-Assessment ROPs. A single page covers all five screen types — Falls, Skin Integrity, VTE, Suicide, and At-home — with a filter to narrow the list.
To open the list, go to Transparency and Standards | Accreditation Canada | Risk Screens.
2.5.1. Page Header Actions
New Screen— opens the editor to record a new risk screen.
2.5.2. Filtering
All screen types— restrict the list to a single ROP-aligned screen type (Falls, Skin, VTE, Suicide, At-home).Any risk level— restrict toLow,Moderate, orHighrisk results only.
2.5.3. Row Columns
Each row shows:
Type— the screen type.Subject— the client the screen was performed on, with the facility and unit shown beneath the name.Tool— the screening tool used (for exampleSCOTTfor falls,Bradenfor skin integrity,Caprinifor VTE).Score— the raw tool result.Risk— a coloured pill: green forLow, amber forModerate, red forHigh.Follow-up— whether follow-up is required, when it is due, and a green check when it has been completed.Performed— the date the screen was performed.
2.5.4. Risk Screen Editor
Click New Screen or the pencil icon on a row to open the editor.
Type— pick which Risk-Assessment ROP the screen supports.Tool used— the screening tool’s name (for exampleSCOTTorBraden).Subject— the client being assessed.Facility/Unit— where the screen was performed.Performed by— the staff member who performed the screen.Performed date— when the screen was performed.Score— the raw tool result.Risk level—Low,Moderate, orHigh.Follow-up required—YesorNo. WhenYes, fill in theFollow-up duedate and, once the follow-up has been documented, theFollow-up completeddate.Notes— free-form notes for the chart.
Click Save to commit the screen, Delete (only on existing
screens) to remove it after a confirmation prompt, or Cancel to
return to the list without saving.
2.6. Evidence Export
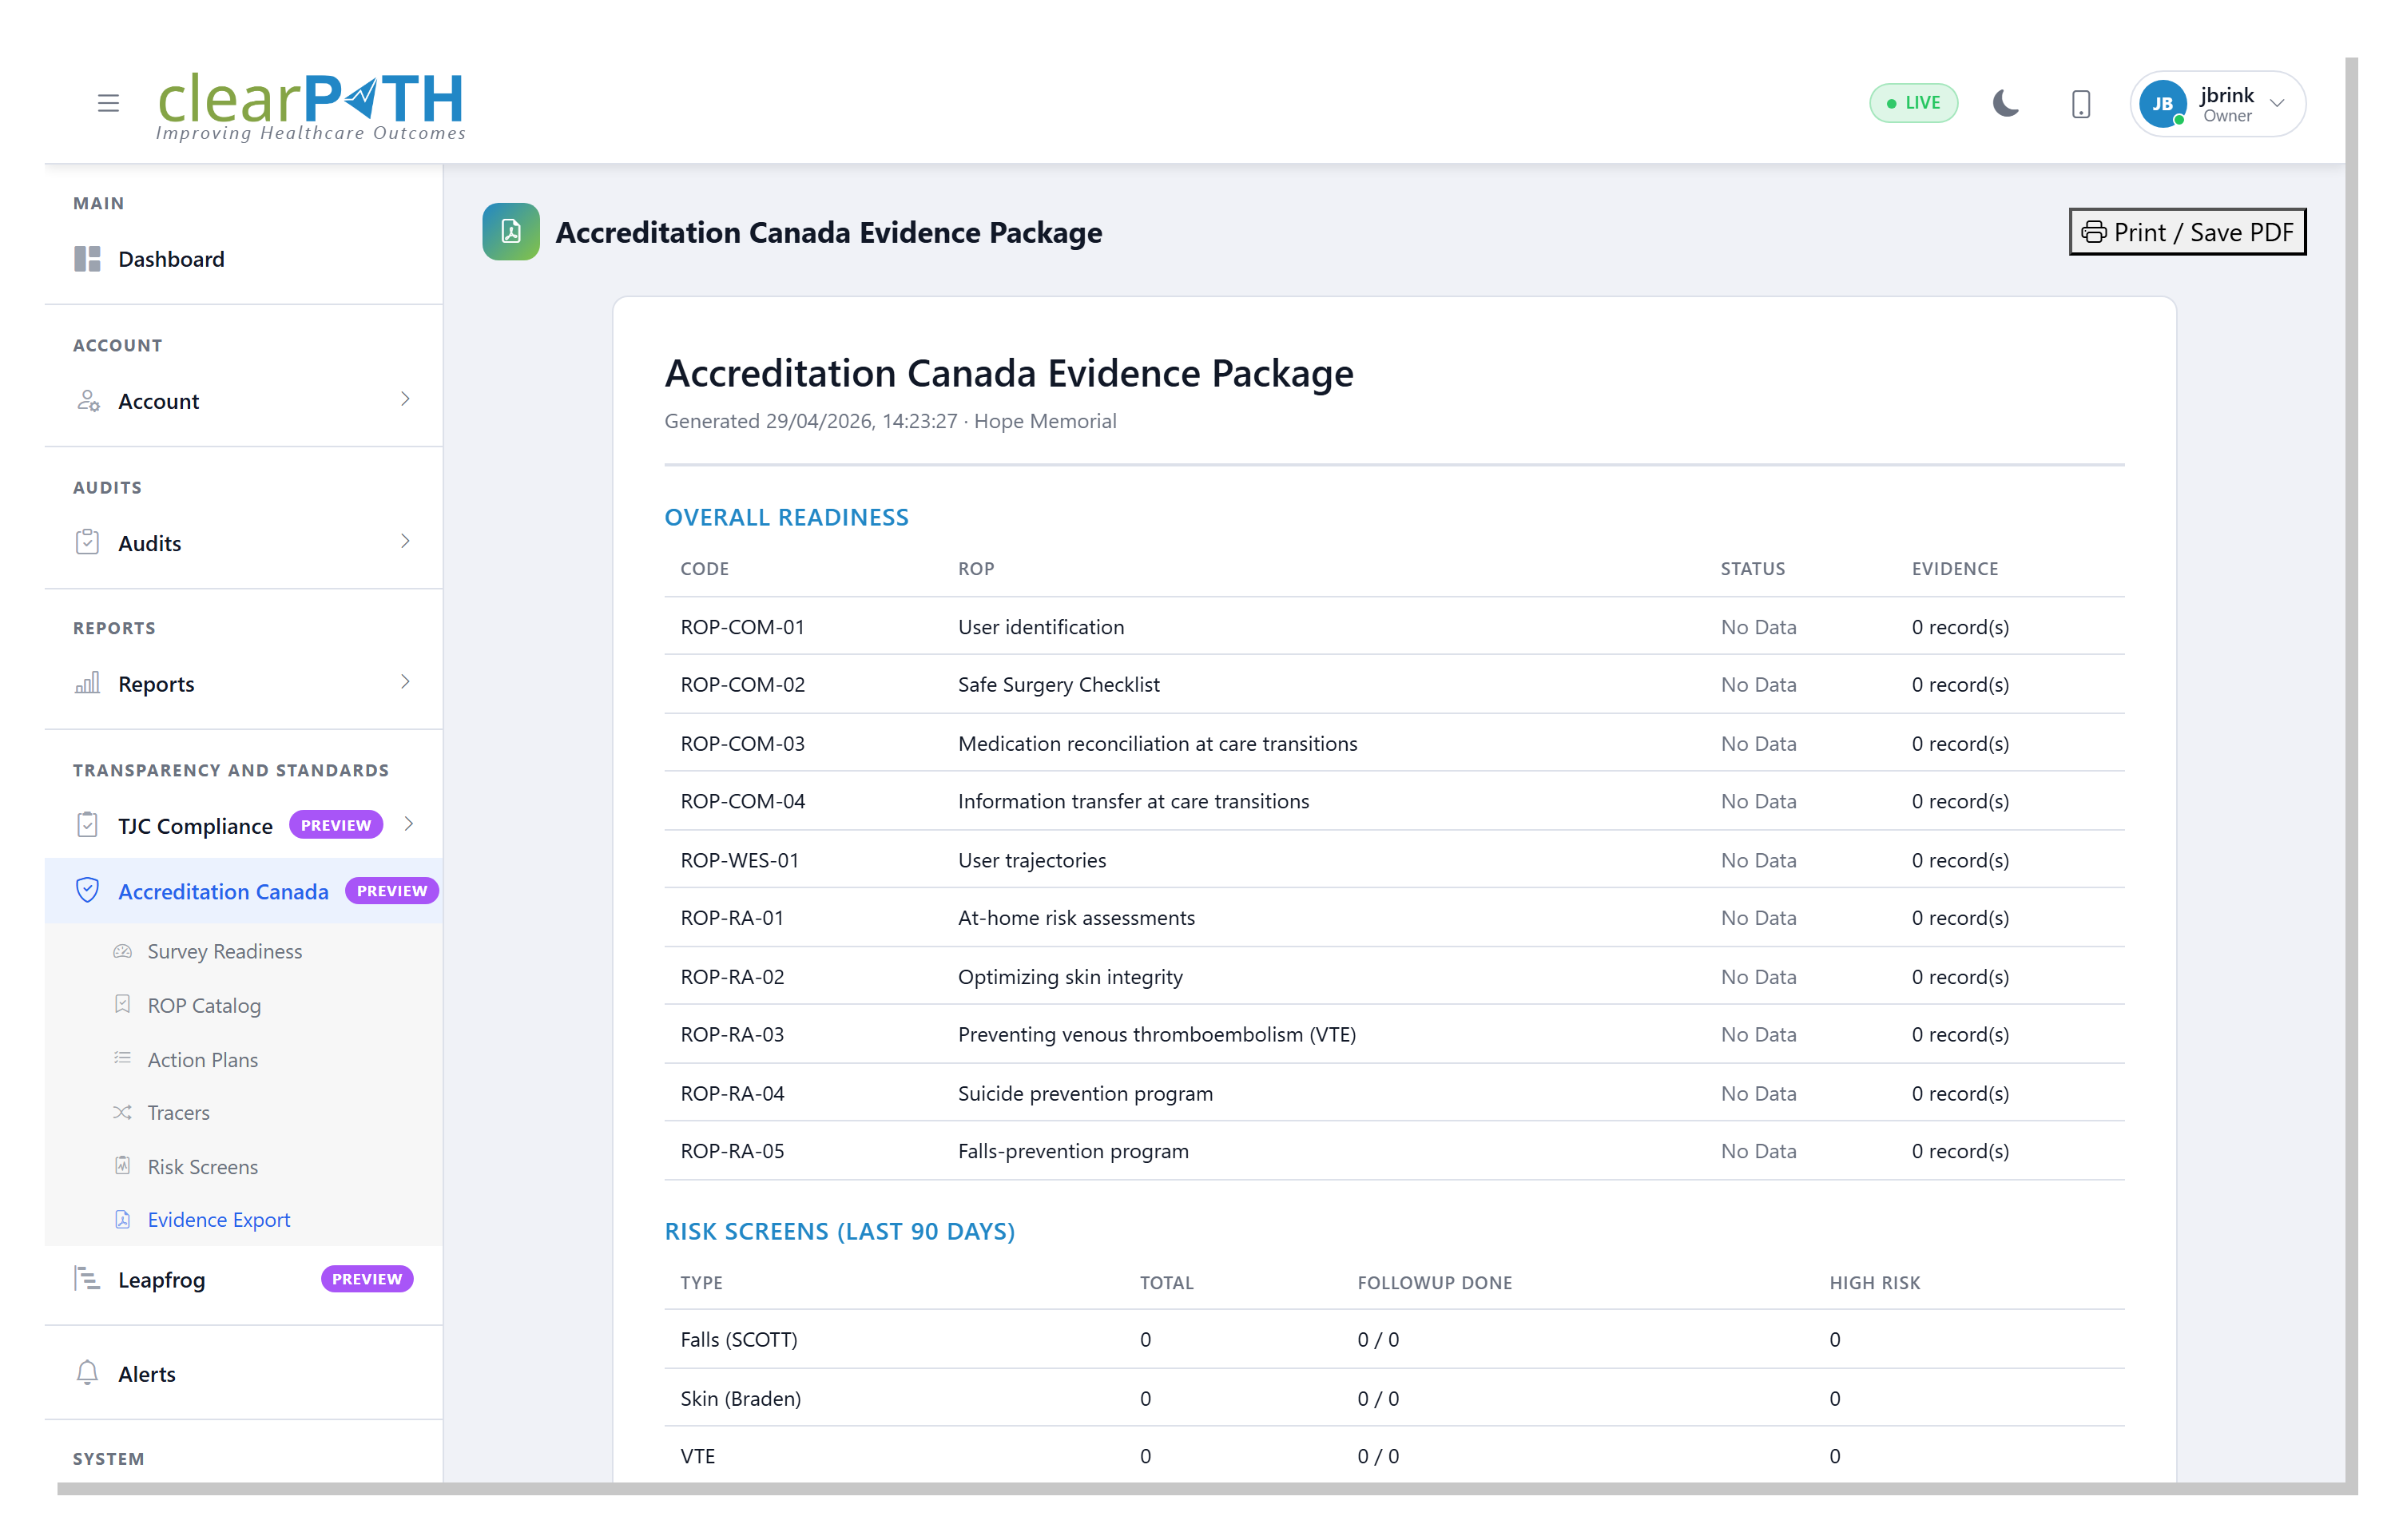
Evidence Export builds a single, printable document that bundles everything an Accreditation Canada surveyor typically asks to see: the per-ROP readiness summary, risk-screen completion totals, the list of open action plans, and the trailing twelve-month hand-hygiene trend.
The document is rendered in your browser; saving it as PDF goes through the browser’s print dialog.
To open the page, go to Transparency and Standards | Accreditation Canada | Evidence Export.
2.6.1. Page Header Actions
Print / Save PDF— opens the browser’s print dialog. Pick Save as PDF in the destination dropdown to file the package.
2.6.2. Document Sections
The generated document contains four sections, in order:
Overall Readiness — the ten-row ROP table with code, title, status, and the count of evidence records on file.
Risk Screens (last 90 days) — one row per Risk-Assessment screen type with totals, follow-up completion, and high-risk counts.
Open Action Plans (PDSA) — the upcoming-due plans grouped by ROP, with status, due date, and target / actual percentages.
Hand Hygiene Compliance Trend (IPC) — a monthly breakdown table of compliance percentage and sample size for the last twelve months.
The print stylesheet hides the sidebar and header so the printed output is just the cover, the four sections, and a bottom margin ready for sign-off.